INSTALLATION INSTRUCTIONS FOR THE WAVEAUDIA PWC STERO SYSTEM
Ready for use in 24 hours after installation
Thoroughly read the instructions before installing any of the components of your Waveaudia PWC stereo system.
The photographs included in this installation guide were taken using a GTI Sea Doo, and serves only as an example
of how the Waveaudia PWC stereo system can be installed.
Contents:
Additional Items Required for
•
Two speakers with mounting cleats
Assembly (not included):
•
Amplifier module
Masking tape
•
Volume control switch
Pliers
•
Four zip tie mounting pads
•
Ten zip ties
•
Two mounting cleat adapters
•
VHB adhesive
•
Two terminal rings
•
MP3 player bag
Parts Included:
Speakers
Mounting
Cleats
Amplifier
Module
Volume Control
Switch
MP3 Player Bag
Before beginning the installation:
•
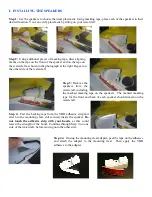
Choose a location to mount the speakers that is closest to the operator as possible. The adhesive strip on the back of the mounting
cleat must be attached to a uniform and smooth surface on the watercraft.
•
Clean and dry the area of the watercraft where the speakers will be mounted.
•
The mounting cleat should be securely inside speaker cavity and locked in place with the spring-loaded plungers, as the entire
speaker unit will be used to mark the desired mounting location.
•
Review the instructions and photographs before attaching the mounting cleat to the watercraft.
•
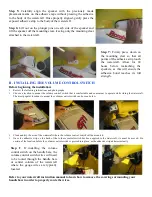
Determine if mounting cleat adapter is needed – the adapter should be used if you are mounting to a concave curve on your
watercraft. The mounting cleat by itself has a curve to match a slight convex curve. It is important to get full contact with the
mounting cleat and your watercraft.
•
If using the adapter, peel the tape on the adhesive and attach the adapter to the mounting cleat. Then peel the tape from the VHB
adhesive and attach to the adapter.
•
If not using the adapter, peel the tape from the VHB adhesive and attach to the mounting cleat.
•
Once the adhesive strip on the back of the mounting cleat has been applied to the watercraft, it cannot be moved. Be certain of the
location before the speakers/mounting cleats are pressed into place, as the adhesive strip adheres instantly.
Note: It takes 24 hours from the time of installation for the mounting cleats to properly adhere to your watercraft.
Zip ties &
mounting pads
Mounting
Cleat Adaptors
Mounting
Adhesive
Terminal
Rings


