WattAge HAWK Скачать руководство пользователя страница 3

3

This instruction manual is designed to guide you through the entire final assembly process of your new Wattage
Hawk EP ARF in the least amount of time possible.  Along the way you'll learn how to properly assemble your new
airplane and also learn many tips that will help you in the future.  We have listed some of our recommendations
below.  Please read through them before going any further.

The Hawk EP is constructed of blow-molded plastic and foam.  It is very important that you use

no solvents, Cyanoacrylate (C/A) glue, or paint that can damage foam.  If any of these

chemicals come in contact with the foam parts, the parts will be destroyed and will not be

covered under warranty.  Use only epoxy where glue is required.  If you decide to paint the

Hawk EP, use a paint that will not attack foam and always test on a scrap piece first.

Please read through each step before starting as-

sembly.  You should find the layout very complete and
simple.  Our goal is to guide you through assembly
without any of the headaches and hassles you might
expect.

There are check boxes next to each step.  After you

complete a step, check off the box.  This will help you
keep from losing your place.

Cover your work table with brown paper or a soft

cloth, both to protect the table and to protect the indi-
vidual parts.

Keep a couple of small bowls or jars handy to put

the small parts in after you open the accessory bags.

We have included a glossary of terms beginning

on page # 14.  Check it out if you come across a term
that is unfamiliar to you.

We're all excited to get a new airplane in the air,

but take your time.  This will ensure you build a straight,
strong and great flying airplane.

If you come across this symbol 

,  it means that

this is an important point or an assembly hint.

If you should find a part missing or damaged, or have any questions about assembly, please

contact us at the address below:

Wattage Customer Care

18480 Bandilier Circle

Fountain Valley CA  92728

Phone: (714) 963-0329          Fax: (714) 964-6236           E-mail: [email protected]

The following section describes our recommendations to help you in deciding which types of accessories to purchase for
your new Wattage Hawk EP ARF.  We have tested all of these items with the airplane and found that these products will
offer the best in performance, reliability and economy.

OUR RECOMMENDATIONS

The Hawk EP will require a minimum 3 channel radio control system with two micro servos.  The radio system we
recommend is the Hitec Focus 3 AM radio with 2 HS-81 Micro servos.  This radio system includes two micro servos, a
three channel mini receiver, servo mounting hardware and a setup guide.

If you want to purchase a radio system that will be more upgradeable in the future, a four or more channel radio with
two micro servos and a mini or micro receiver will work well.  If you decide to go this way, our recommendation would
be to use the Hitec Flash 4X Glider FM Computer radio with 2 HS-81 Micro servos.  This is a very good radio system
that offers the capability to grow as your experience grows.

If you already have a standard radio system, you will need to purchase an after-market mini or micro receiver and two
micro servos.  If you need to purchase these items we recommend the Hitec Micro 555 receiver (part # 759118) and two
Cirrus CS-21 Micro servos (part # 444227).

RADIO SYSTEM

Our Recommendations Cont.

8

Содержание HAWK

Страница 1: ...rplane is quite fast yet is very stable throughout the entire speed range making it a perfect choice for both the experienced pilot and for those just graduating from their first airplane When you open the box you will notice that you won t have much left to do or to purchase to finish your new airplane Included is a direct drive speed 380 motor a propeller adapter and propeller threaded wire push...

Страница 2: ... local hobby shop has information about flying clubs in your area whose membership includes qualified instructors We also recommend that you contact the AMA at the address below They will be able to help you locate a flying field in your area also Academy of Model Aeronautics 5151 East Memorial Drive Muncie IN 47302 9252 800 435 9262 www modelaircraft org Safety Warning 2 Our Recommendations 3 Rad...

Страница 3: ...e air but take your time This will ensure you build a straight strong and great flying airplane If you come across this symbol it means that this is an important point or an assembly hint If you should find a part missing or damaged or have any questions about assembly please contact us at the address below Wattage Customer Care 18480 Bandilier Circle Fountain Valley CA 92728 Phone 714 963 0329 Fa...

Страница 4: ...e Nickel Metal Hydride battery pack will give you about 25 longer run time but not quite as much power ELECTRONIC SPEED CONTROL FLIGHT BATTERY Because the flight battery is small and it powers both the motor and the radio system we suggest using an Automatic Delta Peak Charger such as the Promax Activator Digital Peak Charger part 885650 to charge the flight battery It is vital to the Hawk EP s fl...

Страница 5: ...he motor and second it will give you a chance to test your radio system ESC and flight battery before installing them into the airplane 1 Lay the motor flight battery charger radio sys tem and electronic speed control onto your work table 2 Charge the flight battery using your peak charger following the instructions that were provided with the charger Install 8 AA batteries into the Focus 3 transm...

Страница 6: ...ou cover all of the gluing surfaces 3 Fit the wing panels back together and realign them Remove any excess epoxy using a paper towel and rubbing alcohol Hold the wing panels together firmly until the epoxy cures APPLYING THE WING REINFORCEMENT 4 After the epoxy has fully cured apply a strip of heavy duty Scotch tape to the bottom of the wing over the center section joint from the leading edge to t...

Страница 7: ...o pieces of reinforcement board add a lot of strength to the wing it is important that they all be pressed firmly to the surface of the wing 4 Push one nylon sleeve into each of the four holes Slide the 4mm x 70mm aluminum tube through the two front holes and slide the 4mm x 60mm aluminum tube through the two rear holes See photo 6 below Photo 6 5 Mix a small amount of Kwik Bond 5 Minute Epoxy Cen...

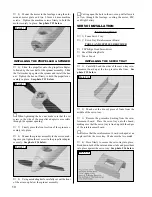
Страница 8: ... properly the stabilizer should be level with the wing If it is not level use a modeling knife and or 220 grit sandpa per and adjust the mounting flanges until the correct alignment is achieved See figure 1 below Figure 1 7 Now check to make sure that the tips of the sta bilizer are equal distances from the tips of the wing Use a ruler and measure from one wing tip to the stabilizer tip on the sam...

Страница 9: ... a modeling knife carefully trim away the extra plastic left over from drilling the holes ALIGNING THE VERTICAL STABILIZER Photo 10 MOUNTING THE VERTICAL STABILIZER 17 Slide the stabilizer back into place and realign it When satisfied with the alignment use a couple pieces of masking tape to hold the stabilizer in place 18 Install and lightly tighten the four 1mm x 4mm wood screws to hold the stab...

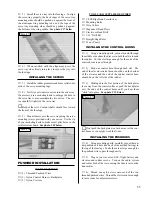
Страница 10: ...D 0 Phillips Head Screwdriver Excel Modeling Knife Pen or Pencil ITEMS REQUIRED 1 Foam Servo Tray 1 Servo Tray Reinforcement Board INSTALLING THE SERVO TRAY 1 Carefully bend the sides of the servo tray rein forcement board up at the two precut scribe lines See photo 15 below 2 Punch out the die cut piece of foam from the middle of the servo tray 3 Remove the protective backing from the rein forcem...

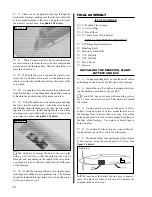
Страница 11: ...ips Head Screwdriver Modeling Knife Wire Cutters Magnum Z Bend Pliers Electric or Hand Drill 1 16 Drill Bit Straight Edge Ruler Pen or Pencil INSTALLING THE CONTROL HORNS 1 Using a modeling knife cut one thin slot through the middle of each molded recess in both the elevator and the rudder Cut the slot large enough for the ends of the control horns to pass through 2 Push one control horn through e...

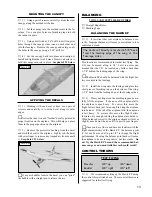
Страница 12: ...tch us ing the hardware provided with your ESC If your ESC does not come with mounting screws use 2 sheet metal screws and 2 flat washers to install the switch 3 Using a pair of scissors cut the piece of Velcro in half Using one piece of Velcro mount the receiver to the fuselage floor in front of the servo tray Uncoil the antenna and feed it out the elevator pushrod exit hole in the back of the fu...

Страница 13: ...OL THROWS 1 We recommend setting up the Hawk EP using the control throws listed above These control throws are suggested for initial test flying This location is recommended for initial test flying The C G can be moved aft up to 1 4 but it is not recom mended that the C G be located any farther back than 1 7 8 behind the leading edge of the wing The Hawk EP should be balanced with the flight bat t...

Страница 14: ... back of the airplane that moves up and down This surface controls pitch Epoxy A two part glue containing a resin and a hard ener Epoxy is available in several drying times and is stronger than C A glue Epoxy is used in high stress ar eas such as where wing halves are joined ESC An acronym for Electronic Speed Control See Motor Controller below Horizontal Stabilizer Mounted in the rear of the air ...

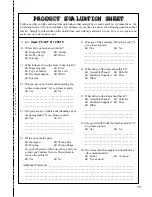
Страница 15: ... parts q Damaged q Wrong Size q Missing q Wrong Shape If you checked any of the boxes above did you contact our Customer Service Department to resolve the problem q Yes q No 7 Was any of the assembly difficult for you If yes please explain q Yes q No _____________________________________ _____________________________________ _____________________________________ ___________________________________...

Страница 16: ...l Hobby Distributors Attn Wattage Customer Care 18480 Bandilier Circle Fountain Valley CA 92728 8610 Post Office will not deliver without proper postage ___________________________ ___________________________ ___________________________ Return Address Here ...

Отзывы: