background image

User Manual

Home

02/07/11

20 : 12 : 40

MON

Sunrise 06:39
Sunset  17:24

DST

Setup

Set Time And Date

Daylight Saving Time

Assign Relays/Input

Assign Relays/Channel

Assign Schedule/Channel

Setup

Set Time And Date

Daylight Saving Time

Assign Relays/Input

Assign Relays/Channel

Assign Schedule/Channel

Assign Schedule/Channel

[A]     Off

[B]    Off

[C]    Off

[D]    Off

[E]    Off

[F]    Off

[G]    Off

[H]    Off

Local - Channel B Set

[Sun]  Sch02

[Mon]  None

[Tue]  None

[Wed]  None

[Thu]  None

[F r i ]    None

[Sat]  None

[Hol]  None

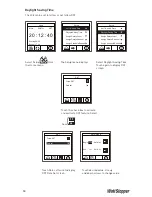
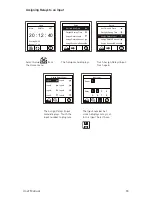
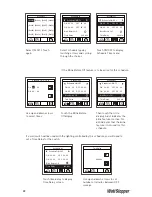
Step 5: Assign Channel to your Schedule

Select Setup


from 

Home menu

Setup menu displays

Touch Assign Schedule/

Channel. Touch again

The Assign Schedule/

Channel menu displays. 

Select Channel B

Enter Sch02 to each day of 

the week desired. Select 

Save 

Result:


The exterior lighting will turn ON at sunset and turn OFF at sunrise as well as turn 

On and OFF according to your schedule.

Note: The above will provide basic lighting control. More complex setups of operation can 

be achieved through the use of additional schedules and/or accessories such as low voltage 

wall switches, photocells, or occupancy sensors.

Содержание LC8-120/277

Страница 1: ...panel cover SPECIFICATIONS Power input 120 277 VAC 50 60 Hz Accessory power 500 mA at 24 VDC Switch inputs with screw terminals Used with 3 wire momentary 2 wire momentary or maintained with pilot lig...

Страница 2: ...erride 16 Setup Menus 17 Setting Time and Date 17 Daylight Saving Time 18 Assigning Relays to an Input 19 Assigning Relays to Channels 20 Assigning Schedules to Channels 21 Schedules 21 Schedule ON OF...

Страница 3: ...ollowing example provides quick setup instructions for assigning interior lighting to a schedule The basic steps are 1 Set Time and Date 2 Assign Relays to a Channel 3 Set a Schedule 4 Assign Channel...

Страница 4: ...m Home menu Select Next Touch Schedules Setting to display Schedule setup menu Select Sch01 Touch again Ensure Schedule ON OFF is highlighted Schedule 01 ON 00 00 OFF 00 00 ON 00 00 OFF 00 00 Blink Be...

Страница 5: ...enu Setup menu displays Schedule Time 1 Set On 00 00 Off 00 00 Touch hours and minutes if desired to highlight Use up and down arrows to select times Select Back Schedule 01 ON 00 00 OFF 00 00 ON 00 0...

Страница 6: ...Assign Relays to a Channel 4 Set a Schedule 5 Assign Channel to your Schedule Step 1 Set Time and Date Select Setup from Home menu Touch Set Time and Date Touch Hour to highlight Use up and down arrow...

Страница 7: ...07 11 20 12 40 MON Sunrise 06 39 Sunset 17 24 DST Setup Set Time And Date Daylight Saving Time Assign Relays Input Assign Relays Channel Assign Schedule Channel Step 2 Enter Geographic Location Selec...

Страница 8: ...l A H 1 2 3 4 5 6 7 8 E F G H C D A B Home 02 07 11 20 12 40 MON Sunrise 06 39 Sunset 17 24 DST Setup Set Time And Date Daylight Saving Time Assign Relays Input Assign Relays Channel Assign Schedule C...

Страница 9: ...e F r i None Sat None Hol None Step 5 Assign Channel to your Schedule Select Setup from Home menu Setup menu displays Touch Assign Schedule Channel Touch again The Assign Schedule Channel menu display...

Страница 10: ...ppropriate for the wall type and material not included The relays for the LC8 are modular and may have shipped separately from the enclosure The relay modules are designed for DIN rail mounting To ins...

Страница 11: ...wer Supply Module To Relay Module Input1 Output1 Input2 Output2 LED Release Button Energize the feed circuit and note the following conditions 1 The touch screen display back light will illuminate for...

Страница 12: ...Relays screen is displayed 5 Touch each relay to toggle the relay on and off 6 Confirm that all of the relays switch and that the loads turn on and off Connecting Low Voltage Switches to the LC8 The L...

Страница 13: ...g Occupancy Sensors and Photocells Any WattStopper low voltage occupancy sensor that is intended to work with a power pack can be used as an input to the LC8 to control relays Connect the occupancy se...

Страница 14: ...s Modules are available as either a single double pole relay or two independent single pole re lays A maximum of 4 relay modules can be installed in the LC8 panel for a total of 8 circuits of control...

Страница 15: ...in 24 hour format The sunrise and sunset times are also displayed based on the astronomic location settings in the panel From most other screens you can return to the home screen by touching the Home...

Страница 16: ...and OFF relays The relays that are assigned can be toggled on and off By default the relays are assigned to the channels on a one to one basis That is relay one to channel A relay 2 to channel B etc S...

Страница 17: ...arrows to change value Select Save Setup Set Time And Date Daylight Saving Time Assign Relays Input Assign Relays Channel Assign Schedule Channel Set time and date Time 20 15 Date 02 07 11 Monday Hom...

Страница 18: ...t twice to display Touch desired value Use up DST Date Set screen and down arrows to change value Setup Set Time And Date Daylight Saving Time Assign Relays Input Assign Relays Channel Assign Schedule...

Страница 19: ...ight Saving Time Assign Relays Input Assign Relays Channel Assign Schedule Channel Select Setup from the Home menu The Setup menu displays Touch Assign Relays Input Touch again Assign Relays Input Inp...

Страница 20: ...2 40 MON Sunrise 06 39 Sunset 17 24 DST Assigning Relays to Channels Select Setup from the Home menu The Setup menu displays Touch Assign Relays Channels to highlight Touch again to enter relay assign...

Страница 21: ...Setting Program Holiday Select Location Sound Options Local Channel A Set Sun Sch01 Mon None Tue None Wed None Thu None F r i None Sat None Hol None Home 02 07 11 20 12 40 MON Sunrise 06 39 Sunset 17...

Страница 22: ...chedule type by touching arrows and cycling through the choices Use up and down arrows to select times Schedule Time 1 Set On 00 00 Off 00 00 If the Blink Before Off feature is to be active for this s...

Страница 23: ...h09 Sch13 Sch02 Sch06 Sch10 Sch14 Sch03 Sch07 Sch11 Sch15 Sch04 Sch08 Sch12 Sch16 Select schedule type by touching arrows and cycling through the choices Schedule 01 ON 00 00 OFF 00 00 ON 00 00 OFF 00...

Страница 24: ...ct Setup from the Home menu Home 02 07 11 20 12 40 MON Sunrise 06 39 Sunset 17 24 DST Select Next Setup Set Time And Date Daylight Saving Time Assign Relays Input Assign Relays Channel Assign Schedule...

Страница 25: ...happens at the set ON and OFF times for the schedule The lighting obeys the last command it is given Note If the photocell only is to turn the light ON and OFF use this selection but do not enter sch...

Страница 26: ...ect Setup from the Home menu Home 02 07 11 20 12 40 MON Sunrise 06 39 Sunset 17 24 DST Select Next Setup Set Time And Date Daylight Saving Time Assign Relays Input Assign Relays Channel Assign Schedul...

Страница 27: ...Repeating Off twice to enter Time Repeat screen Time Repeat 000 Min Use up and down arrows to set number of minutes between OFF sweeps during the scheduled off periods AS 100 Manual ON Auto OFF This...

Страница 28: ...Holiday Date Set screen to set start and end dates Select Save Setup Schedules Setting Program Holiday Select Location Sound Options Holiday set page 1 Holiday Date Set Setup Schedules Setting Progra...

Страница 29: ...lect Save Setup Schedules Setting Program Holiday Select Location Sound Options Location set State Alabama City Manual Entry Birmingham Sunrise 06 52 Sunset 16 50 Location set Lat N 33 Lon W 086 Sunri...

Страница 30: ...Home menu Select Next Schedules Setting displays Touch Sound Options Touch again Touch the box to turn sound ON or OFF when screen is touched Returning the LC8 Panel to Factory Default Settings To er...

Страница 31: ...e zone Set the proper date and time Photocell turns lights OFF too early Check the aperture setting on the photocell Increase the aperture size on the photocell Photocell turns lights OFF too late Che...

Страница 32: ...y in the spaces above WARRANTY INFORMATION WattStopper warranties its products to be free of defects in materials and workmanship for a period of five 5 years There are no obligations or liabilities o...

Отзывы: