background image

Safety

Introduction

Product Overview

Installation

Operation

Maintenance

Troubleshooting

Warranty

40 | 44

Replacing the Compressor Air Filter

Replace the air filter every year. (Replace it more frequently if the 

operating conditions are dusty.)
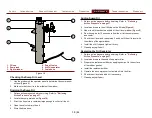
1. 

Open the top cover to access the air filter. Refer to

"Accessing 

the Interior Components" on page 35

2. 

Loosen the clamp tension nut that secures the air filter to the intake 

tube (

Figure 22)

.

1

1.  Clamp tension nut

Figure 22 

3. 

Remove the used filter and install the replacement filter.

4. 

Tighten the screw to secure filter to the intake tube.

Servicing the Foam Pump Oil

Check the oil level after every 8 hours of use. Change the oil after the first 50 

hours of operation and then every 500 hours thereafter. Refer to the foam pump 

Operator's Manual.

Servicing the Engine Oil

Refer to the engine 

Operator's Manual.

Содержание ECLIPSE CAFSystem 2.0

Страница 1: ...t Gen 2 0 Installation Operation and Maintenance Instructions Form Number F 2819 Issue Date Aug 1 2017 Revision Date Waterous Company 125 Hardman Avenue South South Saint Paul MN 55075 651 450 5000 ww...

Страница 2: ......

Страница 3: ...e Control 20 Engine Screen Pressure Control 22 Installation 24 Dimensions 24 Minimum Spacing for Airflow 25 Installation overview 26 Equipment Requirements 26 Preparing for the Install 26 Modifying th...

Страница 4: ...t 34 Adjusting the Valve Controls 34 Adjusting the Engine Speed 34 Adjusting the Water Pressure 34 Using Discharge 1 34 Using the Clearwater Discharge 34 Using the Auxiliary Air Outlet 34 Flushing the...

Страница 5: ...installation is the responsibility of the purchaser Do not operate the equipment when safety guards are removed Do not modify the equipment Regularly check for leaks worn or deteriorated parts Watero...

Страница 6: ...ents and void your warranty Do not modify the foam system Modification Do not touch the surface during operation allow it to cool after operating Hot surface can burn you Hot Surface Do not operate if...

Страница 7: ...ter use and before servicing Liquid ejected at high pressure can cause serious injury High Pressure Do not operate beyond recommended pressure Liquid ejected at high pressure can cause serious injury...

Страница 8: ...ection is an overview of the document Product Overview This section describes the components that make up the system Installation This section describes the initial setup procedures Operation This sec...

Страница 9: ...Safety Introduction Product Overview Installation Operation Maintenance Troubleshooting Warranty 9 44 Operator Panel 2 3 4 5 1 14 15 16 17 19 21 22 23 24 25 26 27 28 18 20 13 6 7 8 9 10 11 12 Figure 2...

Страница 10: ...tion 14 Tank fill valve handle This opens and closes the valve that flows water to the tank It recirculates the tank water or fills the tank 15 Clear water discharge This is the panel mounted clear wa...

Страница 11: ...uter Panels Optional Note The side panels are optional equipment and are not used in every application 1 3 2 Figure 3 Feature Description 1 Top panel This panel covers the top of the equipment 2 Top p...

Страница 12: ...ow plug is operating 4 Panel lights This enables the panel lights Warning Panel 7 5 6 8 Figure 5 Indicator Description 5 Oil temp This illuminates when the engine oil is above operating temperature 6...

Страница 13: ...Feature Description 1 Panel bezel This contains the display and operating software 2 Optical reset button This resets the HMI 3 Operating system version This indicates the firmware version 4 Splash sc...

Страница 14: ...Safety Introduction Product Overview Installation Operation Maintenance Troubleshooting Warranty 14 44 CAFS Screen 12 13 1 18 15 17 16 10 11 6 2 3 4 5 7 8 9 14 Figure 7...

Страница 15: ...ption outputs air through the discharge double tap to activate Suitable for blowing out hose lines Available where regulations permit 8 Dry CAFS button This option outputs dry CAFS through the dischar...

Страница 16: ...Safety Introduction Product Overview Installation Operation Maintenance Troubleshooting Warranty 16 44 Solution Screen ECLIPSE ACTIVE 1 7 9 8 5 2 3 4 15 14 10 12 11 13 6 Figure 8...

Страница 17: ...current operation 5 Water flow gauge This shows the volume of water currently flowing 6 Valve controls button This button navigates you to the valve control screen 7 Minus button This button decreases...

Страница 18: ...Safety Introduction Product Overview Installation Operation Maintenance Troubleshooting Warranty 18 44 Valve Control Screen 1 6 7 4 2 3 12 11 9 8 10 5 Figure 9...

Страница 19: ...Percent scale This shows the setting valve from 0 to 100 5 Plus button This button increases the value 6 Foam system button This button navigates you to the foam system screen 7 Discharge selection Th...

Страница 20: ...Safety Introduction Product Overview Installation Operation Maintenance Troubleshooting Warranty 20 44 Engine Screen Throttle Control 1 7 5 2 3 4 11 8 9 10 6 Figure 10...

Страница 21: ...ses the value 4 Value indicator This shows the selected value 5 Throttle button This button navigates to the throttle screen 6 Pressure button This button navigates to the pressure screen 7 Water pres...

Страница 22: ...Safety Introduction Product Overview Installation Operation Maintenance Troubleshooting Warranty 22 44 Engine Screen Pressure Control 1 7 5 2 3 4 11 8 9 10 6 Figure 11...

Страница 23: ...ton increases the value 4 Value indicator This shows the selected value 5 Throttle button This button navigates to the throttle screen 6 Pressure button This button navigates to the pressure screen 7...

Страница 24: ...Safety Introduction Product Overview Installation Operation Maintenance Troubleshooting Warranty 24 44 Dimensions Figure 12...

Страница 25: ...low Figure 13 Important It is preferred that a minimum of 3 inches 75 mm of space is provided around the sides and back of the module for airflow If this is not possible it may be necessary to drill v...

Страница 26: ...sh air intake will cause premature equipment failure and void your warranty Contact Waterous for more information The system requires 12 Vdc and a frame ground to operate Make sure that you provide su...

Страница 27: ...e module Figure 14 3 2 1 1 Concentrate input 2 Tank fill 3 Water supply intake Figure 14 2 Route a supply hose from the supply tank to the supply inlet 3 Connect the supply hose to the supply inlet Fi...

Страница 28: ...gure the supply and return lines when connecting to a dedicated fuel tank 1 2 3 4 5 1 Return line 2 Supply line 3 1 1 2 inch 35 mm 4 Sludge buildup 5 This configuration is not recommended Figure 15 Se...

Страница 29: ...the terminal posts on the compressor side of the module Figure 17 1 2 1 Negative post 2 Positive post Figure 17 Note Make sure that the positive and negative cables are equal length 2 Connect the pos...

Страница 30: ...160 F 71 C Do not operate if the water temperature exceeds 160 F 71 C Hot liquid can scald you Hot Liquid Avoid conditions the result it high temperature solution Do not operate when solution tempera...

Страница 31: ...a variety of nozzle types and sizes to discharge compressed air foam Consider the following when selecting the nozzle Smooth bore nozzles provide best foam performance Smaller diameter nozzle tip prod...

Страница 32: ...ratus 1 Start the engine Refer to Starting and Stopping the Engine on page 32 2 Press and hold the prime pump button until water fills the fire pump and adequate pressure builds up 3 Begin operating t...

Страница 33: ...n to enable the foam pump Figure 8 6 Press the prime button Figure 8 7 The pump is primed when the concentrate discharges from the hose 8 Press the prime button to stop the foam pump Figure 8 9 Rotate...

Страница 34: ...ne screen Figure 10 2 Press the throttle button 3 Press the plus or minus button to make the adjustment Adjusting the Water Pressure 1 Navigate to the engine screen Figure 10 2 Press the pressure butt...

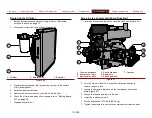
Страница 35: ...Side Panel 1 Align the screw holes in the pane to the holes on the frame Figure 3 2 Use the screws that you set aside to secure the panel to the frame Typical Operation Sequence Note Make sure that yo...

Страница 36: ...ompressor Operator s Manual Maintaining the foam pump Refer to the foam pump Operator s Manual Maintenance Precautions Do not service this equipment if you are not familiar with the tools and skills n...

Страница 37: ...line Figure 2 Relieving Airline Pressure The airline will bleed off over time Open the auxiliary air outlet to vent the compressed air or pull the pop off valve to immediately relieve pressure Figure...

Страница 38: ...e pressure before servicing Refer to Relieving Airline Pressure on page 37 2 Locate and remove the oil fill cap on the fill tube Figure 2 3 Add oil until it reaches the middle of the oil level window...

Страница 39: ...er 6 Check the oil level and add oil if necessary refer to Adding Sump Oil on page 38 7 Cleanup any spilled oil Servicing the Compressor Pump Drive Belt 1 Locate and loosen the jam nut on the slide bl...

Страница 40: ...nents on page 35 2 Loosen the clamp tension nut that secures the air filter to the intake tube Figure 22 1 1 Clamp tension nut Figure 22 3 Remove the used filter and install the replacement filter 4 T...

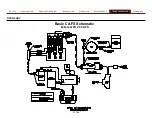
Страница 41: ...Safety Introduction Product Overview Installation Operation Maintenance Troubleshooting Warranty 41 44 Schematic Basic CAFS Schematic Eclipse GEN 2 0 CAFS...

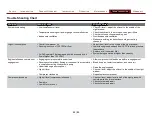
Страница 42: ...0 CFM Adjust the oil level to the middle of the sight window Lower the engine speed and flow CAFS to relieve pressure then recheck Replace air oil separator filter System being operated at higher than...

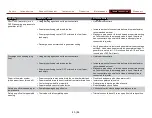
Страница 43: ...scharge hose shaking slug flow Using wetting agent and not foam concentrate Foam proportioning rate turned too low Foam proportioning control OFF or turned too low foam tank empty Use foam concentrate...

Страница 44: ...roduct Overview Installation Operation Maintenance Troubleshooting Warranty 44 44 Contact Waterous for more information Waterous Company 125 Hardman Avenue South South St Paul MN 55075 USA www waterou...

Отзывы: