Waterford E61 Скачать руководство пользователя страница 2

2

Emerald Gas Insert Zero Clearance Kit

TABLE OF CONTENTS

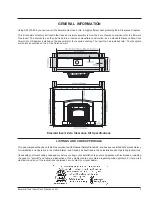
General Information ................................................... 3
Zero Clearance Kit Specifications .............................. 3
Listings and Code Approvals ..................................... 3
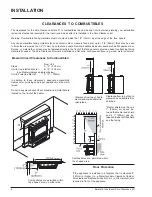
Clearances to Combustibles ..................................... 4
Safety Decal ............................................................. 5
Framing ..................................................................... 6
Zero Clearance Kit Assembly .................................... 6

Assemble the Cabinet ........................................ 7
Attach Cabinet to Framing ................................ 10
Install the Insert ................................................ 11

Venting Introduction ................................................ 11
Simpson Dura-Vent Component List ....................... 11
Venting Arrangements - Horizontal .......................... 13
Venting Arrangements - Vertical .............................. 13
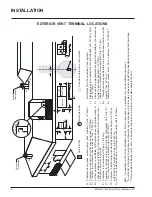
Horizontal Termination Installation ........................... 14
Vertical Termination Installation ............................... 15

Содержание E61

Страница 1: ...additional information con sult an authorized installer service agency or the gas supplier FORYOURSAFETY Donotstoreorusegasolineorother flammable vapours and liquids in the vicinity of this or any oth...

Страница 2: ...rancestoCombustibles 4 Safety Decal 5 Framing 6 Zero Clearance Kit Assembly 6 Assemble the Cabinet 7 Attach Cabinet to Framing 10 Install the Insert 11 VentingIntroduction 11 SimpsonDura VentComponent...

Страница 3: ...the required venting The insert can be installed later The faceplate will normally overlap on top of the finished wall LISTINGS AND CODE APPROVALS This gas component has been tested in accordance wit...

Страница 4: ...e g wood metal concrete INSTALLATION Emerald Insert Clearances to Combustibles From Unit Sides A 12 305 mm Unit to Unprotected Mantel B 16 406 mm see Mantel clearance diagram below Unit to Protected...

Страница 5: ...E61ZeroClear ance Kit 270 900 We have printed a copy of the contents here for your re view The safety label is located on the top panel NOTE Waterford units are constantly being improved Check the lab...

Страница 6: ...tor J Clearance to service regulator vent outlet Canada min 72 1 8m USA min 36 90cm K Clearance to non mechanical air supply inlet to building or the combustion air inlet to any other appliance 12 30c...

Страница 7: ...ions given are from the inside of the finished surfaces The ceiling inside the framed enclosure should be a minimum of 55 1 2 1410mm from the base of the plinth 3 For exterior walls use a vapour barri...

Страница 8: ...and Base sections upright Slide the Lower Back the section with 4 holes down the inside of Side flanges make sure the 4 holes are closest to the floor see photo Secure with 2 screws on each side and 1...

Страница 9: ...pipe over the small vent opening on the base of the adaptor box and secure with a clamp Repeat for the 2nd flex vent pipe Use silicone to seal the connection Left and Right Standoffs in position and...

Страница 10: ...ody Secure the Left and Right Panels to the top with 1 screw each Make sure that the outside edges are aligned Fit the assembled Side Top Face Panels to the front of the cabinet and secure with 19 scr...

Страница 11: ...other hole Warning Combustiblematerialsmustnotextendinsidethe stand offs on the side top and rear supports For safety reasons do not modify or alter any components of the Kit Any non combustible facin...

Страница 12: ...er appliance These venting systems in combination with the E61 Insert and the E61 Zero Clearance Kit 230 900 have been tested and listed as a direct vent heater system by Warnock Hersey The location o...

Страница 13: ...outer diameter A vent guard should be used whenever the termination is lower than the specified minimum or as per local codes Maintain a 1 1 4 clearance to combustibles 1 1 2 withFlex Firestopsarereq...

Страница 14: ...ons completely togeth er then twist lock one section clockwise approximately one quarter turn until the two sections are fully locked The female locking lugs will not be visible from the outside on th...

Страница 15: ...all of the vent pipe Use the two sheet metal screws provided to connect the strips to the pipe section See Dia 4 9 Install wall thimble in the center of the 10 square and attach with wood screws Dia 5...

Страница 16: ...Printed in Canada...

Отзывы: