background image

Section 10 – Warranty

43

Pressure gauges have not been exposed to frosting and freezing conditions and due care has been 

exercised when attaching them to any Waterco products; 

Electrical equipment has been adequately protected from salt air environments and from salt water; and 

Any pump used on a filter does not have a shut-off head that exceeds the pressure rating of the filter 

installed. 

All repairs and replacements shall be carried out by Waterco or its authorized service dealer, unless 

otherwise authorized in writing by Waterco. 

If an authorized service dealer is not available within 25 km of the purchaser’s area: 

• The purchaser must contact the place of purchase or Waterco for further instructions and; 

• The purchaser is responsible for any freight or infield labour costs. 

EXCLUSIONS 

This warranty does not cover, and Waterco will not be responsible for, any defect or damage caused 

or contributed to by: 

(a) installation or use of the product other than in accordance with Waterco’s written 

instructions, any statutory requirements and these terms and conditions; 

(b) use of the product for a purpose other than for which it was designed or sold; 

(c) abuse, misuse, corrosion, internal and external, or normal wear and tear; 

(d) any repairs or modifications whatsoever carried out by any person, other than a 

Waterco authorized service dealer; 

(e) exposure to water not caused by a defect in the product; and 

(f) transit of the product over which Waterco has no control. 

(g) inadequate ventilation 

(h) cement, pebbles, render or other pool surface finishes blocking the pump’s impeller 

(i) insect infestation 

Some three phase pumps are not supplied with thermal overload protection. It is the purchaser’s 

responsibility to have this provision installed by appropriately licensed electricians prior to the initial 

installation of the pump. All electrical work must comply with any appropriate statutory requirements. 

Warranty for installation of thermal overload protection is the sole responsibility of the licensed electrical 

contractor and not Waterco. 

Waterco excludes all liability it may have to the purchaser for indirect, special or consequential loss 

arising from or related to any defect in any Waterco product, or any act or omission of Waterco, including, 

but not limited to, loss of business, loss of profit, loss of revenue, lost opportunity, inconvenience, and 

damage to any property other than the Waterco product. 

Waterco excludes all other conditions, warranties, liabilities or representations which might, but for 

these terms and conditions, be implied by law or otherwise. These terms and conditions do not exclude 

or modify any implied condition or warranty, or any liability imposed on Waterco by any law (including 

the Trade Practices Act), if to do so would contravene that law or make any part of these terms and 

conditions void. 

To the extent permitted by law, Waterco excludes all conditions and warranties implied into these terms 

and conditions and limits its liability for breach of any such condition or warranty that it cannot exclude 

to the greater of (at Waterco’s option); 

(a) for goods: 

• Repairing or replacing those goods; or 

• Paying the cost of having those goods repaired or replaced; and 

(b) for services: 

• Resupplying the services; or 

• Paying the cost of having those services resupplied. 

Содержание Chemflo 25850

Страница 1: ...5385 Facsimile STD 61 7 3849 5384 Email info rainbowpoolproducts com au Web www rainbowpoolproducts com au Chemflo 25850 pH ORP Pool Controller Chlorine Acid controller with dosing pumps and timer for pool pump Chemflo 25850 pH ORP Controller Manual Date 01 Sep 2007 Version 1 0 ...

Страница 2: ... 3 8 Pumping to Waste 18 3 9 Backwashing the Pool Filter 19 3 10 Chemflo Display Messages 20 Section 4 Peristaltic Dosing Pumps 21 4 1 Lubricating the Pump Tubing 21 4 2 Replacing the Pump Tubing 21 4 3 Dosing Pump Error Message 22 Section 5 Probe Calibration 23 5 1 pH Calibration 23 Section 6 Chemflo Settings 24 6 1 Setting the Clock 24 6 2 Emergency ShutOFF timer 25 6 3 Control Setup 26 6 4 Alar...

Страница 3: ...to help you get started and also contains some helpful tips If at any stage you require assistance please contact your local Dealer Please note that the Chemflo must be serviced or repaired by authorised personnel only Opening the unit by unauthorised persons may cause an electrical shock resulting in serious injury or death If the power lead becomes damaged the unit must be returned to your deale...

Страница 4: ... menus and data entry screens without saving changes Press to scroll up when setting data or making menu selections Press to scroll down when setting data or making menu selections Press to select and save new data and system settings Press this key to display helpful information at any time including a guide to Alarms if any are present ...

Страница 5: ...g Part No 116362 Chemflo pH ORP Controller Part No 25850 Tube weight for chemical drum Part No 116354 Probe Injection Tee 50mm Part No 117903 50 to 40mm reduction bushes x 2 Part No NPRB5040 Peristaltic Pump Input and Output Tube 4m Part No 116360 Chemflo Handbook Part No 130050 Spare Parts not included in standard kit Pump tube assembly 1 8 L Hr Part No 116353 Pump tube assembly 6 1 L Hr Part No ...

Страница 6: ...mps is 2 metres 4 The mains power lead from the pool pump reaches the Chemflo without straining 5 The mains power lead from the Chemflo reaches a mains power outlet If the controller is mounted in a wet area a weatherproof power outlet must be used It is recommended that you use an earth leakage circuit breaker with this power outlet Please consult a qualified electrician if you are not sure if th...

Страница 7: ...diameter vent hole to avoid suction build up IMPORTANT INFORMATION REGARDING ACID x Always use dilute Hydrochloric Acid x Add 5 Litres of Acid to 20 to 25 Litres of water x NEVER ADD WATER TO ACID x Using concentrated acid may damage your equipment and void the warranty 2 4 Fit Tubing to Dosing Pumps Insert the suction tubing from the chemical drum to the left hand side compression fitting of the ...

Страница 8: ...unt the Chemflo controller on a sturdy wall or post using minimum 3mm or 1 8 stainless steel bolts screws or masonry anchors The Chemflo controller MUST be installed in a sheltered location Connect the probe and pool pump to the Chemflo Plug the Chemflo into a suitable power outlet ...

Страница 9: ...istaltic dosing pumps are self priming and will operate correctly when the Chemflo is switched on The pump priming function has been included for those installers who wish to check the operation of the dosing pumps when installation is complete 1 Press 2 Press until oPrime Dosers is selected and press 3 Press or to select the Chlorine Pump Acid Pump or Both Pumps and press 4 The Chemflo will now r...

Страница 10: ...control band stops the pump being rapidly switched on and off when the reading is close to the Set Point thereby increasing the pump s life 2 The exact ORP Set Point to achieve the correct Chlorine level will vary depending on other chemical factors such as pH Alkalinity and Cyanuric Acid stabiliser levels It is imperative that the pool water is checked regularly to ensure that all other chemical ...

Страница 11: ...he Set Point is 7 40 pH the Acid pump will start when the rises above 7 60 pH and stop again when the reading reaches 7 40 pH The control band stops the pump being rapidly switched on and off when the reading is close to the Set Point thereby increasing the pump s life 2 The recommended pH range for swimming pools is pH7 40 to pH7 80 This pH range provides the best combination of Chlorine effectiv...

Страница 12: ...ation 3 3 2 Selecting Standby Mode 1 Press 2 Press until oDosing Mode is selected and press 3 Press until oStandby is selected and press In this mode the unit will measure the pH and ORP levels of the pool but it will NOT add any chemicals even if they are required Standby mode should only be used to stop the dosing pumps operating such as when refilling chemical drums Long term use of this mode w...

Страница 13: ... is not in use 1 Press oPump Timer is displayed 2 Press to display the Pump Timer menu Pool Pump Timed p 3 Select oTimed from the menu and press to select the default Timer program The default program operates the Pool Pump as follows Summer 06 00 to 10 00 and 15 00 to 19 00 Winter 06 00 to 10 00 only For the Southern Hemisphere The Chemflo changes to Winter mode on the 15th of May The Chemflo cha...

Страница 14: ... selected and press 4 The Chemflo will now prompt you to enter the Winter Start date Winter Start 15 May np Enter Use the and keys to set the date and press Use the and keys to set the month and press 5 The Chemflo will now prompt you to enter the Winter Finish date Winter Finish 15 Aug np Enter Use the and keys to set the date and press Use the and keys to set the month and press ...

Страница 15: ...switched OFF by the Timer cycle 2 To stop the pump press press select Timed or OFF and press 3 6 To Switch the Pool Pump OFF manually The pool pump can be switched OFF manually using the Chemflo any time 1 Press oPump Timer is displayed 2 Press to display the Pump Timer menu Pool Pump Timed p 3 Press until OFF is selected and press The Chemflo will now display the Pump OFF message with the current...

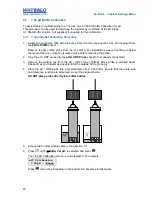
Страница 16: ... you wish to add to the pool and press The maximum dose that can be added is 25 Litres 4 The Chemflo now proceeds to add the Chlorine The display shows how much has been added so far and how much will be added in total for example Chlorine 0 0L Enter Stops 0 7L To stop adding the Chlorine immediately press 5 When the Chemflo has finished adding the Chlorine or if the user stopped the dosing premat...

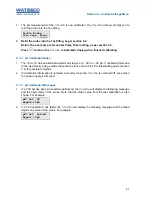
Страница 17: ...ched OFF Set the control on your filter to its Pump to Waste setting then press 3 The pool pump is now pumping pool water to waste The following screen is displayed Pumping to Waste Enter Stops Press to stop the pool pump 4 The Chemflo now prompts you to return the pool filter to its normal filtration setting Re set filter to Normal Enter Re set the filter then press 5 The Chemflo displays the fol...

Страница 18: ...ool pump will now backwash the filter to waste for 60 seconds A countdown is provided on the screen Backwashing 60 Filter 4 When the countdown is complete the Chemflo prompts you to set the control on your filter to its rinse setting Set filter to Rinse Enter The pool pump is now switched OFF Set the control on your filter to its Rinse setting then press 5 The pool pump will now rinse the filter t...

Страница 19: ...and chemical is being added Stby Unit is in Standby mode No dosing of chemicals will occur See section 3 3 sOFF Emergency ShutOFF timer has been tripped See section 6 2 OFF OVR for reading Dosing Pump is off line due to the reading being Over Range Alarm Reading is outside the Alarm margin See section 6 4 Pump Dosing Pump High Current Error See section 4 3 Waiting for Pump Re Start Time Whenever t...

Страница 20: ...ealer part No 116353 for the Small Tube or part No 116352 for the Large Tube To remove the old Pump Tube 2 3 4 1 IMPORTANT Place the pump suction tubing into a bucket of fresh water Use the pump priming function section 2 7 to prime the pump s with water This ensures that there are no dangerous chemicals in the tubes when they are disconnected Switch off the power and disconnect the power cord fro...

Страница 21: ...ng to the compression fittings See the procedure detailed in section 2 4 The power to the Chemflo can now be re connected and switched on 4 3 Dosing Pump Error Message The Chemflo monitors the dosing pump current usage and will detect problems with the pump before damage can occur If excess current is detected the unit will beep and display Pump in the status window for pH or ORP No further dosing...

Страница 22: ...stable 5 1 2 pH Calibration Notes 1 The Chemflo pH probe has an allowable Asymmetry range of 1 00 to 1 00 pH If calibration fails due to the Asymmetry being outside these limits please consult the Troubleshooting guide section 7 4 for possible remedies 2 All calibration information is retained in memory when the Chemflo is switched off even when the power supply is removed 5 1 3 pH Calibration Mes...

Страница 23: ...eys to set the month Press the key to move to the year then use the and keys to set the year Press the key to move to the hours then use the and keys to set the hours Press the key to move to the minutes then use the and keys to set the minutes 3 Press to save the new date and time or Press to quit Notes 1 The Chemflo tests that a valid day of the month is entered If an invalid date is entered eg ...

Страница 24: ... to the ideal values for that pool size For more details or to change the ShutOFF Times see section 9 6 6 2 1 Procedure in event of ShutOFF timer being tripped When the ShutOFF timer has been tripped the word sOFF is displayed as the status for the relevant reading and the Chemflo beeps To re set the ShutOFF timer press the key No further automatic control will occur for that reading until the key...

Страница 25: ...vant pump until the entire OFF time has elapsed The ON and OFF cycles for ORP and pH run sequentially This allows time for mixing for each of the chemicals and avoids the problem of the Chlorine affecting the pH reading or the Acid affecting the ORP reading If no chemical has been added for the entire ON Time for either reading the Chemflo skips the following OFF Time and goes straight to the ON T...

Страница 26: ...he alarm Automatic control will continue even while the alarm is activated as the Chemflo will attempt to correct the alarm condition The condition that caused the alarm function to trip must be rectified to avoid it being tripped again This may involve one or more of the following x Check that the pH ORP reading is correct Use a test kit or have the water tested x Consider selecting a different p...

Страница 27: ...o reset the Chemflo 1 Press 2 Press until oReset is selected and press 3 The Reset menu is now displayed for example Calibration Full System Select Calibration and press to reset only the calibration information to factory values It will be necessary to re calibrate the pH probe after this is done Select Full System and press to reset all calibration and system settings to factory values It will b...

Страница 28: ...d Excess Dosing pump current detected Press Menu to reset error If error re occurs dosing pump will require service 7 3 ORP Troubleshooting Symptom Possible Causes Remedy ORP reading inaccurate 1 Platinum tip of ORP probe dirty 2 Reference junction of probe dirty Clean Platinum tip of ORP probe using a low abrasion crème cleanser and cotton swab If problem persists adjust the set point to compensa...

Страница 29: ...pplied with the probe Flick the probe to release bubble Check connectors Replace if necessary Inaccurate readings even when calibration is successful Reference junction blocked Clean reference junction as per instructions supplied with the probe Displays 7 00 for all solutions Electrical short in connector 1 Check connector Replace if necessary 2 Replace probe Displays 4 00 5 00 pH for all solutio...

Страница 30: ...power outlet and unplug the power lead 2 Locate the fuse holder on the left hand underneath side of the unit Un screw it anti clockwise until it can be removed 3 Fully remove the glass fuse from the fuse holder 4 Replace the fuse with a 3AG type 250V 10A fuse This should be the standard fast blow type A slow blow type fuse may be used if the unit blows fuses consistently when the pool pump starts ...

Страница 31: ...to 1 00 pH Calendar Clock x 24 Hour Calendar Clock x Tests for valid day of the month when setting eg 31 09 99 is not valid x Adjusts for leap years Peristaltic Pumps x The Chemflo has 2 x built in Peristaltic Pumps for ORP and pH control x Chemical resistant Santoprene pump tube x Standard small pump tube produces 1 8 Litres Hour Large pump tube produces 6 1 Litres Hour High demand pools only ...

Страница 32: ...arger than the pool The Pool Size set up adjusts the Emergency ShutOFF Timer and Control Setup to the ideal values for that pool size For more details on these topics see sections 9 3 and 9 6 9 3 Pool Pump Timer Cycle 9 3 1 To select a pre set Timer program Those users who do not wish to use the default Summer Winter Timer program can select the Summer or Winter program to operate all year round 1...

Страница 33: ...being used to control the pool pump ensure that the Chemflo is also controlled by the same device This will ensure that Chlorine and or Acid is only dosed when the pool pump is actually running To select the Continuous program 1 Press to access the menu 2 Press until oSet Timer is selected and press Set Pump Timer Auto p 3 Press until Continuous is selected and press The Chemflo will now provide m...

Страница 34: ...p Set Enter Press or to set the hours for when the pool pump will turn OFF and press Press or to set the minutes for when the pool pump will turn OFF and press 5 The PM ON screen is now displayed PM ON 15 00 np Set Enter Press or to set the hours for when the pool pump will turn ON and press Press or to set the minutes for when the pool pump will turn ON and press 6 The PM OFF screen is now displa...

Страница 35: ...nge is required unless the tube size is changed 9 4 1 Setting the ORP Dosing Pump Tube Size 1 Access the Custom Settings Menu See section 9 1 2 Press until oORP Tube Size is selected and press 3 Press or until the desired tube size is selected and press 9 4 2 Setting the pH Dosing Pump Tube Size 1 Access the Custom Settings Menu See section 9 1 2 Press until opH Tube Size is selected and press 3 P...

Страница 36: ...ighted by the arrow Too Low means that the Chemflo will add Chlorine when the reading gets too low Too High This is rare and not normally used in pool and spa applications Press or until the desired setting is selected and press 4 The current Control On Time is now displayed for example ORP ON Time 6 minnp Enter Press or until the desired On Time is set and press Enter Zero minutes On time to disa...

Страница 37: ...or until the desired setting is selected and press 4 The current Control On Time is now displayed for example pH ON Time 1 minnp Enter Press or until the desired On Time is set and press Enter Zero minutes On time to disable the pH pump 5 The current Control Off Time is now displayed for example pH OFF Time 5 minnp Enter Press or until the desired Off Time is set and press 9 5 1 4 Default pH Contr...

Страница 38: ...to set the required time from 1 to 240 minutes Press and hold the or key to scroll rapidly 6 Press to save the ShutOFF timer setting for the pH pump Press to quit and retain the current setting 9 6 2 Default ShutOFF Times for Pool Sizes The following table details the default ORP and pH ShutOFF times for the various pool sizes Spa 20 000 Litres 50 000 Litres 100 000 Litres Tube Size Small Large Sm...

Страница 39: ... of the pool close the Isolation valve before removing the probe 2 Plug the pH ORP probe into the pH ORP Probe socket if not already connected 3 Remove the wetting cap from the pH ORP probe if fitted Rinse probe in distilled water Shake off as much water as possible Blot the outside of the probe dry 4 Place the pH ORP probe into a small sample of pH 7 00 buffer Ensure that the entire bulb and refe...

Страница 40: ...H If calibration fails due to the Asymmetry being outside these limits please consult the Troubleshooting guide section 7 4 for possible remedies 2 All calibration information is retained in memory when the Chemflo is switched off even when the power supply is removed 9 7 3 pH Calibration Messages 1 If a 7 00 pH has been successfully performed the Chemflo will display the following message and the...

Страница 41: ...end user The provisions of this warranty are not transferable and are in addition to and not in modification of or subtraction from any applicable statutory warranties rights or remedies CONDITIONS OF WARRANTY This warranty only applies where 1 The products have been installed and operated in accordance with written instructions supplied by Waterco 2 The purchaser is able to provide proof of purch...

Страница 42: ... blocking the pump s impeller i insect infestation Some three phase pumps are not supplied with thermal overload protection It is the purchaser s responsibility to have this provision installed by appropriately licensed electricians prior to the initial installation of the pump All electrical work must comply with any appropriate statutory requirements Warranty for installation of thermal overload...

Страница 43: ...s located SCHEDULE WARRANTY PERIODS Residential Applications Controller Feeder 2 years Sensor 18 months Labour 1 year Commercial Applications Controller Feeder 1 year Sensor 1 year Labour 1 year WARRANTY LIMITATIONS The provisions of this warranty are not transferable from the original purchaser and are in addition to and not in modification of or subtraction from any applicable statutory warranti...

Отзывы: