


VISTA Transfer Station Hardware
VISTA Transfer Station Hardware
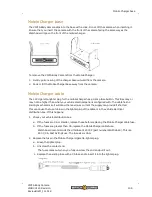
When you set up the VISTA Transfer Station hardware, you connect the power cable and the
Ethernet cable to the Transfer Station. You can add labels to the Transfer Station slots as well, if
desired.
Note:
WatchGuard offers rack options for mounting multiple Transfer Stations in
the same location. For more information, contact your WatchGuard
representative.
Included with the VISTA Transfer Station:
l
Power cable
l
Ethernet cable
l
Sheet of
Station ID
/
Slot #
labels
Setting up the hardware
To set up the VISTA Transfer Station hardware:
1. If desired, use the provided
Station ID
/
Slot #
stickers to label the Transfer Station slots.
Tip:
The provided labels assume an alphabetic
Station ID
, for example,
B
, then slot numbers 1 through 8; so, in this example, for the Transfer
Station with the
Station ID
of
B
, you use the labels
B1
,
B2
,
B3
,
B4
,
B5
,
B6
,
B7
, and
B8
.
VISTA Body Camera
WGD00120 Revision
ReviewDraft_111518
119
Содержание VISTA WiFi
Страница 1: ...Document revision ReviewDraft_111518...


