background image

To Set Up Recording Rates 


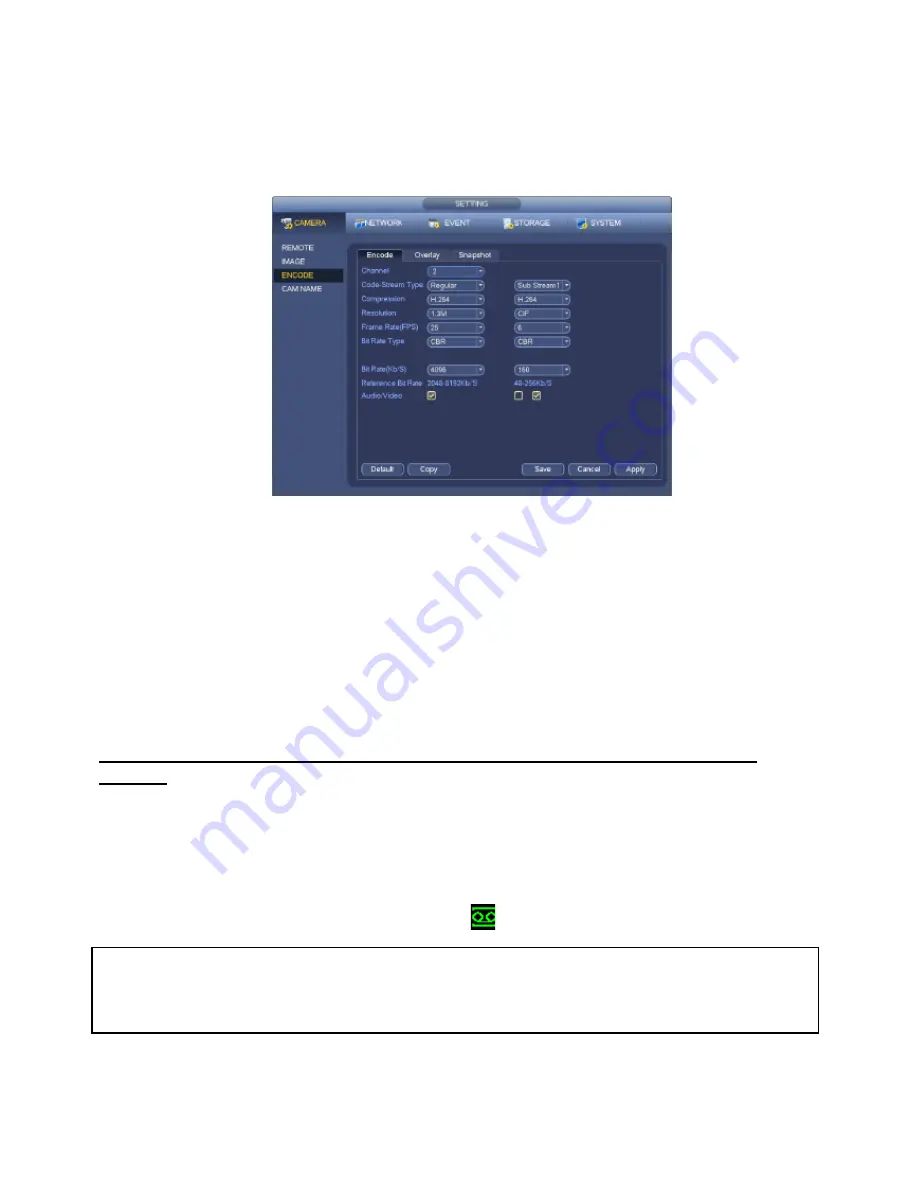
Right click to open the menu and select MAIN MENU, then select SETTINGS followed by CAMERA and 
finally ENCODE. 


In this menu you may set individual encoding options for 

Regular

Motion Detect

 and 

Alarm

 Recording. 

While any of the cameras may be set higher, please be aware that it will reduce the total recording time. 
We suggest: 
 

1MP cameras

: Set to 

H.264

 with a 

1280x720

 resolution, 

10fps

, Bit Rate 

CBR


of 1536kbps

.   

2MP cameras

: Set to 

H.264

 with a 

1920x1080

 resolution, 

10fps

, Bit Rate 

CBR


of 2048kbps

.   


Important: 

The EXTRA STREAM MUST be enabled if you wish to remotely access the recorder.   

All cameras: 

Set to 

H.264

 with a 

CIF

 resolution, 

10fps

, Bit Rate 

CBR


of 320kbps


Please note that not all recorders support IP cameras, and not all recorders support 2MP 
cameras. 

 
To Begin Recording 


Once you have successfully set up the cameras, exit the Menu by right clicking or pressing the CLOSE 
button. By default, the system will begin recording when it is properly connected to the cameras and has 

an installed HDD. If it is recording, the recording icon “


will be displayed on screen.


Automatic Overwriting:     

When the system is in full, the oldest recorded data will be overwritten automatically. 

This NVR 

System is set to Overwrite by factory default 

but can be changed in the 

“GENERAL”

 Menu. 


Содержание CVRxE

Страница 1: ...e is intended as a quick setup and basic use manual only please refer to the full user manual on the included CD for all other details For the latest version of this manual please see http www rhinoco com au support downloads V1 0 N517 www watchguardalarms com au ...

Страница 2: ...k the recorder comes with an approved Hard Drive already installed We strongly recommend using the following Seagate Hard Drives Name Model Part Number Seagate 1TB Video HDD ST1000VM002 HD1TBSN Seagate 2TB NAS HDD ST2000VN000 HD2TBSN Seagate 3TB NAS HDD ST3000VN000 HD3TBSN Seagate 4TB NAS HDD ST4000VN000 HD4TBSN Seagate 1TB Surveillance HDD ST1000VX001 HD1TBSV Seagate 2TB Surveillance HDD ST2000VX...

Страница 3: ...ds with rugs or carpet Service should be handled only by qualified technicians Connection Guide 1 Mount the Cameras as required and connect them to them to the recorder using the required cables 2 Connect the 12V Power Supply to the Recorder 3 Plug all power adaptors into a Power point 4 Switch Recorder on from back of device If necessary hold Power button for 3 seconds 5 The power LED at the fron...

Страница 4: ...the ESC button to return to previous menus click on the icon to enter menus Channel View Menu Moving the mouse to the top of each channel in the live view screen will show a menu From left to right Playback Show in live view the past few minutes of footage Search tag Turn on search tag Save Save the currently displayed file to USB device Camera Source Change the IP Device for this feed Close Close...

Страница 5: ...ime for your region Click Save before clicking OK Network Setup Right click to open the menu and select MAIN MENU then select SETTINGS followed by NETWORK The device comes pre configured to DHCP which means it will automatically receive an IP Address If you wish to manually give it an IP Address un tick DHCP and then enter the IP Address Subnet mask and Gateway Important If you change the date or ...

Страница 6: ...AM MUST be enabled if you wish to remotely access the recorder All cameras Set to H 264 with a CIF resolution 10fps Bit Rate CBR of 320kbps Please note that not all recorders support IP cameras and not all recorders support 2MP cameras To Begin Recording Once you have successfully set up the cameras exit the Menu by right clicking or pressing the CLOSE button By default the system will begin recor...

Страница 7: ...efore checking for motion again Region Select Select region of feed within which motion detection will occur Click and drag with the mouse to arm disarm areas of the feed Motion detected in red areas will cause recording motion will not be detected in grey areas Press ENTER to save Sensitivity Select from 1 to 6 the sensitivity of the recording 6 being the most sensitive to movement Right click to...

Страница 8: ...ld like to use Please note that not all recorders feature this function 1 Right click to open the menu and select MAIN MENU 2 Select SETTINGS followed by CAMERA and finally CHANNEL TYPE 3 Select which channel types you would like to use 4 Select Save to save your settings 5 Your recorder will restart once restarted your settings will take effect ...

Страница 9: ...n select the month and day you wish to playback Any date that is highlighted blue has video available to playback 4 Once you have selected the day you can choose which cameras you wish to playback and the mode in which they will be displayed 1ch 4ch 8ch 16ch at a time 5 Finally you can select the time from the time bar at the bottom of the screen You will notice that the hours are listed from 00 0...

Страница 10: ...p to Choose your device and click BACKUP to continue 4 You will see the NVR Backup screen where you can choose the Camera Channel followed by the Start and End times for the section of video you wish to backup Click ADD to save your selection and repeat process for any addition video footage you wish to back up 5 Once you have selected all the video to be backed up press Start to begin the transfe...

Страница 11: ...re you would like to play back and press the Play button 5 Converting Footage to AVI Format with Smart Player 6 You may wish to convert your footage to another format such as AVI To do this add the footage you wish to convert to Smart Player as described in the previous steps Once the footage has been added the guide below describes how to convert your footage to the AVI format 7 Press the Export ...

Страница 12: ... an Android smartphone with the gDMSS App Once you have these you can proceed to set up the Remote Access by 1 Connect your recorder to your Modem by a network cable 2 Under Main Menu Settings Network Enable DHCP or enter your local network address information 3 Exit to save 4 Now go to Main Menu Settings Network Network Settings Tick the box for P2P Then Click P2P to open up the sub menu 5 Ensure...

Страница 13: ...k Settings P2P Tick the box to enable P2P 2 On your Smartphone go to MENU then Device manager and select ADD 3 Set Register Mode to P2P 4 You can now click Scan QR Code and use your phone to scan the code on your NVR 5 Enter in your devices NAME 6 Enter your Username Password and the set Live Preview and Playback to Extra 7 You can now select Start Live Preview to save and test the connection to t...

Страница 14: ...t connection or mobile on 3G Test your Remote Access by connecting to the NVR When you are in the same building as the recorder you will be able to connect via WIFI and use the Internal IP address of the NVR However when you are not where the NVR is and wish to connect via the internet or 3G you would use the External static IP address given to you by your Internet Service Provider Port forwarding...

Страница 15: ...There are free and paid services available however a free DDNS service has been built in to these NVRs This tutorial will go over how to set up your NVR to use the free DDNS service How to enable DDNS In order to set up DDNS on your recorder you will need to enable the DDNS service in the Network settings MAIN MENU NETWORK SETTINGS DDNS Set DDNS Type to Private DDNS and Tick ENABLE SERVER IP to ww...

Страница 16: ...dows Phone Configuration 1 Go to MENU then Device manager and select ADD 2 Set Register Mode to IP DOMAIN 3 Enter in your devices NAME IP Address or DDNS and TCP Port default is 37777 4 Enter your Username Password and the set Live Preview and Playback to Extra 5 Select SAVE in the top right corner or Start Live Preview to save and connect 6 You be returned to your Live View screen where your came...

Страница 17: ...by remote access You will also require the Paid version of the mobile app iDMSS plus for Apple iOS gDMSS plus for Android wDMSS plus for Windows Phone DMSS plus for others Configuration 1 Open the paid mobile app where you have remote access already set up 2 Go to MENU then Push Config 3 Choose your Recorder from the list and switch Push Notifications to ON ...

Страница 18: ...a non PoE network switch you may power the camera separately You may now manually address each camera individually 1 Connect one camera to your local network leave your other cameras disconnected 2 Right click to open the menu and select MAIN MENU then select REMOTE 3 Click Device Search to begin scanning for the IP Camera 4 The recorder will find your new IP camera normally with a default IP Addr...

Страница 19: ...ttings 7 The IP Camera should now be listed with its new IP Address You can then select the new camera you wish to connect and select Add to have it connect to the recorder 8 The IP Camera will now be shown in the bottom list with a green Status indicator meaning it has been successfully added to the recorder 9 This process can now be repeated for any additional cameras one camera at a time ...

Страница 20: ...nce installed open VIP Vision Smart PSS 2 A login screen will ask for a Username and Password the Username is admin and the Password is admin Press login to continue 3 Select the button labeled Devices 4 Select the button labeled Manual Add 5 Set Register Mode to SN if connecting using the QR code method If connecting by IP Address set the option to IP Domain 6 Enter your device s details 7 Give y...

Страница 21: ... admin Press login to continue 3 Select the PLAYBACK button 4 On the right side of the screen you will see Default Group Expand this folder and then expand your recorder 5 Once expanded you will see a list of your cameras double clicking on any of your cameras will bring the cameras on screen 6 You will then see a green Timeline down the bottom of your screen if you select your desired time you wi...

Отзывы: