background image

34

WatchBot Home Security Camera - User Guide

NOTE:

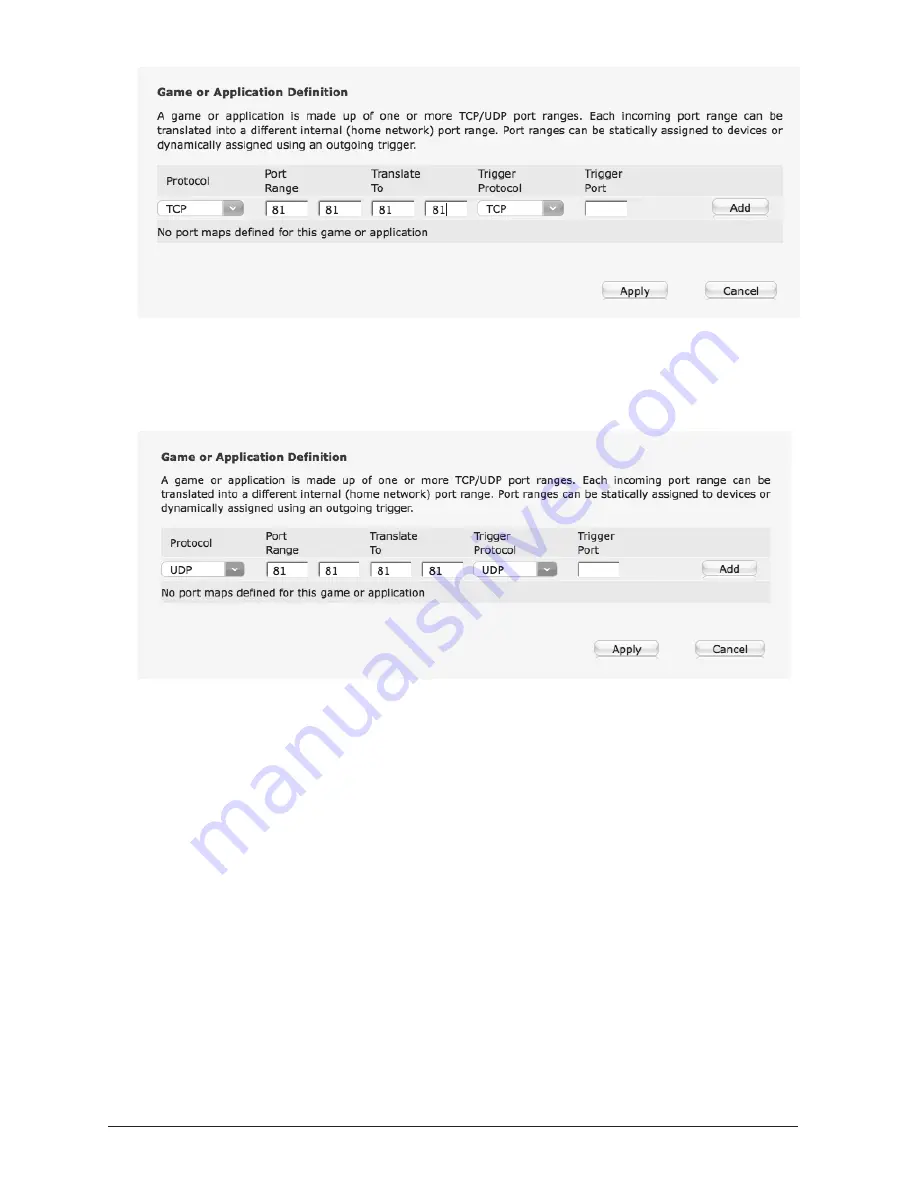
CLICK ADD and APPLY. Then repeat the step above 

selecting UDP as the protocol and use 'watchbot_udp' as the name:

NOTE:

CLICK ADD and APPLY.

NOTE:

If you are connecting more than one camera, please re-visit 

steps 4 - 6 above, naming each camera differently, eg. 

'watchbot2_tcp' and 'watchbot2_udp' and adding a different port 

number in each case, eg. 82 instead of 81.

7.  Go to 'Home Network'

8.  Go to 'DHCP Table'

9.  Under 'Device' you will see your computer and any other connected 

device(s) (Note: May be called 'Unknown Host')

10. Make a note of the MAC Address and IP Address of the device(s) 

listed (other than your computer)

11. Click on 'Unknown Host' (This brings you back to the 'Devices' 

page)

Содержание Home Security Camera

Страница 1: ...1 WatchBot Home Security Camera User Guide User Guide Revision 3 Dec 2011...

Страница 2: ...e Positioning Buttons 12 1 6 6 Screen Resolution Mode 12 1 6 7 Brightness and Contrast 12 1 6 8 Default Settings 12 1 7 Visitor Controls Recording Video and Audio 12 1 7 1 Multi View 13 1 7 2 Add Time...

Страница 3: ...tion 24 3 6 2 Motion Detect Sensitivity 24 3 6 3 Alarm Input Armed 25 3 6 4 I O Linkage on Alarm 25 3 6 5 Setting up I O linkage hardware 25 3 6 6 Send Alarm Notification by Mail 25 3 6 7 Upload Image...

Страница 4: ...strong magnetic or electrical fields that could damage the unit Always ensure the installation environment is well ventilated Transportation and carrying The camera packaging ensures the device will...

Страница 5: ...supports modern web browsers making management and maintenance of your device simple and intuitive You can use the WatchBot camera to remotely monitor for example your home office car or pets Control...

Страница 6: ...EDs I O Connector Light Sensor Lens turn to focus Microphone Mini Jack for Speaker Pan Tilt motion RJ45 Network Port Warning Do not forcibly move the camera pan tilt motion manually This is likely to...

Страница 7: ...or more advanced setup options and troubleshooting please consult the Advanced Guide on page 16 and FAQs on page 29 of this guide 1 2 Connect camera components On removing your camera from the box the...

Страница 8: ...rt the supplied Software CD into your CD ROM drive It should auto run but if it does not open up Computer and double click on the CD ROM drive icon and select WatchBotCamSetup exe Choose Install Watch...

Страница 9: ...Right clicking on the entry above will give access to a context menu for functions described in detail later in this manual 1 5 Setting up your WatchBot camera on your Local Area Network LAN Note This...

Страница 10: ...te Internet Explorer asks if you want to install the ActiveX control Some WatchBot camera functions such as recording and audio require ActiveX controls to be enabled If you experience any issues with...

Страница 11: ...ra click on the red centre icon The device will then perform a full vertical and horizontal patrol before re centering it s view 1 6 2 Patrol Clicking the horizontal or vertical patrol buttons will te...

Страница 12: ...240 pixels low res and 640 x 480 pixels high res and the Mode Refresh Rate can be set to either 50Hz 60Hz or Outdoor for a flicker free video display 1 6 7 Brightness and Contrast Brightness and Contr...

Страница 13: ...he PLAY ARROW icon to monitor the live video feed click the PAUSE icon to turn off the live video feed and click the Camera icon to take a still snapshot of the current view 1 7 6 Recording video and...

Страница 14: ...dministrator tab on right then go to Basic Network Settings This page allows you to either manually enter the network details these would be available from your Internet Service Provider or in most ca...

Страница 15: ...ch bot net and login with the default admin no password To set up more users please see Section 3 1 4 After logging in click Sign In under ActiveX Mode for IE Browser you will be logged in to the came...

Страница 16: ...bilities of the device 3 1 Administrator Settings Click the ADMINISTRATOR tab on the right of the interface to access these settings 3 1 1 Device Info See screenshot above This provides an overview of...

Страница 17: ...nyone else who will need access to the camera They are as follows Administrator Access to all camera functions and administrator settings Operator Access to all viewing camera control and recording fu...

Страница 18: ...r first camera You can add more cameras in the LAN for monitoring The Web software supports up to 4 Cameras online simultaneously Click The 2nd Device and Double click the item in the Device List in L...

Страница 19: ...an IP address automatically 3 1 7 Wireless LAN Settings Your WatchBot camera can function wirelessly on your local network negating the need for a network cable to be attached to the device By adding...

Страница 20: ...save the settings The camera will reboot Unplug the network cable Once the settings above have been saved and the camera has rebooted unplug the network cable from the camera then unplug the power ca...

Страница 21: ...ew account information 3 2 2 Add contacts details In the fields below add the MSN details of those accounts you want to appear in the camera s Contacts List in Messenger Tip If you are Administrator i...

Страница 22: ...l The camera will respond with an http address link Click on this to visit your camera control panel and log in as normal 3 3 DDNS Service Settings If you have correctly registered your camera See Sec...

Страница 23: ...come from This must be a real email address 3 4 2 Enter the receiving email address s Enter email addresses by which you want to receive emails from the camera 3 4 3 Mail server settings Enter the SMT...

Страница 24: ...ined from your Web Hosting Provider 3 51 Save and Test settings Once settings are entered you must click on Submit first then click on Test 3 6 Alarm Service Settings Your WatchBot camera has a built...

Страница 25: ...iggered WatchBot can be programmed to send an email with picture or control the internal relay output If you link an external alarm with Pin3 and Pin4 when alarm input is armed the external alarm is e...

Страница 26: ...d 3 10 Restore Factory Settings All user settings will be erased from the camera and the device will be reset to it s default factory settings A prompt will appear asking if this is really what you wa...

Страница 27: ...assword as shown then click Sign In under the Server Push Mode For FireFox Safari Browser heading 4 1 1 The Web Interface There are now only three headings on the right Click Live Video to access the...

Страница 28: ...r 4 2 1 The Web Interface When viewing via a mobile browser only Pan Tilt controls and Live Video Viewing functions are available Note When viewing your live video feed on your mobile device using a b...

Страница 29: ...e done this because of internet worms such as Code Red If this is the case you willl have to setup your HTTP server on an alternate port such as 8080 I have no picture Problems with ActiveX Controller...

Страница 30: ...been successful There are two possible solutions Go to Administrator UPnP Settings Check the box next to Use UPnP to Map Port Click Submit and ensure you see the Success message If your router has Vi...

Страница 31: ...ticipating in a computer network LAN Short for Local Area Network a computer network that interconnects computers in a limited area such as a home school computer laboratory or office building SMTP Sh...

Страница 32: ...32 WatchBot Home Security Camera User Guide...

Страница 33: ...it will stop moving Next see section 1 3 in the User Guide to set up your camera on your local network Make a note of the local IP address asigned to the camera it will begin 192 168 Login to your cam...

Страница 34: ...4 6 above naming each camera differently eg watchbot2_tcp and watchbot2_udp and adding a different port number in each case eg 82 instead of 81 7 Go to Home Network 8 Go to DHCP Table 9 Under Device y...

Страница 35: ...ilst using your home network try from another external network Using a NetGear Router Firstly with your camera plugged in press the Reset button on the camera base It will be marked Reset you will nee...

Страница 36: ...a new Custom Service as below CLICK APPLY You should see the page below displayed NOTE If you are connecting more than one camera please re visit step 3 above naming each camera differently eg watchbo...

Страница 37: ...ser Guide 4 Go to LAN IP Setup May be called just LAN Setup and click ADD to add a new device Use the local IP address the Camera Tool software assigned to your camera enter a common name and also you...

Страница 38: ...your own camera s Destination IP Address This is displayed when visiting http www watch bot net in your browser This external IP may change if your camera is reset or powered off This Static Routes st...

Страница 39: ...uters do not Go to Firewall Rules and add a new inbound service Complete as below but in Service Type select your camera and in Send to LAN Server use the local IP address of your camera you added in...

Страница 40: ...y to access it without using the software You will need to know the login to your network router before continuing Visit the address of your router in your web browser It may be 192 168 0 1 or 192 168...

Страница 41: ...41 WatchBot Home Security Camera User Guide NOTES...

Страница 42: ...42 WatchBot Home Security Camera User Guide NOTES...

Страница 43: ...43 WatchBot Home Security Camera User Guide NOTES...

Страница 44: ...44 WatchBot Home Security Camera User Guide Copyright 2011 MyGadgetsAndGifts...

Отзывы: