WASPcam 9906 Скачать руководство пользователя страница 13


13 

Under Video mode, press the menu button to enter video settings, press the 
left/right arrow buttons to choose the options, then press the OK button to confirm, 
press menu button again to quit
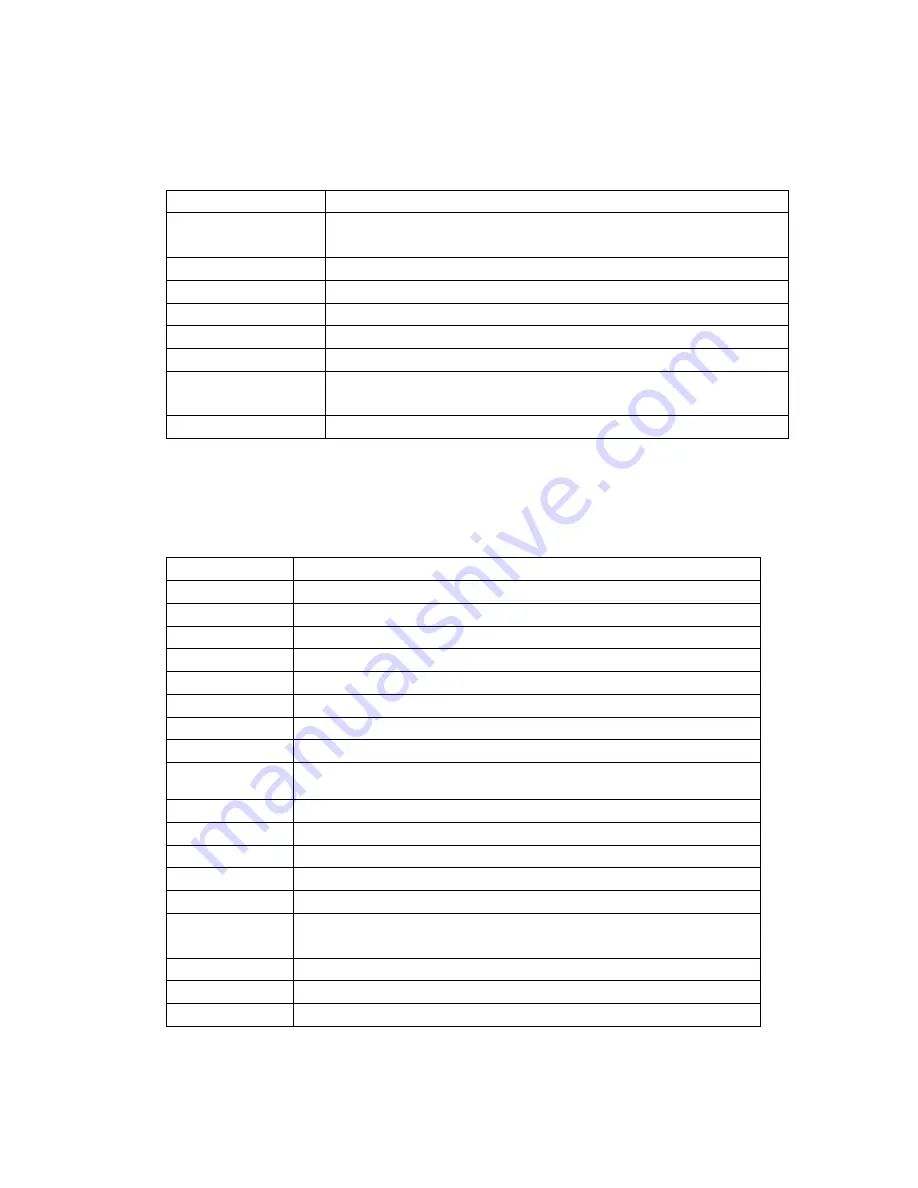


MENU OPTION 

SETTINGS 

Resolution 

1440 30FPS/1080P 60FPS/1080P 30FPS / 720P 120FPS / 720P 
60FPS/ VGA 240FPS 

Loop recording 

Off / 2 Minutes / 5 Minutes / 10 Minutes 

WDR 

Off/On 

Motion Detection 

Off / 30 Seconds / 1 Minute / 5 Minutes 

Audio 

Off/On 

Date Stamp 

Off / Date / Date & Time 

Time-lapse Record 

Off/1 Second/3 Seconds/5 Seconds/10 Seconds/30 Seconds/1 
Minute 

Image rotation 

Off/On 

System Settings 

Under standby mode and playback mode, press the menu button twice to enter the 
system settings, press the left/right arrow buttons to choose the option, press the OK 
button to confirm, press the menu button to exit settings.   

MENU OPTION 

SETTINGS 

WIFI 

On/Off 

WIFI SSID 

User name setting, the default is WASPcam 

WIFI Password 

Password setting, the default is 12345678 

Remote Control  Off / On /Remote Match (for pairing with the camera) 
Date / Time 

YYYY / MM / DD / HH / MM / SS 

Auto Power Off  Off / 1 minute / 5 minutes/ 10 minutes 
Beep Sound 

Off/30%/60%/100% 

Exposure 

+0.0, -0.5, -1.0, -1.5, -2.0, +2.0, +0.5, +1.0, +1.5 

Language 

English/FRAN

Ç

AIS/ESPA

Ñ

OL/Portuguese/Deutsch/ Italano/

简体中文

/

體中文

/PYCCK

ЙЙ

/

日本语

/Polski/

한국어


TV Out 

Off / On


TV Mode   

NTSC/PAL 

Frequency 

60 HZ / 50HZ 

Remove Fisheye  Off / On 
Anti-shaking 

On/Off 

Screen saver 

  Off/30Seconds / 1Minute/5Minutes (Length of time before the 
screen shuts off) 

Format 

SD Card 

Default Setting 

Cancel / Ok 

Version 

FWVer

X.X /XXXX XX XX 

Photo Menu Settings 

Содержание 9906

Страница 1: ...read through this user manual before using the product and keep the manual for future reference Product appearance and or specifications are subject to change without notification WASPcam is a divisi...

Страница 2: ...Waterproof Seal 9 Recording Functions 9 10 Image Rotation 10 Photos 10 12 Zoom Playback Mode 11 Deleting Protecting Files Slide Show 12 Menu Interface Introduction 12 Video Menu Settings 12 13 System...

Страница 3: ...slightly damp soft cloth Do not open the battery cover while an image is being recorded Doing so will not only make storage of the current image impossible it can also corrupt other image data already...

Страница 4: ...of RAM or higher At least DirectX 9 video card DirectX 10 is recommended Standard USB 1 1 port and later At least 2GB or greater available hard disk space Features The camera offers a variety of feat...

Страница 5: ...ny items are missing or damaged contact your dealer immediately Micro USB Cable Bar Mount Helmet Mount Tripod Mount Adapter Straight Joint Mount J Hook Buckle User Manual 3M Stickers Wall Charger Flat...

Страница 6: ...6 Camera Function Quick Guide Diagram Refer to the following illustrations to familiarize yourself with the buttons and controls of this camera...

Страница 7: ...n you are in the menu Menu Button To enter exit menu settings OK Button OK To browse photos and videos to enter and confirm settings under setting mode Left Button To choose the last menu or file To z...

Страница 8: ...e camera is charging Once it is fully charged the red indicator light will turn off Note To improve the charging efficiency of the camera please turn the camera off while it s charging Turning the Cam...

Страница 9: ...camera under regular tap water and dry completely Once dry open the battery compartment and remove the battery Place battery in dry ventilated area to ensure battery remains dry This avoids any degra...

Страница 10: ...REC button again to stop recording And choose Time lapse Record to off Note This feature only suit for a long time recording example if set the Lapse record to 1 second the recording time should not b...

Страница 11: ...Auto Photo off 3 5 10 seconds Press the menu button to enter camera settings press the left and right arrow buttons to choose Auto Photo mode and select the time and press ok Press menu to exit Press...

Страница 12: ...t then press the OK button to confirm Press the left right arrow buttons to choose Cancel or OK to deleting the file Press OK to confirm delete mode will exit Protecting Files Under standby mode press...

Страница 13: ...the system settings press the left right arrow buttons to choose the option press the OK button to confirm press the menu button to exit settings MENU OPTION SETTINGS WIFI On Off WIFI SSID User name s...

Страница 14: ...nload and install the WASPcam TACT App to your Apple iPhone iOS system smartphone or Android smartphone Installing the WASPcam TACT App Apple iPhone iOS system Smartphone There are two ways to downloa...

Страница 15: ...icon to view the app page Click the install button to install the WASPcam TACT app to your phone Once download is complete the WASPcam TACT app will appear in your application menu Android by Computer...

Страница 16: ...o delete the WIFI password Then you can enter a new WIFI password Press the left right arrow buttons to choose the letters to spell the word you want then press the Ok button to confirm Press the menu...

Страница 17: ...ess this icon to record video or photo Press this icon to enter settings Video Resolution Photo Size Looping Record Audio Auto Off Clear Cache Wi Fi Press this icon to see all the files Press this ico...

Страница 18: ...ccessful when the LCD screen shows Remote Match OK NOTE The 9906 TACT Wireless Wrist Remote can be paired to multiple TACT cameras You can pair the cameras to the remote one by one or pair several cam...

Страница 19: ...able to the TV choose USB mode on the TV then go into the camera menu settings and make sure the TV Out is set to open The LCD screen on the camera will turn off automatically and now all operations a...

Страница 20: ...luding interference that may cause undesired operation This equipment has been tested and found to comply with the limits for a Class B digital device pursuant to part 15 of the FCC Rules These limits...

Страница 21: ...y signifies that the Industry Canada technical specifications were met This product meets the applicable Industry Canada technical specifications Le pr sent appareil est conforme aux CNR d Industrie C...

Отзывы: