WASPcam 9906 CAMO Скачать руководство пользователя страница 18


WASPcam™ 9906 CAMO User Manual


01 June 2016


Page 18


Remote Control


Under standby mode, press the menu button to enter system settings, press the left/right arrow 
buttons to choose remote then select Remote Match. The message on the LCD Screen is “Wait 
Remote Match” and camera enters  pairing mode. Pres s  both buttons  on the remote 
controller to s tart pairing. Pairing is  s uccessful when the  LCD s creen s hows  “Remote 
Match OK”.


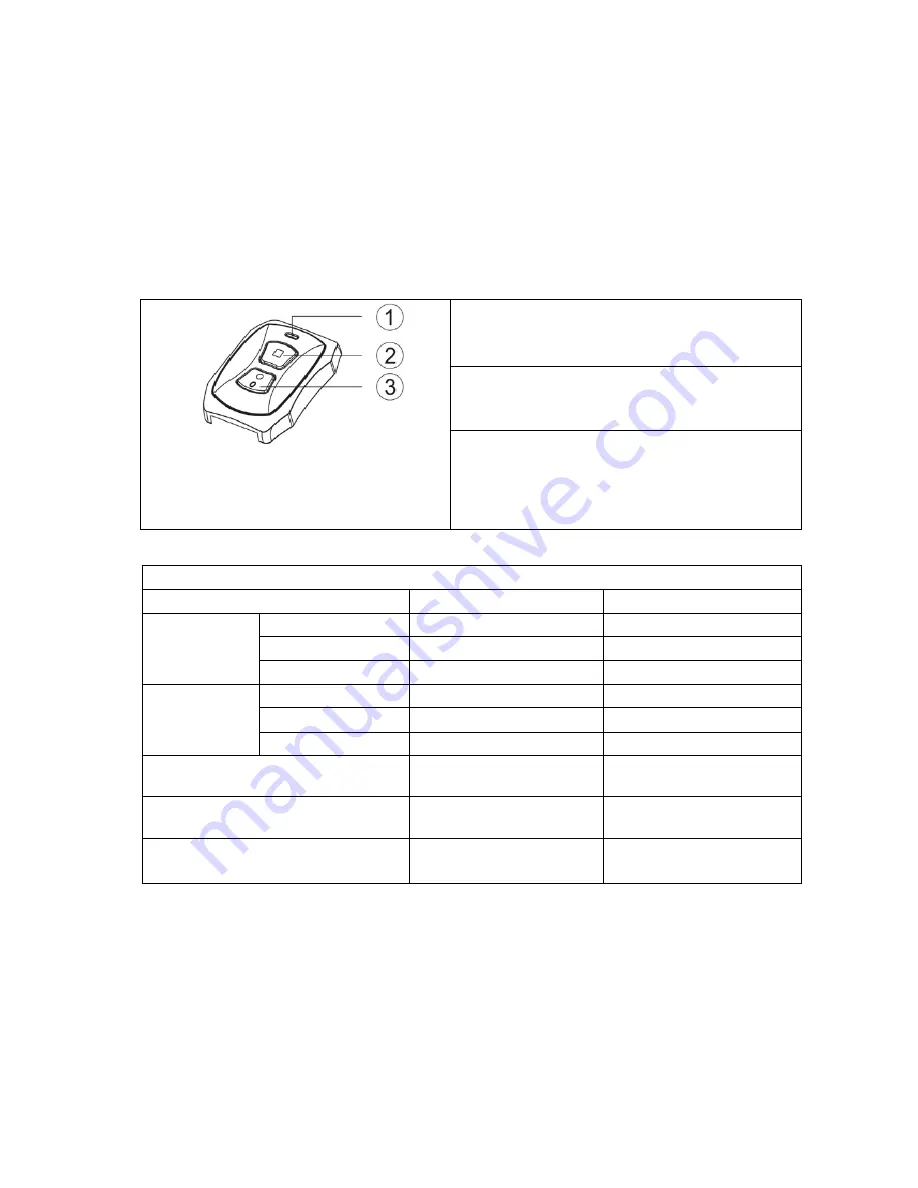
Press the Inquiry/Record  Button (3) and the 
Photo button  (2) simultaneously to enter 
Pairing mode


-

 Indicator light


2 – Photo  Button 

-

 press to take photos


3 – Inquiry/Record  Button – press to start/stop 

recording, press and hold for 3 seconds to check 

the present status of the camera (see below)


Connecting  to External  Devices


Playback on HD TV


Turn the camera on, connect the HDMI port  in the camera to the TV via an HDMI cable (not 
included) and choose the HDMI mode on TV. The LCD screen on the camera will turn off 
automatically and now all operations and functions can be seen on the TV.


Remote Control Indicator Light Status


Status/LED


Red LED Light


Blue LED Light


Status I nquiry


Standby (Flashes)


1 time/sec for 5sec


Off


Recording


Off


On for 3 seconds,  then off


Power Off (Flashes)


3 secs,  then off


Off


Pairing Mode


Pairing


On


On


Success (Flashes)


3 secs,  then off


3 secs,  then off


Failure


Off


Off


Start recording (Flashes)


2 times/sec for 5sec


Off


Stop recording (Flashes)


1 time/sec for 5sec


Off


Photo


Off


Flashes once each time you 


take a photo


Содержание 9906 CAMO

Страница 1: ...notice Before using this camera please insert a micro SD card class 10 card no larger than 64GB into the WASPcam 9906 CAMO camera Camera functions will not work without a micro SD card inserted into t...

Страница 2: ...Using the LED Lights 8 Charging the Battery 8 Turning the Camera On Off 8 Screen Icons 9 Zoom In Out 9 Menu Interface Introduction 9 Recording Functions 9 Photos 11 Deleting Protecting Files Slide Sho...

Страница 3: ...sions from the use of the WASPcam 9906 CAMO or from the sharing of footage Do not attempt to open the casing or attempt your own repairs High voltageinternal components create the risk of electric sho...

Страница 4: ...Intel Core Duo AMD Dual Core CPU 2 GB of RAM DirectX 9 compatible graphics solution Available hard disk space The camera requires a computer with the following minimum specifications for full WVGA VGA...

Страница 5: ...should be included in the camera package If any items are missing or damaged contact your dealer immediately Micro USBCable OutdoorUtility Mount JawsClamp TripodMount Adapter StraightJointMount J Hook...

Страница 6: ...WASPcam 9906 CAMO User Manual 01 June 2016 Page 6 Camera Function Quick Guide Diagram Refer to the following illustrations to familiarize yourself with the buttons and controls of this camera...

Страница 7: ...eturns to the photo video mode when you are in the menu Menu Button Enter exit menu settings OK Button OK Browse photos and videos to enter and confirm settings under setting mode Left Button Choose t...

Страница 8: ...ED lights in bright mode press again for normal mode press a 3rd time to make the LED lights flash and press a 4th time to turn the lights off Charging the Battery Connect camera and power supply usin...

Страница 9: ...and the recorded time and recording icon will be displayed on the top of the LCD screen Press the record button again to stop recording and save the file the estimated remaining recording time is dis...

Страница 10: ...on Motion Detection and choose 30 SEC for example for more options refer to Video Settings Press REC to enter Motion Detection mode The screen will say Motion Detecting 2 If there is movement the cam...

Страница 11: ...time and then take a photo Press the record button again to stop the count down 2 Burst Off Burst 3 Burst 10 When Burst is turned on press the record button and the camera will take and save 3 or 10 c...

Страница 12: ...ress the left right arrow buttons to select Lock Current Unlock Current Lock All Unlock All then press OK to confirm Press the Menu button to exit Slide Show Off 2 5 8 seconds In playback mode press t...

Страница 13: ...e default is 12345678 Remote Control Off On Remote Match For pairing with the camera Date Time YYYY MM DD HH MM SS Auto Power Off Off 1 min 5 mins Length of time with no activity before the camera shu...

Страница 14: ...e Enabling the Camera s Wi Fi 1 Before using this function download and install the WASPcam to your Apple iPhone or Android smartphone 2 Before using this function please insert a micro SD card class...

Страница 15: ...App icon to view the app page Click the install button to install the WASPcam App to your phone Once download is complete the WASPcam App will appear in your application menu Using the Camera s Wi Fi...

Страница 16: ...photo mode press the symbol to take a photo Wi Fi connected Battery charging or displays current battery power level Micro SD card inserted Displays what the date stamp will look like on footage Disp...

Страница 17: ...the word you want then press the Ok button to confirm Press the menu button to select and Ok to confirm the setting Updating the Wi Fi Password Turn the camera on and press the menu button twice to en...

Страница 18: ...ess and hold for 3 seconds to check the present status of the camera see below Connecting to External Devices Playback on HD TV Turn the camera on connect the HDMI port in the camera to the TV via an...

Страница 19: ...ons to select Mass Storage and the record button to confirm Click on the CARDV folder on the computer There are two sub folders MOVIE and PHOTO Open and view the corresponding files Web cam PC Only Co...

Страница 20: ...ssion of WASPcam Cobra Electronics For manuals in additional languages please visit www waspcam com Apple and the Apple logo are trademarks of Apple Inc registered in the U S and other countries App S...

Отзывы: