Some dealers will prepare your unit for operation and even “dry run” it before delivery. If
this has not been done, you can follow the steps as listed below.
1.
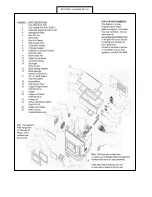
Attach the spring handle to the door by turning it counterclockwise. Install the hopper
lid latches as illustrated by the drawing at the rear of this manual
. Important: Latches
must be tight so that the top is sealed to prevent back-burn.
Check to insure the baffle
is in place in the firebox.
2.
Test your 110-volt outlet for current and then plug in the unit. (
We highly
recommend a surge protector for our pellet stoves).
3.
It is important to note that this stove is equipped with a dual auger system. The top
auger runs intermittently and drops pellets to the bottom auger; the bottom auger runs
constantly and simply pushes the pellets forward to the burn pot. The control board setting
determines the top auger feed rate.
4.
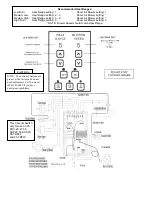
The stove has a digital read-out control board and is started by pressing the “ON”
touch pad. This will immediately start the upper auger, bottom auger and exhaust blower.
Pressing the arrows under “Heat Range” to a higher setting will make the top auger operate
for a longer period of time; pressing these arrows to a lower setting will make the top auger
operate for a shorter period of time. You may observe the top auger by opening the hopper
lid, and the bottom auger by opening the door to the firebox and looking in the burn pot. The
room air blower will start later as the stove reaches the pre-set blower temperature (see
“Control Board” section for further explanation).
FLUE SYSTEM
Caution: Follow the pipe manufacturer’s installation instructions and directions
for passing through combustible walls and ceilings. Check local codes in your area.
This unit is equipped with a negative draft system that pulls air through the burn pot and
pushes the exhaust out of the dwelling. If this unit is connected to a flue system other than
the way explained in this manual, it will not function properly.
The manufacturer will not be
held responsible for damage caused by the malfunction of a stove due to improper
installation.
Pellet Vent Pipe
The UL approved pellet vent pipe is a twist lock system; however, it is still recommended
that high temperature silicone be used at each joint.
Do not
use “B” vent gas pipe or
galvanized pipe with this unit. The pellet pipe is designed to disassemble for cleaning and
should be checked several times during the burning season. Pellet vent pipe is not furnished
with the unit and must be purchased separately. (Contact us at 800-516-3636 for information
on our AC-3000 Through-the-wall kit.)
Do not install a flue damper of any kind in this
system and do not connect this unit to a flue system serving another heating
appliance.
Through the Wall
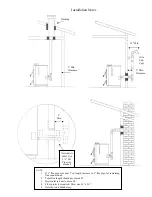
To vent the unit through a wall, connect the pipe adapter to the exhaust motor adapter. If
the exhaust adapter is at least eighteen inches (18”) above ground level, a straight section of
pellet vent pipe can be used through the wall. Your dealer or our factory should be able to
provide you with a kit that will handle most of this installation, which will include a wall thimble
that will allow the proper clearance through a combustible wall. Once outside the structure, a
three-inch (3”) clearance should be maintained to the outside wall and a clean out tee should
be placed on the pipe that extends through the wall. We recommend a minimum of three feet
(3’) of vertical pipe with a 90-degree turn away from the house. At this point a one-foot (1’)
section should be added with a horizontal cap which would complete the installation.
Содержание 25-PAF
Страница 16: ...Pellet Stove Exploded View...
Страница 18: ......


