WARN INDUSTRIES
PAGE 6
61584 Rev C0
WINCH-CARRIER PLATE INSTALLATION:
1.
Attach the WARN winch and the associated fairlead to the WINCH-CARRIER PLATE, using the
fasteners that were included with the winch. Make sure that the 5/16-18 bolts that attach the winch to the
WINCH-CARRIER PLATE are torque to approximately 20 ft-lbs.
2.
Install the WINCH-CARRIER PLATE into the rear-receiver and secure with a HITCH-PIN and CLIP.
CAUTION:
It is recommended that the winch is stored in the rear-receiver when it is not in use. It has been
determined that the winch is less likely to be damaged while it is stored in the rear than in the front
receiver. This is because the winch tends to “stick-out” and is not as protected as in the permanently-
mounted-winch systems.
CONTACTOR INSTALLATION:
3.
It is recommended that you install the contactor in a dry and clean location on the bike. The best
location would be inside the rear storage box or under the seat, away from dirt and rain.
4.
Refer to the
WINCH OPERATOR’S MANUAL
for remote socket installation.
5.
Before proceeding, refer to the
WINCH OPERATOR’S MANUAL
for contactor installation. After the
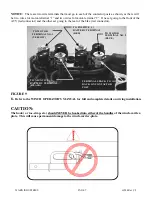
wiring has been properly routed through the ATV, the wires going to the contactor must be installed a
certain way. The wires going from the battery to the terminals on the contactor are straightforward, but
the wires going from the red quick-disconnects to the terminals on the contactor must be orientated a
certain way prior to being connected to the contactor (Figure 9). Place the black rubber boot on both
wires (one 48in and the other 96in). The terminals of each of these two wires must be orientated such
that they are “back-to-back” as shown in the Figure 9 below. With the wires positioned as shown, use a
13mm wrench to tighten the terminal bolt. Finally, place the black rubber boot over both terminals and
post.


