background image

©2018 Warn Industries, Inc. WARN® and the WARN logo are trademarks of Warn Industries Inc.

 3 

101677A0

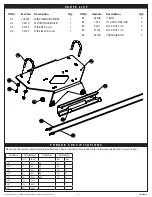
P A R T S   L I S T

ID No.

Item No.

Description

Qty.

A1

102399

WINCH MOUNT PLATE

1

A2

94514

MOUNTING BRACKET

1

A3

95743

WIRE RED 6 GA.

1

A4

95734

WIRE BLACK 6 GA.

1

T O R Q U E   S P E C I F I C A T I O N S

Please use the recommended torque specifications when assembling this product unless otherwise specified in the instructions.

FASTENER SIZE 

FASTENER TORQUE 

FASTENER SIZE 

FASTENER TORQUE 

lb-ft 

(N.m) 

lb-ft 

(N.m) 

1/4" 

8

(11)

M4

(2)

3

5/16" 

17

(23)

M5

(4.5)

6

3/8" 

30

(40)

M6

(7.5)

10

7/16”

48

(66)

M8

(18)

25

1/2" 

74

(100)

M10

(37)

50

9/16”

106

(144)

5/8" 

148

(200)

3/4”

269

(364)

ID No.

Item No.

Description

Qty.

B1

69308

U-BOLT

2

B2

1324

5/16 FLAT WASHER

4

B3

2002

LOCK NUT 5/16

9

B4

91162

LOCK NUT 7/16

2

B5

85749

CARRIAGE BOLT

2

Содержание 101676

Страница 1: ...ndelectricalterminals Alwaysinstallterminalbootsasdirectedininstallationinstructions Alwaysuseappropriateandadequatecareinliftingcomponentsintoplace Alwaysinsurecomponentswillremainsecureduringinstallationandoperation Alwaystightenallnutsandboltssecurely pertheinstallationinstructions Alwaysperformregularinspectionsandmaintenanceontheplowmechanism fasteners cableandrelatedhardware Alwaysreplaceall...

Страница 2: ...rmedications Read installation and operating instructions thoroughly T A B L E O F C O N T E N T S Tools Required page 2 Torque Specifications page 3 Parts List page 3 Installation page 4 6 Maintenance Care page 6 T O O L S R E Q U I R E D Standard and Metric wrenches Standard and Metric sockets N O T I C E EQUIPMENT DAMAGE Nevertowvehiclebyattachingatowbartotheeyeletsonthebumper Neverattachtowbar...

Страница 3: ...O N S Please use the recommended torque specifications when assembling this product unless otherwise specified in the instructions FASTENERSIZE FASTENERTORQUE FASTENERSIZE FASTENERTORQUE lb ft N m lb ft N m 1 4 8 11 M4 2 3 5 16 17 23 M5 4 5 6 3 8 30 40 M6 7 5 10 7 16 48 66 M8 18 25 1 2 74 100 M10 37 50 9 16 106 144 5 8 148 200 3 4 269 364 ID No Item No Description Qty B1 69308 U BOLT 2 B2 1324 5 1...

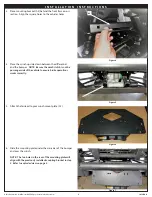
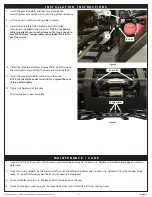
Страница 4: ...emarks ofWarn Industries Inc 4 101677A0 I N S T A L L A T I O N I N S T R U C T I O N S 1 From underneath the bumper remove the three bolts 2 Carefully pull the lower part of the bumper towards you to allow for space Remove Space Figure 3 Figure 2 Figure 1 ...

Страница 5: ...E Be sure the winch clutch is on the passenger side of the vehicle to ensure brake operations works correctly 5 Attach the fairlead to your winch mount plate A1 6 Slide the mounting plate under the cross bar of the bumper and over the winch NOTE The two holes in the rear of the mounting plate will align with the previously installed mounting bracket in step 3 Refer to exploded view on page 3 I N S...

Страница 6: ...g up on the winch plate and pushing the bumper back into place 11 Install the provided u bolts washers and lock nuts NOTE U bolts will be easier to install if you spread the ends of the u bolts slightly 12 Tighten all hardware at this time Your installation is now complete A1 B5 B4 B1 B2 B3 Bumper Bolts M A I N T E N A N C E C A R E 1 Inspect all parts on the winch winch mount and related hardware...

Отзывы: