background image

3

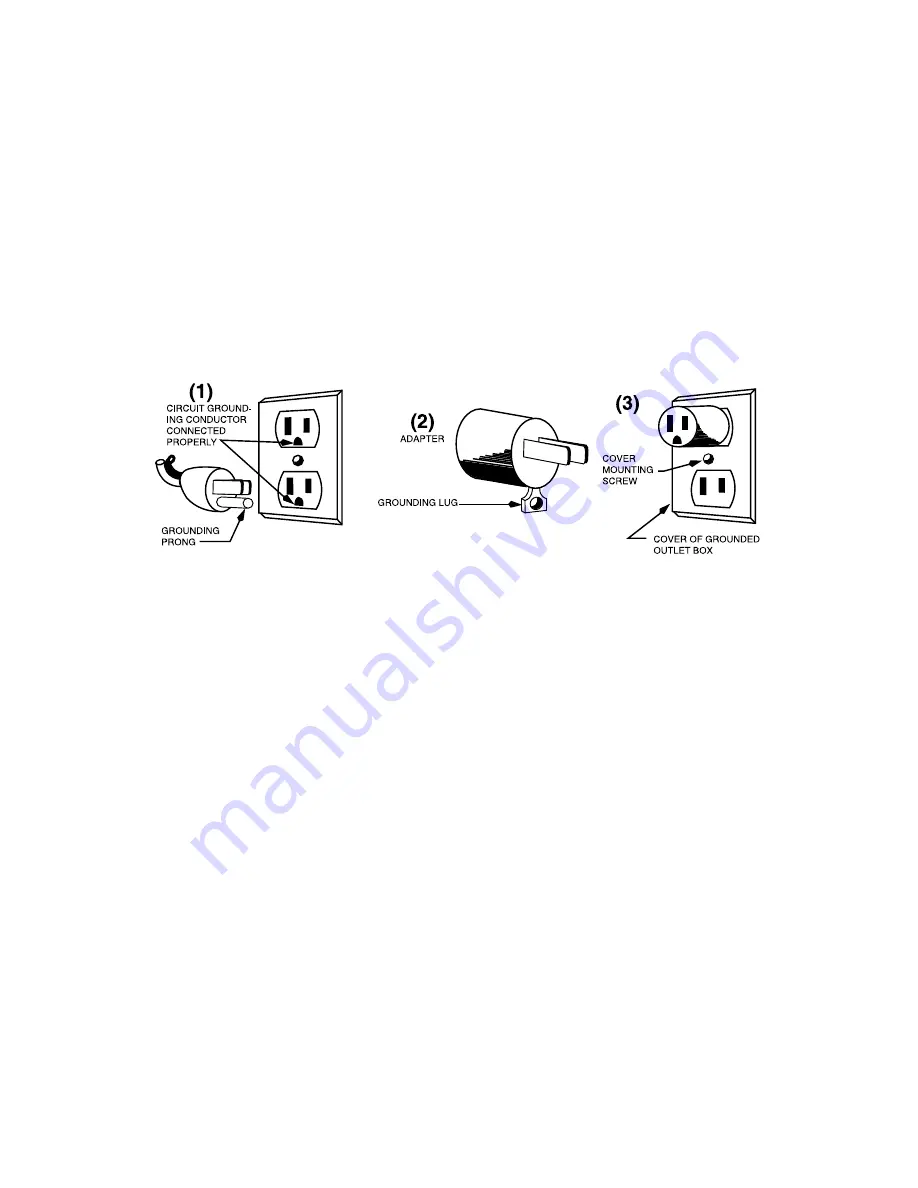
If a grounding type outlet is not available, an adapter, shown in 

Figure 2, may be obtained to enable a 2-slot wall outlet to be 

used with a 3-prong plug.
As shown in Figure 3, the adapter must be grounded by attaching 

its grounding lug under the screw of the outlet cover plate.
CAUTION: Before using an adapter, it must be determined that 

the outlet cover plate screw is properly grounded. If in doubt, 

consult a licensed electrician.
Never use an adapter unless you are sure it is properly grounded.
NOTE: Use of an adapter is not permitted in Canada.

HOW TO USE YOUR  

WARING

®

 COMMERCIAL DRINK MIXER

Each spindle on your Waring

®

 Commercial Drink Mixer has 

its own independent 1 peak HP motor. Your new Waring

®


Commercial Drink Mixer has an automatic ON/OFF switch 

(actuator) located behind the front tab of each upper cup support 

that starts the motor when the mixing cup is placed in the proper 

position on the lower cup support. The cup support has two 

steps. To activate the automatic ON/OFF switch, the bottom of 

the mixing cup must be securely resting on the upper step of the 

cup support and the top rim of the mixing cup must go behind 

the front tab of the upper cup support.
The motor will continue to operate while the mixing cup remains 

on the mixer, activating the actuator.  
Removal of the mixing cup will shut off the motor.
The 3-speed switch on top of the Waring

®

 Commercial Drink 

Mixer regulates the operating speed. Choose either LO (I), MED 

(II), or HI (III) speed. For mixing heavy drinks, use HI (III) speed 

only; for light drinks with more liquid, use LO (I) speed.

Содержание WDM240

Страница 1: ...nued enjoyment of this product always read the instruction book carefully before using Para su seguridad y para disfrutar plenamente de este producto siempre lea las instrucciones cuidadosamente antes...

Страница 2: ...void contact with moving parts 7 Do not operate the Waring Commercial Drink Mixer or any other electrical equipment with a damaged cord or plug or after the unit malfunctions or is dropped or damaged...

Страница 3: ...P motor Your new Waring Commercial Drink Mixer has an automatic ON OFF switch actuator located behind the front tab of each upper cup support that starts the motor when the mixing cup is placed in the...

Страница 4: ...IMER UNIT INSTRUCTIONS To operate your drink mixer with the timer you must follow the following instructions 1 When plugging in the unit the timer s will automatically read R0 00 2 NOTE To turn the ti...

Страница 5: ...s This will become your set time NOTE If cup is placed back on unit to re actuate before the 10 second setting time has elapsed the counter will continue to count up 4 The timer will begin to count do...

Страница 6: ...simply push each support up then pull out towards you 4 To remove the upper cup supports D firmly hold the notches on both sides of the support then pull directly out from the base 5 Wash rinse and s...

Страница 7: ...acteria buildup Surfaces of the mixer housing that are outside of the food contact areas may be cleaned as required using wiping cloths moistened with cleaning solution rinse water and sanitizing solu...

Страница 8: ...service representative LIMITED ONE YEAR WARRANTY Waring warrants every new Waring Commercial Drink Mixer to be free from defects in material and workmanship for a period of one year from the date of p...

Страница 9: ...ed on Direct Current DC SERVICE Should service on this product in USA or Canada be required at any time call or write to Waring Service Center 314 Ella T Grasso Ave Torrington CT 06790 Tel 1 800 492 7...

Страница 10: ...enir tout risque de choc lectrique ne jamais placer l appareil dans l eau ou tout autre liquide 6 viter tout contact avec les l ments en mouvement 7 Ne pas utiliser l appareil si le cordon d alimentat...

Страница 11: ...adaptateur En cas de doute demander conseil un lectricien Ne jamais utiliser un adaptateur moins qu il ne soit correctement mis la terre REMARQUE L utilisation d un adaptateur comme celui mentionn ci...

Страница 12: ...teur Tenir le haut de la tige et tourner l agitateur dans le sens des aiguilles d une montre pour le desserrer D visser ensuite la vis puis tirer sur l agitateur Installer l autre agitateur serrer la...

Страница 13: ...e fois que l cran affiche R0 00 mettre le gobelet en place L appareil se mettra en route et la minuterie commencera compter 3 Une fois la boisson pr te appuyer sur le bouton pendant 3 secondes Le temp...

Страница 14: ...IL 3 Retirer les supports inf rieurs C en les poussant vers le haut puis en tirant 4 Retirer les supports sup rieurs D en les tenant fermement par les c t s et en tirant 5 Laver rincer et d sinfecter...

Страница 15: ...sinfectante D BRANCHER L APPAREIL AVANT DE NETTOYER LE BO TIER Bien essorer l ponge pour viter que le liquide ne p n tre dans le bo tier Nous recommandons l utilisation d une solution de nettoyage bas...

Страница 16: ...pas t soumis des charges exc dant sa capacit maximale Le moteur de l appareil est sous garantie totale pendant une p riode de trois ans Au titre de cette garantie la division Waring Commercial r pare...

Страница 17: ...7464 Fax 860 496 9017 ou bien adressez vous au service apr s vente le plus proche Les pi ces d tach es pour r parations hors garantie sont galement disponibles l adresse ci dessus Remarque Si l appare...

Страница 18: ...g rese de que los ni os no jueguen con este aparato 5 Para reducir el riesgo de electrocuci n no sumerja el aparato en agua u otro l quido 6 Evite el contacto con las piezas m viles 7 No utilice este...

Страница 19: ...r aseg rese de que la toma de corriente est puesta a tierra Si no est seguro comun quese con un electricista Nunca use un adaptador sin estar seguro de que la toma de corriente est puesta a tierra NOT...

Страница 20: ...motor y gire el agitador en sentido horario para aflojarlo Afloje el tornillo y jale el agitador Instale otro agitador apriete el tornillo y gire el agitador en sentido antihorario para sujetarlo Util...

Страница 21: ...de 10 segundos el temporizador seguir contando 4 El temporizador se pondr en marcha al colocar el vaso en su sitio NOTA El temporizador no funcionar con la funci n de pulso 5 Para cambiar el tiempo pr...

Страница 22: ...luci n desinfectante durante 2 minutos Sacuda las piezas y permita que sequen al aire libre 6 Lave enjuague y desinfecte la parte inferior del bloque motor y la parte superior del eje con una esponja...

Страница 23: ...y soluciones desinfectantes con una concentraci n m nima de cloro de 100 ppm Se podr n usar las soluciones siguientes o sus equivalentes CONSEJOS TILES 1 Siempre desconecte el aparato antes de instal...

Страница 24: ...servicio posventa demuestre defectos de materiales o fabricaci n siempre que el producto se entregue con franqueo pagado a 314 Ella T Grasso Ave Torrington CT 06790 o a cualquier servicio postventa ap...

Страница 25: ...esto para reparaciones fuera de garant a est n disponibles en la misma direcci n Nota Si el aparato ha sido usado para procesar sustancias biol gicamente activas se deber n esterilizar las piezas ante...

Страница 26: ...26 NOTES...

Страница 27: ...27 NOTES...

Страница 28: ...ing Commercial 314 Ella T Grasso Ave Torrington CT 06790 www waringcommercialproducts com Printed in Taiwan Impreso en Taiw n Imprim Ta wan WDM120 WDM240 WDM360 WDM120T WDM240T WDM360T IB 13WC139263 I...

Отзывы: