WANDERS pecan eco l Скачать руководство пользователя страница 25

25

GB

Pecan Eco S 


Pecan Eco M   |   Pecan Eco L

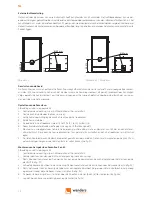
Connecting the stove

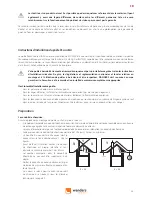
The Pecan Eco is a heavy wood stove. Depending on the version, the Pecan Eco weighs at least 300 kilos, including the 
2-meter long smoke-gas discharge. Make sure the wall or floor that you are installing the stove on can easily carry this weight. 
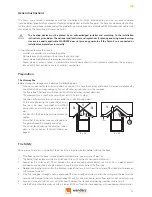
Before installing the stove, follow the directions in the previous chapter ‘Preparation’. Protect your back and the floor during 
installation. 

Setting up the Pecan Eco:

All images can be found on page 55.
1.  Check the packaging, is there any visible damage? If so, report it.
2.  Pull the wood-burning stove out of the box (use the correct lifting procedures and take care not to injure your back).
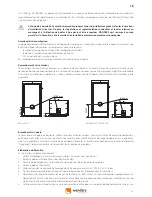
3.  Carefully put the fireplace in the right place, directly under the flue.
4.  Ensure the fireplace is level.
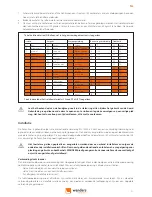
5.  The underpressure in the flue must be 10 to 12 Pa (0.1 to 0.12 mBar).
6.  Take any fire-protective measures that may be necessary (see page 23 “Fire Safety”).
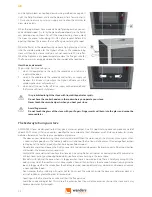
7.  Now install the flue. Use a suitable flue with a diameter of 150 mm and a thickness of at least 2 mm. Remember, a flue can 

expand by up to 1 cm per meter; so ensure the flue is not fitted too tight.

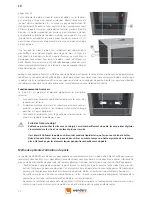
8.  The steel front plate above the door can be removed for convenience. This is held in place with 4 magnets. 2 pin/hole 

connections ensure the plate does not sag (see fig. 01).

Mounting the soapstone on the Pecan Eco S and Pecan Eco M:

All images can be found on page 55.
1.  Check the packaging, is there any visible damage? If so, report it.
2.  Take the soapstone panels out of the box (use the correct lifting procedures and take care not to injure your back).
3.  Place the lower side stones into position. A pin on the bottom plate of the wood-burning stove ensures the stone 

remains in place (see fig. 02).

4.  Screw the headless Allen bolt into the connection. This bolt will be the connection pin for the second stone (see fig. 03).
5.  Place the second stone into position and attach it, also using a headless Allen bolt. Ensure the Allen bolt is screwed in far 

enough to ensure it does not touch the stones above (see fig. 04).

6.  The upper mounting clamp can be adjusted by loosening the 2 bolts in the slotted holes (see fig. 04a).
7.  Gently place the 2 upper stones into position on top of the wood-burning stove (see fig 05).

Assembly of the Pecan Eco L:

All images can be found on page 55 and 56.
The Pecan Eco L is based on the M version of the wood-burning stove. A height extender is put in place as described below. 
First follow the steps for setting up the Pecan Eco M as described above.
1.  Check the packaging, is there any visible damage? If so, report it.
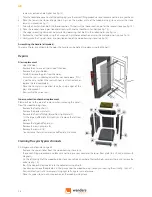
2.  Remove the height extender set from the packaging. This consists of a rack and a front plate (see fig. 06).
3.  Remove the steel front plate above the door. This is held in place with magnets (see fig. 07).
4.  Remove the upper mounting clamps for the soapstone from the wood-burning stove and attach them to the top of the 

height extender set (see fig. 08).

5.  Put the height extender in place on the wood-burning stove. It does not have to be screwed in place (see fig. 09).
6.  Remove the middle mounting clamps used for the soapstone from the wood-burning stove and re-attach them in the 

292,75

96,2

Ø 80 mm

442,75

96,2

Ø 80 mm

Содержание pecan eco l

Страница 1: ...072017_V 1 5 INK 00 7937 S M L Handleiding en installatievoorschriften 2 Users guide and installations manual 15 Mode d emploi et instructions d installation 27 Bedienungsanleitung und Montagevorschr...

Страница 2: ...al 8 Onderhoud 8 Klein onderhoud 8 Buiten gebruikstelling 8 Jaarlijks onderhoud 8 Veiligheid 8 Garantie 9 Algemene aanwijzingen 10 Voorbereiding 10 Het schoorsteenkanaal 10 Brandveiligheid 10 Installa...

Страница 3: ...deingebruiknamevanuwhoutkacheldezehandleidingzorgvuldigtelezenenvervolgensgoedtebewaren Uw installateur kan deze handleiding nodig hebben voor het jaarlijkse onderhoud van uw haard Wij wensen u veel w...

Страница 4: ...lijk geldende voorschriften Een erkende installateur kan u ook het juiste advies geven over het rookkanaal waarop de haard moet worden aangesloten Aansluiten van houtkachels door onbevoegden is verbod...

Страница 5: ...ken met stoken in een nieuwbouwwoning die recent is opgeleverd of een ruimte die onlangs sterk is gerenoveerd In muren en plafonds zitten dan nog gassen weekmakers en vocht afkomstig van stuc en schil...

Страница 6: ...elt door de hoge hitte de paraffine te snel uit de houtblokken De vervuilde rookgassen die hierdoor ontstaan slaan direct neer op het glas van de kacheldeur branden in het glas en zijn dan niet meer t...

Страница 7: ...t glas van de kachel niet met de vingers aanraakt Vingerafdrukken branden in het glas en zijn daarna niet meer te verwijderen Het is verboden om met vloeibare middelen zoals benzine en spiritus de kac...

Страница 8: ...w rookkanaal Onderhoud Klein onderhoud Wij adviseren u om een laagje as van twee tot drie centimeter te laten liggen Zo beschermt u de stookplaat Verwijder 2 3 keer per week de afgekoelde as uit de ka...

Страница 9: ...controleren of er zichtbare schade is aan het toestel In dat geval moet u het toestel niet accepteren maar contact opnemen met uw leverancier Buiten de garantie vallen het glas storingen ontstaan doo...

Страница 10: ...nt zonder omwegen te worden aangesloten op het schoorsteenkanaal De onderdruk in het schoorsteenkanaal moet minimaal 12 Pa of 0 12 mbar zijn Hetschoorsteenkanaalmoetaltijdinuitmondingsgebied 1 uit kom...

Страница 11: ...en regelgeving voor plaatsing en gebruik van houtkachels WANDERS biedt geen garantie wanneer de Pecan Eco onvolledig of onjuist is aangesloten of ge nstalleerd Verbrandingslucht toevoer De haard dien...

Страница 12: ...haard waterpas 5 De onderdruk in het rookkanaal moet 10 to 12 Pa 0 1 tot 0 12 mBar zijn 6 Neem brandbeschermende maatregelen zie pagina 10 Brandveiligheid 7 Monteer nu uw rookgasafvoer Gebruik hiervoo...

Страница 13: ...zie fig 12 10 Plaats de tweede steen en bevestig deze ook met een koploze inbusbout zie fig 13 11 De bovenste bevestingsklem is te stellen door de 2 bouten in de sleufgaten iets los te draaien zie fig...

Страница 14: ...en rechts een aantal vlinderbouten draai deze los en verwijder de klep zie fig 15 Veeg met een borstel de aanwezige aanslag naar beneden in de opvangbakjes In de ruimte onder de kachel kunt u nu de op...

Страница 15: ...burn your stove 20 Chimney and flue 21 Maintenance 21 Small maintenance 21 Decommissioning 21 Annual maintenance 21 Safety 21 Guarantee 22 General instructions 23 Preparation 23 The chimney flue 23 Fi...

Страница 16: ...f the stove They are of particular importance to the installer We advise you to read this manual thoroughly before using your new stove and to keep the manual in a handy place Your installer may need...

Страница 17: ...tions A certified installer can also give you the right advice about the flue tube to which the stove must be connected Connecting wood burning stoves by unqualified persons is prohibited in which cas...

Страница 18: ...ouse or recently renovated It is advisable to wait six weeks before lighting the stove in a newly built house that has recently been completed or in a space that has recently been renovated drasticall...

Страница 19: ...polluted flue gasses which consequently develop will deposit on and burn in the glass of your stove and cannot be removed later Do not use any wood that is painted impregnated glued together or proce...

Страница 20: ...s Finger marks will burn into the glass and cannot be removed later The best way to burn your stove All WANDERS stoves are designed so that they give a maximum output A well lit wood burning stove can...

Страница 21: ...terior of the stove with a damp cloth that does not give off fluff Do not use any aggressive cleansing agents or abrasives Clean the cold glass pane with a cleaning agent for ceramic cooking rings Do...

Страница 22: ...t the fireplace but contact your supplier The following items are not covered by the guarantee the glass faults caused by improper use non compliance with national regulations and the accompanying ins...

Страница 23: ...with the chimney without diversions The underpressure in the chimney must be at least 12 Pa or 0 12 mbar The chimney flue must always end up in outlet area 1 see drawing below At the time of placing t...

Страница 24: ...re is a cooker hood in the same space The air supply opening must be closable if it goes through a fire resistant wall When there are several combustion devices in the same space there must be enough...

Страница 25: ...apstone panels out of the box use the correct lifting procedures and take care not to injure your back 3 Place the lower side stones into position A pin on the bottom plate of the wood burning stove e...

Страница 26: ...ose If this is not the case reattach the seal with heat resistant sealant or replace the seal completely Place the new glass in position take the sharp edges of the glass into account Reassemble the v...

Страница 27: ...tion du po le 32 Chemin e et conduit de chemin e 33 Entretien 33 Petit entretien 33 Mise hors service 33 Maintenance annuelle 33 S curit 34 Garantie 34 Instructions d installation du po le Pecan Eco 3...

Страница 28: ...t une source de chaleur confortable qui vous donnera beaucoup de plaisir pendant de longues ann es Ce po le bois a t con u tout sp cialement pour r pondre aux exigences d un emploi ais de la s curit e...

Страница 29: ...illera aussi sur le conduit de chemin e auquel votre po le devra tre raccord Le raccordement des po les bois par une personne non agr e est fortement d conseill Dans ce cas nous ne garantissons pas le...

Страница 30: ...ent plus tre enlev es par la suite Maison neuve ou r novation r cente Attendez six semaines avant d allumer votre appareil de chauffage dans une maison neuve r cemment livr e ou dans une pi ce qui a t...

Страница 31: ...aussi par le bas et vite le contact des b ches avec l eau Les b ches contenant de la paraffine sont proscrire dans le po le car apr s la fermeture de la porte la paraffine se s parerait des b ches en...

Страница 32: ...les prises d air secondaire et tertiaire 2 En position m diane les prises d air secondaire et tertiaire sont mi ouvertes le po le est alors son rendement maximal et le lavage des vitres est le plus p...

Страница 33: ...eau l air dans la chemin e De m me le brouillard frais et relativement lourd peut contrarier le bon tirage de votre chemin e tout comme un long conduit de chemin e dont la paroi est rugueuse et avec d...

Страница 34: ...pi ces d origine Garantie l achat de votre po le bois le fabricant de produits en m tal WANDERS situ s Netterden vous propose une garantie de 5 ans compter de la date d achat condition que le po le s...

Страница 35: ...re incompl te ou inappropri e Il est interdit d installer votre po le Dans les galeries ou couloirs accessibles au public Dans les cages d escalier sauf dans les immeubles ne comportant pas plus de d...

Страница 36: ...ne puissent pas y causer des d g ts L espace non combustible autour du po le doit tre un cercle ayant un rayon d au moins 65 cm partir du centre du po le Si le sol est en bois vous devez y poser une...

Страница 37: ...e Si le canal a une longueur sup rieure 1 m tre y compris une courbe de 90 degr s alors le diam tre du canal devra tre augment Pecan Eco S Pecan Eco M Pecan Eco L Branchement du po le Le Pecan Eco est...

Страница 38: ...fix e avec des aimants voir fig 07 5 Retirez les attaches de fixation sup rieures devant la st atite du po le et montez les sur le dessus du kit de montage voir fig 08 6 Mettez la structure sur le po...

Страница 39: ...ection des gaz de combustion Les illustrations se trouvent en page 58 Enlevez les pierres sup rieures du po le songez au poids et la plaque frontale inf rieure elle est attach e avec des aimants Au de...

Страница 40: ...40 FR...

Страница 41: ...47 Kleine Wartung 47 Auser Gebrauchnahme 47 J hrliche Wartung 47 Sicherheit 48 Garantie 48 Allgemeine Anweisungen 49 Vorbereitung 49 Der Rauchabzugskanal 49 Brandschutzvorrichtung 49 Installation 50...

Страница 42: ...lem f r den Installateur wichtig VorGebrauchIhresHolzofensbittenwirSiedieGebrauchsanweisungsorgf ltigzulesenundSiedanngutzubewahren IhrInstallateur braucht vielleicht diese Anleitung f r die j hrliche...

Страница 43: ...auchabzugskanal an welchen der Ofen angeschlossen werden muss Der Anschluss der Holz fen durch Unbefugte ist verboten In dem Fall k nnen wir Ihnen die gute Funktion des Pecan Eco Ofens nicht garantier...

Страница 44: ...Feuchtigkeit von den Stuck und Malerarbeiten Durch die warmen Luftstr me k nnen sich die vielen Staubteilchen im Raum verf rben und sich auf W nde und Decken festsetzen Auch die noch vorhandene Feuch...

Страница 45: ...on unten trocknen und bleiben die untersten Holzbl cke vor Wassereinwirkung gesch tzt Benutzen Sie in Ihrem Ofen keine Holzbl cke die Paraffin enthalten Wenn die Ofent r geschlossen ist schmilztdasPar...

Страница 46: ...Ofen brennt jetzt mit dem h chsten W rmeertrag und die Scheibensp lung funktioniert optimal 3 Vollst ndig nach links geschoben alle ffnungen geschlossen der Ofen wird jetzt allm hlich erl schen Achten...

Страница 47: ...So kann auch eine relativ schwere Nebelluft den guten Zug im Schornstein hemmen Auch ein zu langer Rauchkanal mit rauer Oberfl che und zu vielen Biegungen ergibt diese Wirkung Bei einem nat rlich sch...

Страница 48: ...eue Teile Arbeitslohn und andere Kosten fallen nicht unter die Garantie Defekte Teile k nnen portofrei an die WANDERS Metaalproducten B V Amtweg 4 7077 AL Netterden Niederlande geschickt werden Bevor...

Страница 49: ...werden Eventuell vorhandene Ventile m ssen entfernt werden Der Rauchgasabzug des Ofens muss ohne Umwege direkt an den Rauchgaszugskanal angeschlossen werden Der Unterdruck im Rauchabzugskanal muss mi...

Страница 50: ...n darf nur durch einen anerkannten Installateur und gem den unten beschriebenen Installationsvorschriften montiert werden Dabei m ssen auch die nationalen und rtlichen Gesetze und Vorschriften f r Ins...

Страница 51: ...ldungen finden Sie auf Seite 55 1 Kontrollieren Sie die Verpackung auf sichtbare Besch digungen Bitte melden Sie alle Besch digungen 2 Nehmen Sie den Ofen aus dem Karton bitte denken Sie an Ihren R ck...

Страница 52: ...en Sie diese ein Loch h her auf dieselbe Weise s Abb 10 7 Nehmen Sie die Specksteinplatten vorsichtig aus der Verpackung bitte denken Sie an Ihren R cken 8 Setzen Sie die untersten Seitensteine in ihr...

Страница 53: ...chfang Umleitungskan le Abbildungen finden Sie auf Seite 58 Entfernen Sie die obersten Steinplatten vom Ofen Achtung schwer und die unterste Frontplatte Diese Platte ist mit Magneten befestigt Oben au...

Страница 54: ...54 DE...

Страница 55: ...55 fig 01 fig 02 fig 03 fig 04 fig 05 fig 04a...

Страница 56: ...56 fig 07 fig 11 fig 08 fig 09 fig 10 fig 06...

Страница 57: ...57 fig 14 fig 12 fig 13 fig 13a...

Страница 58: ...58 fig 15 fig 16 fig 17...

Страница 59: ...Maattekeningen Zeichnungen Pecan Eco S 290 kg Pecan Eco M 310 kg Pecan Eco L 350 kg 1060 455 481 5 164 5 150 460 5 305 574 1206 455 481 5 164 5 1 5 0 574 460 5 305 150 164 5 1493 455 481 5 460 5 305 5...

Страница 60: ...0902 Pecan Eco INK 00 0903 Pecan Eco INK 00 0904 Pecan Eco INK 00 0905 Pecan Eco INK 00 0901 2 x Pecan Eco INK 6922 10 mm hollow INK 6921 10 x 3 mm selfadhesive INK 6926 15 x 3 mm selfadhesive INK 00...

Страница 61: ...61 Top down OND 0170 optional Alluminium grip...

Страница 62: ...mbre maximum Maximal einlegen 2 pcs Primaire lucht Primary air Air primaire Prim re Luft max Secundaire lucht Secundairy air Air secondaire Sekund re Luft max Brandtijd brandstof Burning period fuel D...

Страница 63: ...n cover To minimize the chance of cracks in stucco and discolouration we refer to the advice given for decorative hearths Your installer can give you more information Any complaints will be dealt with...

Страница 64: ...4 Fax 31 0 315 386 201 info wanders nl www wanders nl Wanders_fires www facebook com Wandersfiresstoves Type en zetfouten voorbehouden Wanders fires stoves is een onderdeel van de Wanders Groep 2017 W...

Отзывы: