background image

28

GB

having been improperly installed in the fi rst place. Another option is that someone may knock into the glass at some point, 
not cracking it, but weakening it all the same. A crack can then form days or weeks later, depending on how frequently the 
fi replace is used.

Replacing the front window

• 

To replace the front window, complete the steps on pages 24 to open the fi replace.

• 

Now remove the window and replace it with a new one – only ever use original replacement parts! Please be careful, as the 
edge of the glass is sharp.

Replacing the side window

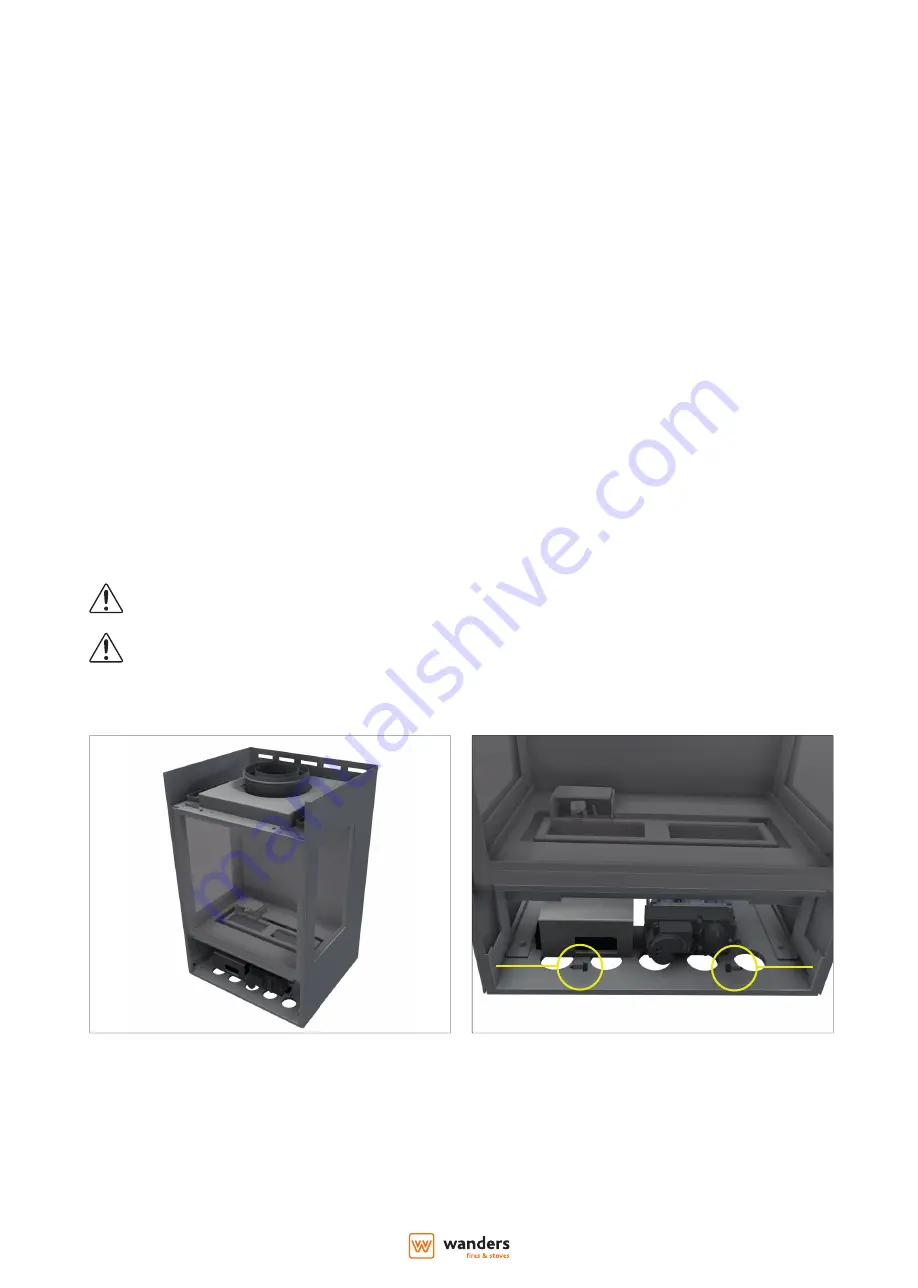
To replace the side window, you need to remove the entire fi replace mantle. If your fi replace is wall-mounted, this will involve 
taking it down from the wall. When doing so, mind your back, and make sure to properly protect the fl oor that you rest the 
fi replace on.
• 

Remove the top plate, which will also mean removing the fi rst segment of the fl ue pipe. 

• 

Remove the front plate as outlined on page 24.

• 

At the bottom left and right corners are 2 bolts that you will need to remove.

• 

There are also 4 bolts on the back that you will need to remove.

• 

The mantle is now loose and can be slid upwards, off  of the fi replace.

• 

The windows are attached with two clamps, 1 on the top, and 1 on the bottom.

• 

Completely unscrew the top clamp and remove it. 

• 

Merely loosen the bottom clamp slightly. 

• 

Now remove the window and replace it with a new one – only ever use original replacement parts! Please be careful, as the 
edge of the glass is sharp.

Make sure to leave no fi nger marks on the cleaned glass pane when you close the appliance door. Finger marks 
leave stains which will burn in the glass.

Ensure that the door is closed properly before using the fi replace

Содержание Onyx Series

Страница 1: ...INK 00 7946 Handleiding en installatievoorschriften 2 Users guide and installations manual 16 Mode d emploi et instructions d installation 30 Bedienungsanleitung und Montagevorschriften 44 Onyx Wall...

Страница 2: ...derhoud van uw gaskachel Wij wensen u veel warmte met uw aanschaf Het Team van WANDERS Het toestel mag niet gebruikt worden zonder glas Het is niet toegestaan om brandbare stoffen op de keramische hou...

Страница 3: ...al 7 Voorschriften voor het plaatsen van de uitmonding 7 Opstellingsmogelijkheden kanalensysteem 8 Geveldoorvoer type C11 8 Dakdoorvoer type C31 8 Eerst het pijpensysteem aanbrengen dan het toestel pl...

Страница 4: ...zet de plaat voorzichtig aan de kant de ontvanger zit in een beschermende kap tegen de hitte Hier vindt u het gasregelblok type Mertik GV60 M1 C5D3KL en de ontvanger type Mertik GV60 R4AU Instellen va...

Страница 5: ...aan de binnenzijde van de deur Nieuwbouwwoning of recente renovatie Wacht zes weken met stoken in een nieuwbouwwoning die recent is opgeleverd of een ruimte die onlangs sterk is gerenoveerd In muren e...

Страница 6: ...of onjuist is aangesloten en of ge nstalleerd Het kanalensysteem bestaat uit een binnenkanaal met een diameter van 100 millimeter en een buitenkanaal van 150 millimeter De rookgassen worden door natu...

Страница 7: ...em 100 mm 150 mm is toe te passen bij nieuwbouw of bij een bestaand rookkanaal Beugelen van het kanaal Zet het concentrisch systeem vast met voldoende goed gekeurde bevestigingsbeugels zodat het gewic...

Страница 8: ...verder een afstand aan van minimaal 5 centimeter tussen de buitenkant van de concentrische pijp en wand of plafond Start altijd met 1 meter verticaal Let vooral op een juiste montage als door bouwkun...

Страница 9: ...40 mm Propaan Butaan 1 0 3 0 m 1 0 2 0 m alle maten zijn exclusief de lengte van de muurdoorvoer alle maten zijn exclusief de lengte van de dakdoorvoer Gassoort B min max A1 min max A1 A2 min max Stu...

Страница 10: ...et binnenwerk denk aan het gewicht van de plaat zet de plaat voorzichtig aan de kant draai de bouten van de glasstrip boven los en verwijder de strip draai de bouten van de onderste glasstrip alleen i...

Страница 11: ...agina 9 in de bovenzijde van de verbrandingskamer te monteren De standaard doorlaat voor de rookgassen is 100 mm Zorg ervoor dat de stuw juist gemonteerd wordt Montage van de stuw in een foutieve situ...

Страница 12: ...u alleen vervangen door dezelfde soort blokken van WANDERS Voorkom dat een blok voor de waakvlam komt te liggen De hoofdbrander kan dan niet gaan branden en onverbrand gas kan zich verzamelen in de ka...

Страница 13: ...dat er in een onbewaakt moment een keer tegen aan gestoten is Dit hoeft niet direct tot een breuk te lijden maar kan het glas wel verzwakken De breuk kan dagen weken later ontstaan afhankelijk van hoe...

Страница 14: ...en zich 4 bouten die u moet verwijderen De mantel is nu vrij en kan naar boven toe van de kachel geschoven worden De ruiten zitten met 2 glasklemmen vast 1 boven en 1 onder Draai de bovenste helemaal...

Страница 15: ...15 NL...

Страница 16: ...table source of heat to enjoy for many years on end Your gas hearth is fitted with a so called closed system double walled flue The flue gases are directly discharged through the inner flue The outer...

Страница 17: ...1 Instructions for placing the outflow 21 Placing possibilities for the pipe system 22 Wall outlet type C11 22 Roof outlet type C31 22 Placing the pipe system first and then placing the hearth 24 Open...

Страница 18: ...ate Carefully put the front plate off to the side The receiver has a protective hood to shield it from the heat Here you will find the gas control unit Mertik GV60 M1 C5D3KL and the receiver Mertik GB...

Страница 19: ...ppliance in a newly built house that has recently been delivered or in a space that has recently been drastically renovated The walls and ceilings still contain gases softeners and moist from plasterw...

Страница 20: ...concentric channel system recommended by WANDERS M G or Ontop Metaloterm Only then will the fireplace be approved in accordance with the European CE directive for appliances burning gaseous fuels We d...

Страница 21: ...entric channel system 100 mm 150 mm can be used in new construction as well as existing chimneys Bracketing the channel Secure the concentric system with several approved mounting brackets so that the...

Страница 22: ...istance of at least 5 centimetres between the outer wall of the concentric pipe and the ceiling Always start with 1 meter vertical Pay special attention to proper installing when due to circumstances...

Страница 23: ...40 mm Propane Butane 1 0 3 0 m 1 0 2 0 m all dimensions are exclusive the length of the wall outlet all dimensions are exclusive the length of the roof outlet Gastype B min max A1 min max A1 A2 min m...

Страница 24: ...te off to the side Unscrew the bolts on the window strip at the top and remove the strip Merely loosen the bolts on the bottom window strip no need to remove the clamps The window is now loose and can...

Страница 25: ...r of 35 mm 50 mm 60 mm or 80 mm according to the tables on page 23 must be installed in the top of the combustion chamber The standard culvert for the flue gases is 100 mm Ensure that the reducer is p...

Страница 26: ...fingers Finger marks burn in the glass It is prohibited to add any extra ceramic wooden logs or other materials to the log set Using vermiculite granules on the MAIN burner is prohibited It will prev...

Страница 27: ...across logs 04 and 01 Then place log 05 diagonally across logs 03 and 04 followed by log 06 across logs 04 and 02 Finally place log 07 across logs 04 and 08 Repairs Fireplace windows are made out of c...

Страница 28: ...ke sure to properly protect the floor that you rest the fireplace on Remove the top plate which will also mean removing the first segment of the flue pipe Remove the front plate as outlined on page 24...

Страница 29: ...29 GB...

Страница 30: ...ts locaux et nationaux en vigueur Cher client Nous vous f licitons pour l acquisition de votre nouveau po le gaz de WANDERS C est une source de chaleur confortable qui vous donnera beaucoup de plaisir...

Страница 31: ...embouchure 35 Fixer le canal 35 Possibilit s d installation du syst me de canalisation 36 Sortie de fa ade type C11 36 Sortie de toit type C31 37 Installation du syst me de conduits avant celle de l...

Страница 32: ...aution la plaque de c t Le r cepteur se trouve dans un capuchon qui le prot ge contre la chaleur Vous trouverez ici le bloc de gaz type Mertik GV60 M1 C5D3KL et le r cepteur type Mertik GV60 R4AU 1 R...

Страница 33: ...command de laisser la veilleuse allum e pendant la p riode de chau age Ainsi vous vitez une ventuelle condensation et de possibles traces de calcaire l int rieur de la porte vitr e Maison neuve ou r n...

Страница 34: ...de garantie se trouvent la page 83 Consignes d installation Votre foyer au gaz peut uniquement tre install par un installateur comp tent et en combinaison avec le syst me de canalisations concentriqu...

Страница 35: ...raccorder l appareil Eviter les pressions sur le robinet et les conduits Elles pourraient causer des fuites Contr ler l tanch it au gaz des raccords Mise en place du syst me de canalisation concentri...

Страница 36: ...n Aussi apr s montage l ensemble du syst me de canalisation concentrique doit tre envelopp entre l endroit o celui ci dispara t de la vue et la sortie de parois en mat riau ignifuge Ventilez cet ensem...

Страница 37: ...fixez les colliers de serrage Calculez la longueur des conduits n cessaires et veillez ce que la plaque adh sive ou la tuile universelle adh re bien la toiture Sciez le conduit ext rieur la bonne lon...

Страница 38: ...conduit sur l appareil doit tre coulissant Ouvrir et fermer le po le Pour placer les b ches avec apparence de bois et l ventuel orifice de restriction il faut ouvrir le po le A cet effet il faut parco...

Страница 39: ...st pas permis d utiliser placer des mat riaux inflammables tels que des rideaux proximit de l appareil Pour les distances minimales reportez vous aux pages 58 60 L installation du foyer debout L appar...

Страница 40: ...iliser placer des mat riaux inflammables tels que des rideaux proximit de l appareil La distance de s curit minimale est 1 5 m Veillez l installation correcte de la plaque de propulsion Son installati...

Страница 41: ...autres mat riaux au jeu de b ches L utilisation de grains de vermicullet est interdite sur le br leur MAIN Le po le ne fonctionnerait pas correctement et cela causeraitdesd g tsirr parables Lesb chesd...

Страница 42: ...e verre et placer une vitre de remplacement originale Attention le verre est tranchant Remplacer la vitre lat rale Pour remplacer la vitre lat rale il faut retirer le manteau complet du foyer Cela veu...

Страница 43: ...R Faire bien attention ne plus toucher le verre nettoy des doigts lorsque vous le replacez Les empreintes digitales se br lent dans le verre Veiller replacer correctement la porte avant d allumer le p...

Страница 44: ...f rdie richtigeundsicherArtIhrenGasheizofen zu benutzen Im zweiten Teil finden Sie die Aufbauvorschriften und technische Spezifikationen des Kaminofens Diese sind vor allem f r den Installateur wicht...

Страница 45: ...orschriften zur Installation der Ausm ndung 50 Aufstellungsm glichkeiten des Kanalsystems 50 Mauerdurchf hrung Typ C11 50 Dachdurchf hrung Typ C31 51 Erst das Rohrsystem anbringen dann das Ger t aufst...

Страница 46: ...atte Platte vorsichtig beiseite legen Der Empf nger befindet sich in einer Schutzkappe gegen die W rme HierfindenSiedenGasregelblock TypMertikGV60 M1C5D3KL unddenEmpf nger Typ Mertik GV60 R4AU Einstel...

Страница 47: ...st es ratsam die Z ndflamme brennen zu lassen Das verhindert eventuelle Bildung von Kondensation und m gliche Kalkspuren auf der Innenseite der T r Neubauwohnung oder rezente Renovierung WartenSiemitH...

Страница 48: ...nstallationsvorschriften Ihr Gasofen darf nur von einem autorisierten Installateur und in Kombination mit dem konzentrischen Kanalsystem installiert werden dasvonM GoderMetalotermempfohlenwird Erstdan...

Страница 49: ...sshahn mit Kupplung L ften Sie die Zufuhrleitung bevor sie am Ger t fest gekuppelt wird Vermeiden Sie Spannungen auf dem Bedienungshahn und den Leitungen Dies gibt Anleitung zu Gas Lecks Den Anschluss...

Страница 50: ...chnet F r einen Winkel von 45 Grad wird 1 Meter berechnet F r die gesamte kombinierte Rauchgasabzug und Luftzufuhr zur Verbrennung m ssen Sie eines der folgenden Aufstellungsm glichkeiten des konzentr...

Страница 51: ...inem verstellbaren Dachziegel f r schr ges Dach oder mit einer Klebeplatte f r Flachdach geliefert Legen Sie die Stelle f r das Ger t und die Dachdurchfuhr fest Machen Sie f r die Dachdurchfuhr ein Lo...

Страница 52: ...it einem einzuschiebenden Rohr machen nen und Schlie en des Ofens Um das Holz Set und eine eventuelle Beschr nkungsblech aufzustellen muss der Ofen ge ffnet werden F hren Sie dazu die folgenden Schrit...

Страница 53: ...BeideVarianten des Sockels werden mit 4 Schrauben M6 die von unten in den Ofen geschraubt werden k nnen befestigt Es d rfen sich keine entflammbaren Materialien wie z B Vorh nge in der N he des Ofens...

Страница 54: ...und der Brenner gut z nden kann Sorgen Sie daf r dass die Scheibe richtig geschlossen wird bevor Sie den Kamin z nden Bei Propan Ausf hrung KEINE Dekoration auf den Brenner legen Beim Einrichten des K...

Страница 55: ...ch dieselbe Art Bl cke von WANDERS ersetzt werden Achten Sie darauf dass die T r geschlossen wird bevor Sie den Ofen in Betrieb nehmen Vermeiden Sie dass ein Block vor der Z ndflamme liegt Der Hauptbr...

Страница 56: ...en Zum Auswechseln der Frontscheibe befolgen Sie die Schritte auf Seite 52 zum ffnen des Ofens Sie k nnen nun die Scheibe entfernen und eine Original Ersatzscheibe einsetzen Achtung Das Glas ist schar...

Страница 57: ...dass Sie das gereinigte Fenster nicht mehr mit den Fingern anfassen wenn Sie die Ofent r schlie en Fingerabdr cke brennen in das Glas ein Achten Sie darauf dass die T r geschlossen wird bevor Sie den...

Страница 58: ...18 156 187 305 205 443 194 33 85 174 207 195 25 65 90 10 20 100 150 382 Maten Dimensions Les dimensions Abmessungen 500 mm 500 mm 1000 mm 500 mm 500 mm 500 mm 500 mm 1000 mm 1000 mm Minimum advised he...

Страница 59: ...300 327 442 397 150 180 199 118 300 180 113 180 254 262 150 360 390 25 194 85 297 860 100 150 500 mm 500 mm 1000 mm 500 mm 500 mm 500 mm 500 mm 1000 mm 1000 mm Minimum advised hearth dimensions where...

Страница 60: ...300 327 118 484 180 304 221 300 180 118 113 343 180 85 194 337 25 390 902 100 150 500 mm 500 mm 1000 mm Minimum advised hearth dimensions where applicable 590 x 593 x 12 mm 500 mm 500 mm 500 mm 500 mm...

Страница 61: ...r 2 1 0 557 m3 h GB G20 I2H 20 mbar 5 3 kW 11 5 mbar 2 1 0 557 m3 h PT G20 I2H 20 mbar 5 3 kW 11 5 mbar 2 1 0 557 m3 h ES G20 I2H 20 mbar 5 3 kW 11 5 mbar 2 1 0 557 m3 h DK G20 I2H 20 mbar 5 3 kW 11 5...

Страница 62: ...INK 3252 Mertik G6R H4TV4 INK 3253 Mertik G6R R4AU GAS 20 3257 Mertik G60 ZKIS1 500 INK 3256 Mertik G6R C5 INK 3270 Mertik G60 ZMA3 INK 4089 Mertik G30 ZPT600A GLA 00 0836 200 x 320 x 4 mm ceramic gl...

Страница 63: ...den The Netherlands 31 0 315 386 414 info wanders nl www wanders com Bedieningshandleiding Usersinstructions Mode d emploi Bedienungsanleitung GV60 afstandsbediening remote t l commandes Fernbedienung...

Страница 64: ...64 Setup setup configuration Einrichtung R R...

Страница 65: ...e der Batterien kann auch ein Netzteil benutzt werden Ohne Netzteil wird ein Batteriewechsel zu Be ginn jeder Heizperio de empfohlen Fr quence radio 433 92 MHz pour l Europe Piles t l commande 1 x 9 V...

Страница 66: ...nger nicht nochmals vorgenommen werden Premi re utilisation uniquement 1 Appuyer sur le bouton de r initialisation du r cepteur jusqu ce que deux 2 bips re tentissent Le premier bip est plus court et...

Страница 67: ...aste EIN AUS falls vorhanden in I Position EIN HINWEIS When the pilot ignition is confirmed the motor runs automatically to the maximum flame height WARNING Le moteur se met automatiquement la hauteur...

Страница 68: ...de flamme ou A petite flamme Fernbedienung Im Standby Modus Halten Sie die Taste B gro e Flamme gedr ckt um die Flammenh he zu ver gr ern Halten Sie die Taste A kleine Flamme ge dr ckt um die Flam men...

Страница 69: ...osition ON Le symbole J l cran indique que la soupape lectroai mant est OUVERTE NOTE Le fonctionnement de la fonction J est bloqu au mode OFF d horloge lorsque le param tre de la temp rature de remise...

Страница 70: ...t Halten Sie die Taste B gro e Flamme ge dr ckt um das Licht einzuschalten und die Helligkeit zu erh hen Halten Sie die Taste A kleine Flamme ge dr ckt um die Hellig keit zu verringern Im Licht Dimmer...

Страница 71: ...Z ndflamme stand De tijd instellen Setting the time Reglage de l heure Uhrzeit einstellen C 24 uur of F 12 uur Druk op Q en A kleine vlam totdat de display van Fah renheit 12 uur klok in Celsius 24 u...

Страница 72: ...r le bouton A petiteflamme pour r duire la temp rature de remise en heure de nuit C Appuyer sur Q ou attendre simplement pour terminer la pro grammation Einstellen der Tagestemperatur Standard Einstel...

Страница 73: ...r les minutes en appuyant sur le bou ton A petite flamme R glage P2 heure ALLUMEE Appuyer bri vement sur le bouton P Standardeinstellungen Programm 1 P1 D 6 00 P1 C 8 00 Programm 2 P2 D 23 50 P2 C 23...

Страница 74: ...po sition an orifice beco mes visible 5 Push the metal pin in the orifice with some thing like a small pen Quand les batteries sont vides ou dans le cas o le r cepteur est d fectueux il est galement p...

Страница 75: ...nzu z nden Durch das Glasfenster kann man sehen ob die Z nd flamme brennt 7 Wenn die Z ndflamme brennt das Metallstiftchen noch 10 Sekunden eingedr ckt halten danach loslassen Wenn die Z ndflamme wied...

Страница 76: ...cannot be altered in the field tion wird vom Ger teherstel ler festgelegt und kann nicht ver ndert werden d utilisation limit e La dur e d inactivit program m e afin d activer le processus est sp cifi...

Страница 77: ...n 2 Vervang de ontvanger en volg oplossing A 1 3 Controleer de stekker aansluiting op kromme pennen en of vervang de kabel 4 Vervang het gasregelblok E Geen waakvlam 1 Lucht in de leiding 2 Thermokopp...

Страница 78: ...the steps listed under solution A 1 3 Check the plug for any bent pins and or replace the cable 4 Replace the gas control block E No pilot flame 1 There is air in the pipe 2 The thermocouple wires ar...

Страница 79: ...rifiez si la fiche connexion n a pas de broches tordues et ou remplacez le c ble 4 Remplacez le bloc de r gulation gaz E Pas de veilleuse 1 Air dans la conduite 2 C blage du thermocouple invers 3 Aucu...

Страница 80: ...urch 3 berpr fen Sie Stecker Verbindung auf verbogene Stifte und oder ersetzen Sie das Kabel 4 Ersetzen Sie den Gasregulierungsblock E Keine Z ndflamme 1 Luft in der Leitung 2 Thermoelement Verdrahtun...

Страница 81: ...81...

Страница 82: ...n de conformit est tablie sous la seul res ponsabilit du fabricant et appartient au produit ci dessous Produit Appareils de chauffage ind pen dants convection utilisant les combustibles gazeux Cat gor...

Страница 83: ...ffectu lorsque les po les quittent notre usine de Netterden Malgr toutes ces pr cautions il se peut que votre foyer ne fonctionne pas de mani reoptimale Danscescas notredirectivedegaranties applique 1...

Страница 84: ...andersfiresstoves Type en zetfouten voorbehouden Wanders fires stoves is een onderdeel van de Wanders Groep 2020 Wanders Metaalproducten B V All rights reserved wandersfires wandersnetterden Y IE IJA...

Отзывы: