1. Pull back the draw bar of the spray gun. The material inlet
is now open and both material duct and material nozzle will
be cleaned.
2. Do not let go of the drawbar until clear cleaning solution
emerges from the nozzle.
7
Repairs / Replacements
Warning
Prior to any repairs / replacements: Make sure that the spray gun is in unpressurized
condition, i.e. all air and material inputs must be shut off - if not, imminent risk of inju-
ry.
Note
Please use the drawing at the beginning of these operating instructions to perform
the following procedures.
7.1
Replacement of defective Needle Seal Packings
1. Remove the material control needle (see
5.5 Retooling the Spray Gun
).
2. Unscrew the sealing screw in (pos. 14) with the O-ring and the packing screw
(pos. 13).
3. Remove the packing spring in (pos. 11) (replace, if damaged) and the pressure
ring in (pos. 10).
4. Pull out the needle seal packing in (pos. 9) with an auxilliary tool. Use a strong
wire on which one end is bent making a small hook.
5. Lubricate the new needle seal packing with non-acidic, non-resinogenic grease.
6. Install the new needle seal packing in the gun body.
Installation of the remaining parts is performed in reverse order.
Note
Never reinstall a used needle seal packing (pos. 9) as otherwise the functional seal-
ing reliability of the spray gun will suffer.
7.2
Replacement of Nozzles, Needles, Springs and Seals
Dismantle the spray gun in accordance with Chapter
Replacement of Material Control
Nozzle and Needle
, if the following components have to be replaced:
• Material Control Nozzle
• Piston spring
• Material control needle*
• Needle spring*
• Cup seal*
• Piston O-ring*
Note
Parts marked with * must be lubricated with non-acidic, non-resinogenic grease
prior to installation. WALTHER PILOT repair kits are available for PILOT WA 450,
WA 451, WA 452 and WA 453 spray guns including all wearing parts:
Article No.: V 16 545 06 . . 3
Wearing parts are also shown in the listing of replacement parts (in bold face).
8
Troubleshooting and Corrective Action
Warning
Prior to any servicing and repair work: Make sure that the spray gun is in unpres-
surized condition, i.e. all air and material inputs must be shut off - if not, imminent
risk of injury.
9
Disposal of Cleaning / Servicing Substances
Disposal of any such substances must be in accordance with all applicable local
and national regulations, directives and laws.
Warning
Pay special attention to all processing specifications and safety warnings issued
by the manufacturers of spraying and cleaning media. The improper disposal of
any toxic waste material represents a serious threat to the environment, i.e. to the
health of mankind and animal life.
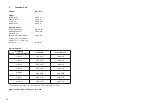
Fault
Cause
Corrective Action
Gun is dripping
Material control nozzle or
needle fouled or damaged
- Removing, cleaning, if need
be - replacing
Gun fails to open
Control air pressure too low - Increaese control air pressure
to at least 4.5 bar
Material leaks from
leakage boring
Needle seal packing leaks
Packing gland too loose
- see 7.1 Replacing Needle
Seal Packing
- Tighten packing screw in
(pos.22) slightly with a screw-
driver
Spray jet pulsating
or unsteady
Level in material tank too
low
- Top-up material level (see
operating instructions of plant
systems manufacturer)
Gun keeps blo-
wing in off-position
Cup seal po. 18 damaged
- Replace cup seal
Spray jet one-side
Horn boring soiled at air cap - Remove and clean
l
l
l
11
12
Содержание 20 545
Страница 3: ...PILOT WA 450...


