background image

GB

28

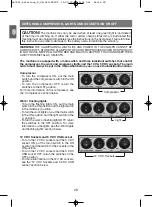
12 V DC Sockets

SWITCHING COMPRESSOR, LIGHTS AND SOCKETS ON OR OFF

Compressor

- To turn the compressor ON, put the main

switch and the compressor switch in the ON
position.

- To turn the compressor OFF, return the

switches to the OFF position.

For more information on the compressor, see
the ‘Compressor’ section below.

Work / flashing lights

- To turn the flashing lights ON, put the main

switch in the ON position and the light switch
in the middle (=) position.

- To turn the work lights on, put the main switch

in the ON position and the light switch in the
(-) position.

- To turn the work or flashing lights OFF, return

the switches to the OFF position. For more
information on the lights, see the ‘Work lights
and flashing lights’ section below. 

12 V DC Sockets and 5 V DC USB socket

- To turn the 12 V DC sockets and the 5 V DC

socket ON, put the main switch in the ON
position and the switch for the sockets in the
ON position.

- To turn the 12 V DC sockets and the 5 V DC

USB socket OFF, return the switches to the
OFF position.

- For more information on the 12 V DC sockets,

see the ’12 V DC Sockets and 5 V DC USB
socket’ section below.

CAUTION!

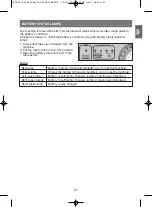
The machine may only be used when at least one green light is illuminated

at the time of switching on. If either the red or yellow charge status lamp is illuminated the
machine must be charged immediately (see the instructions on the next page). Failure to follow
this instruction can lead to damage to the battery and will invalidate the warranty.

WARNING! 

THE CLAMPS ARE ALWAYS LIVE AND POWER TO THE CLAMPS CAN NOT BE

SWITCHED OFF. STORE THE CLAMPS IN THE HOLSTERS PROVIDED WHEN THIS PRODUCT
IS NOT IN USE. NEVER ALLOW THE RED AND BLACK CLAMPS TO TOUCH AND KEEP THEM
AWAY FROM METALLIC OBJECTS.

The machine is equipped with a main switch and three individual switches that control
the compressor, the work and emergency lights and the 12 V & 5 V DC sockets. The main
switch must always be put in the ON position before you can use the individual functions.

Compressor

Light

640045_Anleitung_D,GB,SLO:PRINT  14.03.2016  8:34 Uhr  Seite 28

Содержание NFQ2020A

Страница 1: ...lesen und aufbewahren Diese Bedienungsanleitung ist eine Original Bedienungsanleitung Autostart ger t mit Kompressor Vor Inbetriebnahme ist das Ger t 72 Stunden zu laden SLO D GB 640045_Anleitung_D G...

Страница 2: ...te 11 Starthilfe Seite 11 Arbeits und Blinklicht Seite 12 Kompressor Seite 13 12 Volt Gleichstromanschl sse und 5 Volt USB Anschluss Seite 14 Wartung Seite 14 Monatliche Erhaltungsladung Seite 14 Recy...

Страница 3: ...das Kabel nicht um das Elektrowerkzeug zu tragen auf zuh ngen oder um den Stecker aus der Steckdose zu ziehen Halten Sie das Kabel fern von Hitze l scharfen Kanten oder sich bewegenden Ger teteilen Be...

Страница 4: ...halb der Reichweite von Kindern auf Lassen Sie Personen das Ger t nicht benutzen die mit die sem nicht vertraut sind oder diese An weisungen nicht gelesen haben Elek trowerkzeuge sind gef hrlich wenn...

Страница 5: ...ragen Sie einen geeigneten Augenschutz und Schutzkleidung B Halten Sie ausreichend Wasser und Seife in der N he f r den Fall bereit dass Ihre Haut Kleidung oder Ihre Augen mit der Akkus ure in Kontakt...

Страница 6: ...tzadapter 9 12 Volt Gleichstrom Ausg nge 5 Volt USB Anschluss 10 Batterieklemmen 11 Manometer 12 15 A Hauptsicherung 13 Batteriestatus Leuchten 14 Notbeleuchtung 15 Arbeitsbeleuchtung 16 Luftschlauch...

Страница 7: ...G DC 15V 500 ENERGIESTATION MODELL NFQ2020 A Schutzklasse II VERWENDUNGSZWECKE Die Energiestation ist als Starthilfe f r Pkw als Kompressor als Not Arbeitsbeleuchtung sowie zur Versorgung von 12 V Ger...

Страница 8: ...er t werkseitig mit keiner Sicherung versehen Die Sicherungen sind in dem Fach auf der R ckseite der Energiestation verwahrt Achtung Wenn die Hauptsicherung fehlt defekt ist oder nicht korrekt platzie...

Страница 9: ...und den Schalter f r die Steckdosen in die Position EIN Um die Anschl sse auszuschalten stellen Sie die Schalter wieder in die Position AUS zur ck Weitere Informationen zu den 12 V Gleichstromanschl...

Страница 10: ...Akku Statusanzeiger zu blinken beginnen oder leicht gedimmt werden Dies ist normal 8 Der Akku ist dann hinreichend geladen wenn beide oder einer der gr nen Akku Statusanzeiger aufleuchten Beenden Sie...

Страница 11: ...kus verbunden werden Die entweichenden Gase k nnten explodieren 3 Sorgen Sie daf r dass die ROTE Klemme Pol nicht die SCHWARZE Klemme Pol erreicht 4 Starten Sie jetzt den Motor Sobald das Fahrzeug sta...

Страница 12: ...zwei f r die Notbeleuchtung Zum Austauschen der Lampen gehen Sie folgenderma en vor Blinklicht Stellen Sie sicher dass alle Schalter ausgeschaltet sind Dr cken Sie vorsichtig auf die Lampen abdeckung...

Страница 13: ...tzen Sie falls erforderlich einen der Adapter aus dem Zubeh r Aufbewahrungsfach an der R ckseite der Energiestation Schieben Sie den Ventilstecker 17 ber das Ventil und dr cken Sie den Hebel nach unte...

Страница 14: ...ote Lade statusanzeige aufleuchtet sollten Sie das Ger t ausschalten und vor jeder weite ren Verwendung wieder Aufladen MONATLICHE ERHALTUNGSLADUNG Um eine lange Lebensdauer des Bleis ureakkus zu gew...

Страница 15: ...einer daf r vorgesehenen Sammelstelle abgegeben werden Dieskannz B durchR ckgabebeimKaufeines hnlichenProduktsoderdurchAbgabe bei einer autorisierten Sammelstelle f r die Wiederaufbereitung von Elekt...

Страница 16: ...ew hrleistungszeitraumes k nnen defekte Ger te FREI HAUS an die auf der R ckseite dieser Anleitung angef hrte Adresse gesandt werden Im Rahmen des Gew hrleistungsrechtes entscheiden wir ber Reparatur...

Страница 17: ...17 D 640045_Anleitung_D GB SLO PRINT 14 03 2016 8 34 Uhr Seite 17...

Страница 18: ...18 D 640045_Anleitung_D GB SLO PRINT 14 03 2016 8 34 Uhr Seite 18...

Страница 19: ...d carefully and keep for future reference This is a translation of the original instruction manual Jump start with air compressor GB Charge the jump start prior to first use 640045_Anleitung_D GB SLO...

Страница 20: ...ARTER b To reduce the risk of battery explosion follow these instructions and those published by the car battery manufacturer and the manufacturer of any equipment you intend to use in the vicinity of...

Страница 21: ...clips starter cables while the device is connected to the plug in charger Never allow the clips to touch each other b Attach clips to battery and chassis as indicated in 15 e and 15 f 15 FOLLOW THESE...

Страница 22: ...g lights Page 30 Compressor Page 31 12 V DC Sockets 5 V DC USB Socket Page 32 Maintenance Page 32 Monthly charging Page 32 Maintenance and cleaning Page 33 Recycling Page 33 Moving and storage instruc...

Страница 23: ...00 JUMP START WITH AIR COMPRESSOR MODEL NFQ2020A SCOPE OF USE This product is designed for jump starting vehicles inflating objects illumination and powering 12 V 5 V DC appliances according to the in...

Страница 24: ...B socket 8 Mains adapter 9 12 DC output sockets USB Port 10 Clamps 11 Pressure gauge 12 15 A Main fuse 13 Battery status lamps 14 Flashing lights 15 Work lights 16 Air hose 17 Hose valve Rear not illu...

Страница 25: ...supplied with four 32 V DC 15 A automotive type fuses For technical reasons the machine is not factory fitted with a fuse The three fuses can be found in the storage compartment at the rear of the ma...

Страница 26: ...rmal and does not indicate a fault 8 The battery has sufficient charge when either both or one of the green battery status indicators lights up If both or one of the green battery status indicators li...

Страница 27: ...e main switch in the ON position 3 Read the battery status and refer to the table below Lamp Red lamp Battery is empty Charge immediately do not use the machine Yellow lamp Charge the battery Charge i...

Страница 28: ...DC sockets and the 5 V DC USB socket OFF return the switches to the OFF position For more information on the 12 V DC sockets see the 12 V DC Sockets and 5 V DC USB socket section below CAUTION The ma...

Страница 29: ...from the battery Do not connect clip to the carburetor fuel lines or sheet metal body parts Connect to a heavy gauge metal part of the frame or engine block g Ensure that your vehicle s transmission i...

Страница 30: ...cement bulbs two for the work lights and two for the flashing lights Proceed as follows to change the bulbs Flashing lights Ensure that all the switches are turned off Gently squeeze the lamp cover at...

Страница 31: ...he device s rear housing Connect the hose with the object you wish to inflate If necessary use one of the adapters stored in the accessory compartment at the rear of the device Move the lever on the h...

Страница 32: ...acid battery it is vital that you charge the battery regularly for best results at least once a month and always immediately after you use the machine 1 Switch the light and the compressor on for appr...

Страница 33: ...electrical and electronic devices WEEE This product must be handed in at a collection point intended for the purpose This can occur for example by returning it when a similar product is purchased or...

Страница 34: ...r gasket 10 Selftapping screw 11 Label 12 Plastic board 13 Clamp 14 Plastic cover 15 Side lamp 16 Battery 17 Cigarette plug socket 18 Fuse socket 19 Battery status PCB 20 Pad for battery 21 Switch boa...

Страница 35: ...eceipt safe as proof of the date of purchase The guarantee period can only be extended for the duration of any repair required During the warranty period defective devices can be sent FREIGHT PREPAID...

Страница 36: ...36 GB 640045_Anleitung_D GB SLO PRINT 14 03 2016 8 34 Uhr Seite 36...

Страница 37: ...reberite in shranite Ta navodila za uporabo so prevod originalnih navodil za uporabo Aparat za zagon avtomobila s kompresorjem SLO Pred zagonom naprave jo morate polniti 72 ur 640045_Anleitung_D GB SL...

Страница 38: ...vne in utripajo e lu ke stran 48 Kompresor stran 49 12 V priklju ki za enosmerni tok in 5 V USB priklju ek stran 50 Vzdr evanje stran 50 Mese no vzdr evalno polnjenje stran 50 Recikliranje stran 50 Ri...

Страница 39: ...ljajte za no njo elektri nega orodja obe anje ali da izvle ete vti iz vti nice Kabla ne pribli ujte vro ini olju ostrim robovom ali gibljivim delom naprave Po kodovani ali zapleteni kabli pove ajo tve...

Страница 40: ...niso prebrali teh navodil ne dovolite delati z njim Elektri na orodja so nevarna e jih uporabljajo neizku ene osebe e Elektri no orodje skrbno negujte Kontrolirajte e vsi premi ni deli brezhibno deluj...

Страница 41: ...adosti vode in mila za primer da pride va a ko a obleka ali va e o i v kontakt s kislino akumulatorja Ne dotikajte se o i ko delate v bli ini akumulatorja e pride kislina akumulatorja v kontakt z va o...

Страница 42: ...adapter 9 Izhodi za enosmerni tok 12 V 5 V USB priklju ek 10 Pri eme akumulatorja 11 Manometer 12 15 A glavna varovalka 13 Lu ke za status akumulatorja 14 Zasilna osvetlitev 15 Delovna osvetlitev 16 G...

Страница 43: ...EKTRI NI PRIKLJU EK MODEL WJG DC 15V 500 ENERGIJSKA POSTAJA MODEL NFQ2020 A Razred za ite II NAMENI UPORABE Energijska postaja je konstruirana kot pripomo ek pri zagonu za osebna vozila kot kompre sor...

Страница 44: ...tehni nih razlogov aparat tovarni ko ni opremljen z nobeno varovalko Tri varovalke so shranjene v predal ku na zadnji strani energijske postaje Pozor e manjka glavna varovalka ali je pregoreta ali ni...

Страница 45: ...a vti nice v polo aj EIN VKLOP Za izklop priklju ka enosmernega toka 12 V preklopite stikalo ponovno nazaj v polo aj AUS IZKLOP Ostale informacije glede priklju kov enosmernega toka 12 V in 5 V USB pr...

Страница 46: ...ja enega ali ve statusnih prikazov akumulatorja utripati ali rahlo brleti To je obi ajno 8 Akumulator je dovolj napolnjen e zasvetita obe ali ena od zelenih statusnih prikazov akumulatorja Polnjenje k...

Страница 47: ...o eksplodirajo 3 Poskrbite za to da se RDE A pri ema pol ne dotika RNE pri eme pol 4 Nato za enite motor Takoj ko motor vozila ste e odstranite kable iz vozila v obratnem zaporedju Najprej odklopite r...

Страница 48: ...litev in dve za zasilno osvetlitev Pri zamenjavi arnic se ravnajte po naslednjih navodilih Utripajo a lu ka Prepri ajte se da so vsa stikala izklju ena Da bi sneli pokrov ek previdno pritisnite zgoraj...

Страница 49: ...z zrakom Po potrebi uporabite ustrezni vmesnik iz predala za shranjevanje pribora na zadnji strani energijske postaje Vti ventila 17 porinite prek ventila in potisnite vzvod v smeri navzdol Kompresor...

Страница 50: ...izpraznil e zasvetita rumena ali rde a lu ka za stanje polnosti morate napravo izklopiti in pred nadaljnjo uporabo ponovno napolniti MESE NO VZDR EVALNO POLNJENJE Da bi zagotovili dolgo ivljenjsko dob...

Страница 51: ...injskimi odpadki Ta izdelek je treba oddati na ustreznem zbirnem mestu Napravo lahko oddate pri nakupu podobnega izdelka lahko pa ga oddate na poobla enem zbirnem mestu za ponovno predelavo elektri ni...

Страница 52: ...lj a za as trajanja popravila Proizvajalec Walter Werkzeuge Salzburg GmbH Gewerbeparkstrasse 9 5081 Anif Austria Uvoznik Walter Werkzeuge Salzburg GmbH Gewerbeparkstrasse 9 5081 Anif Austria Izdelek o...

Страница 53: ...53 SLO 640045_Anleitung_D GB SLO PRINT 14 03 2016 8 34 Uhr Seite 53...

Страница 54: ...640045_Anleitung_D GB SLO PRINT 14 03 2016 8 34 Uhr Seite 54...

Страница 55: ...640045_Anleitung_D GB SLO PRINT 14 03 2016 8 34 Uhr Seite 55...

Страница 56: ...Gewerbeparkstrasse 9 5081 Anif Austria Fax 0043 6246 72091 15 Tel 0043 6246 72091 60 Email service f walter werkzeuge com Servicio Espa a ROTHENBERGER S A Servicio Posventa Ctra Durango Elorrio Km 2 4...

Отзывы: