background image

8

Click the orange “

Connect to WiFi network

” button. On the following two screens 

select the home WiFi network you want to connect your Hub to and the password 
for this network.

After you click the orange “

Connect

” button, your hub will disconnect from your 

computer and attempt to connect to the home WiFi network. 

Re-connect your computer to your home WiFi network. If your hub has 
successfully connected to your WiFi network, both hub lights will become solid 
orange. If this does not happen and the hub lights return to alternately flashing 
blue, the hub has not connected to your home WiFi network and you will need to 
press the button on the back of your hub and re-attempt the process. If you 
continue to be unsuccessful, try some of the tips in the troubleshooting section of 
the support page (

http://www.wallyhome.com/support/

) or contact customer 

service (

[email protected]

). 

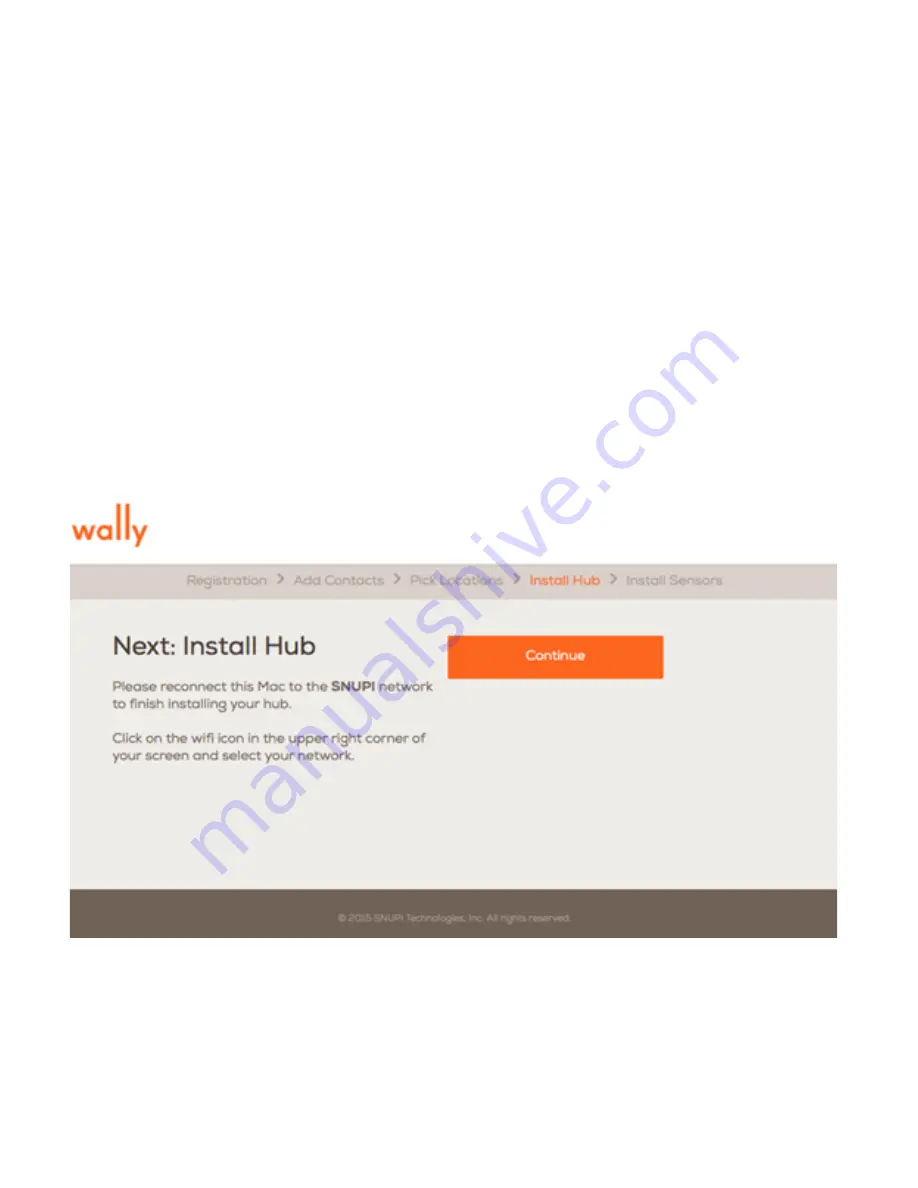
After your computer is connected to your home network and both of the hub lights   

are solid orange, click the orange “

Continue


button to complete installing your 

hub. 

Содержание 810-00008

Страница 1: ...Product Manual Version 1 0 ...

Страница 2: ...me We are excited that you have decided to protect your home with Wally These pieces are all you need to get started If you wish to purchase additional Hubs or sensors visit www wallyhome com buy YOUR WALLYHOM SYSTEM INCLUDES Hub x 1 Sensor x 6 Ethernet cord x 1 Power cord x 1 Model 810 00008 Model 810 00011 1 ...

Страница 3: ...working DSL cable modem or LAN based always on high speed Internet connection in your home that is positioned to communicate reliably with the Wally DEVICES If your modem is not a modem router combination you should install a router between your modem and your computer to share the Internet connection with your Wally Hub Visit www wallyhome com support for a solution to limited access to Ethernet ...

Страница 4: ...wser on your computer and go to https my wallyhome com You will be presented with the following page Click on the Create an Account button Enter in your information and then continue by clicking the Create an Account button 3 ...

Страница 5: ...azard or conditions that require maintenance You have the option to designate contacts as Primary or Emergency Primary contacts may be alerted via email text or push notification for both urgent and preventative care Emergency contacts will only receive text messages if a sensor detects moisture 4 ...

Страница 6: ...r and room for each sensor Use this page to plan where each of your sensors will be placed in your home Plan of Attack 5 Simply click on one of the tiles and then customize the floor in specific room to make the reading applicable to your home Finish by clicking the orange Add to My Locations button This will add the tile to the right column titled My Locations Once you have added all locations to...

Страница 7: ...you are ready to connect your Hub to your network Connect Your Hub Click on the Wired tab and follow the step by step instructions Ethernet Installation Click on the Wireless tab and follow the step by step instructions WiFi Installation 6 ...

Страница 8: ...7 Once you ve connected to the Wally Network a screen will pop up and prompt you to connect to your Hub s WiFi network WiFi Installation cont d ...

Страница 9: ...work both hub lights will become solid orange If this does not happen and the hub lights return to alternately flashing blue the hub has not connected to your home WiFi network and you will need to press the button on the back of your hub and re attempt the process If you continue to be unsuccessful try some of the tips in the troubleshooting section of the support page http www wallyhome com supp...

Страница 10: ...n At this point you may continue installation on a mobile device If you prefer not to move to a mobile device simply press the button labeled Continue and proceed as directed If you prefer to continue on a mobile device please skip to page 10 to learn how to access your account on a mobile device and continue installing sensors ...

Страница 11: ...you will need to activate all of your sensors Each grey tile represents an inactive sensor on your dashboard Activate your Sensors 10 To activate a sensor click on the Activate This Sensor link Once you click this button you will be directed to the Activate a Sensor page ...

Страница 12: ... Cancel Animation SIGNOUT NEED HELP Once the sensor connects you will hear a chime indicating that the sensor has been detected by the Hub 11 Press the button on the sensor so that the lighted ring stays illuminated for one second and then continues to flash in one second intervals The screen will display an orange spinning wheel while the sensor connects to the Hub ...

Страница 13: ...ected to a page that displays the recommended location for the sensor Once you place the sensor in the desired location press the orange Continue button to proceed to the next page Animation 12 Repeat this step for your remaining sensors ...

Страница 14: ...Dashboard Once you have installed all sensors you can view the overall health of your home using your dashboard 13 ...

Страница 15: ... you can continue installation using the Wally app on a mobile device In order to proceed using your mobile device visit the Apple Store or Google Play store and download the Wally iOS App or Android App for your phone When the application launches remember to accept push notifications from Wally This will allow you to be alerted of significant changes detected in your home such as a water leak On...

Страница 16: ...ensor is attempting connection Once the sensor connects a chime will sound and the page will advance An animation will display how best to place the sensor in the desired location A steadily blinking label saying Wally Sensor Activated appears on the top to confirm that the button press triggered a successful activation of the sensor After placing the sensor press Done on your mobile device You wi...

Страница 17: ...ge indicating which sensor was just paired Repeat this process until all the sensors have been activated Wally iOS App Once all of your sensors have been activated you can tap on any one of your active sensors to see the Sensor Detail page This will display the humidity and temperature readings of an individual sensor You can also set the humidity and temperature thresholds for the sensor 16 2 38 ...

Страница 18: ... well as an email and push notification to the primary contact These messages will be sent immediately and then repeated after 5 minutes unless acknowledged by one of the contacts A contact can acknowledge an alert through a text message or by clicking on the link sent via email An alert acknowledgement will be sent to all contacts primary and emergency in order to notify them of who accepted the ...

Страница 19: ...responsive The Hub detects a Wally sensor button press Movement of a Wally sensor is detected Should any of these situations be detected Wally will send an email and a silent push notification to all primary contacts In addition an alert icon will appear on your dashboard Wally Alerts cont d Low priority alert Wally will send a low priority alert should any of the following circumstances be detect...

Страница 20: ...0 F 1400 F 0 100 Any heated indoor 500 F 1000 F 30 100 Recommended range location bathroom for preventing freezing pipes bedroom etc based on indoor temp Attic 350 F 1200 F 0 100 Freezing pipes overheating attic can shorten life of shingle Crawlspace basement 350 F 1000 F 0 100 Garage 350 F 1000 F 0 100 Water heater 350 F 1000 F 0 100 Freezing pipes Under sinks 500 F 1000 F 0 100 Dishwasher 500 F ...

Страница 21: ...t is flashing this indicates that the sensor is transmitting and allows the Hub to determine the signal strength Rotate and or change it s orientation from vertical to horizontal or vice versa to get the maximum number of bars Make sure to remove your hand after adjusting the sensor to prevent interference Once you ve found the best orientation click the orange Continue button If you cannot get an...

Страница 22: ...ome property where your Nest is You will then be directed to a Nest specific dashboard In order for WallyHome to control your Nest thermostat Nest s internal schedule and learning behavior must be disabled so that they don t try to modify your temperature at the same time Please do so before you hit the orange Next button 21 ...

Страница 23: ...creen instructions in the center pane to build up a scene to control your Nest The screen below shows how this appears on the final step of scene creation 4 Select the days of the week and the time for scene to run 22 ...

Страница 24: ...ion You can now see a list of scenes Add scenes as desired by clicking on the orange Add Scene button Edit your current scenes by clicking on the orange Edit text in the Scene summary pane To return to your WallyHome dashboard click on the icon at upper left 23 ...

Страница 25: ...rference to radio or television reception which can be determined by turning the equipment off and on the user is encouraged to try to correct the interference by one or more of the following measures Reorient or relocate the receiving antenna Increase the separation between the equipment and receiver Connect the equipment into an outlet on a circuit different from that to which the receiver is co...

Страница 26: ...électrique reçu même si ce brouillage est susceptible de compromettre le fonctionnement du dispositif Notice for Licence Exempt Radio Apparatus This device complies with RSS 210 of the Industry Canada Rules Operation is subject to the following two conditions 1 This device may not cause harmful interference and 2 this device must accept any interference received including interference that may cau...

Страница 27: ...SNUPI Technologies 1415 NE 45th Street Seattle WA 98105 t 206 673 2707 e support wallyhome com https www wallyhome com support ...

Отзывы: