background image


32 

Manual 23091 LED Niova 150-F Pro 150W Bi Color 

14


Understanding this manual 

14.1


Markings and symbols on the device 


This symbol means that your device complies with the 
safety requirements of all applicable EU directives. 


This symbol means that you may only dispose of the 
device at a local collection point. 

14.2


Markings in this instruction manual 

Label 

Meaning 


Makes you aware of the handling and impact 
of safety information. 

NOTICE: 

Alerts you to possible material damage and 
other important information related to your 
device. 

 CAUTION 

Alerts you to a dangerous situation that may 
result in a 

minor

 to 

moderate

 injury if not 

avoided. 

 WARNING 

Alerts you to a dangerous situation that may 
result in 

serious

 injury or 

death

 if not avoided. 


Содержание LED Niova 150-F Pro 150W Bi Color

Страница 1: ...1 LED Niova 150 F Pro 150W Bi Color Gebrauchsanleitung Manual 23092 2 2022 ...

Страница 2: ... Stativ 14 6 3 Montage der Abschirmklappen sowie des Diffusors 14 7 Stromversorgung 17 7 1 Stromversorgung per Akku 17 7 2 Stromversorgung per Netzteil 18 7 3 Stromversorgung trennen 18 8 Gerät betreiben und bedienen 19 8 1 Betrieb der Leuchte 20 8 2 Manuelle Steuerung der Leuchte 20 8 3 Steuerung der Leuchte mit der Funkfernbedienung 20 8 4 Einbinden der Leuchte in ein DMX Netzwerk 22 9 Gerät tra...

Страница 3: ...genden Funkfernbedienung gesteuert werden Außerdem kann sie in ein DMX Universum eingebunden werden Über ihren Standard 5 8 Zoll Spigot Anschluss kann die Leuchte auf praktisch jedem handelsüblichen Lampenstativ stehend oder hängend montiert werden Lesen Sie diese Gebrauchsanleitung aufmerksam durch bevor Sie Ihr neues Gerät das erste Mal benutzen Sie enthält alles was Sie wissen müssen damit Sie ...

Страница 4: ...gen in dieser Gebrauchsanleitung Kennzeichnung Bedeutung Macht Sie auf die Handhabung und Auswirkung von Sicherheitsinformationen aufmerksam HINWEIS Macht Sie auf mögliche Sachschäden und andere wichtige Informationen in Verbindung mit Ihrem Gerät aufmerksam VORSICHT Macht Sie auf eine gefährliche Situation aufmerksam die eine leichte bis mittelschwere Verletzung nach sich ziehen kann wenn sie nic...

Страница 5: ...erden Die Leuchte eignet sich nicht als reguläre Lichtquelle für Wohnräume Büros und vergleichbare Anwendungen 3 Sicherheitshinweise Lesen Sie diese Gebrauchsanleitung sorgfältig durch bevor Sie Ihren Artikel das erste Mal benutzen Sie enthält alles was Sie wissen müssen damit Sie Personen Umwelt und Sachschäden vermeiden Beachten Sie sorgfältig alle detaillierten Sicherheitshinweise in der vollst...

Страница 6: ...ie Lampe nicht zur Ausleuchtung bei Aufnahmen mit Kleinkindern oder Babys VORSICHT Stoß Quetsch Verbrennungs und Brandgefahr Achten Sie darauf dass Sie das Gerät stets kippsicher und rutschfest aufstellen Achten Sie darauf dass alle Befestigungsschrauben fest und sicher angezogen sind Decken Sie die Lüftungsschlitze des Gerätes nicht ab und entfernen Sie leicht entflammbare Materialien aus der Näh...

Страница 7: ... niemals selbst Lassen Sie das Gerät ausschließlich von einer Elektrofachkraft reparieren VORSICHT Stromschlaggefahr Verbrennungsgefahr Beachten Sie dass das Gerät auch dann noch mit der Stromversorgung verbunden ist wenn es ausgeschaltet ist Erst wenn Sie das Gerät von der Stromversorgung trennen indem Sie den Netzstecker ziehen und die Akkus entfernen ist es wirklich spannungsfrei Schalten Sie d...

Страница 8: ...s Ladegerät vom Netzstrom 4 Gerät auspacken und prüfen 1 Packen Sie den Lieferumfang vorsichtig aus 2 Prüfen Sie ob der Lieferumfang vollständig vorhanden ist a 1x Walimex pro LED Niova 150 F Pro 150W Bi Color b 1x Abschirmklappen Set c 2x Diffusorscheibe soft und ultrasoft d 1x U Halterung e 1x Fernbedienung f 1x DMX Kabel g 1x Netzteil mit Netzstecker h 1x Transport und Aufbewahrungstasche 3 Prü...

Страница 9: ...ED Niova 150 F Pro 150W Bi Color 5 Übersicht über die Bestandteile 1 Leuchte Gehäuse 2 Leuchtfläche mit LEDs 3 Diffusor 4 Klemmhebel 5 Halteriegel s 14 6 Halteschienen 7 U Halterung 8 9 Fixierschraube 8 2 1 4 6 5 3 7 9 ...

Страница 10: ...10 Manual 23091 LED Niova 150 F Pro 150W Bi Color 10 Abschirmklappen 11 Lüftungsschlitze 12 Akkudock für V Mount Akkus 13 Entriegelungsknopf für den Akku 14 Taste für Halteriegel 5 12 11 14 10 13 ...

Страница 11: ... Fernbedienung 2 4G manuell 19 LED Farbtemperatur COLOR 20 Drehregler 21 Kanalwahltaste CHANNEL 22 Kanalwahltaste CHANNEL 23 Bedienmodus Taste DMX 2 4G 24 Wahltaste Dimmer Farbtemperatur DIMMER COLOR 25 Ein Aus Schalter 26 DMX Eingangs IN und Ausgang OUT 27 Stromanschlussbuchse 15 23 17 16 18 19 20 21 22 24 25 26 27 ...

Страница 12: ...Pro 150W Bi Color 28 Fernbedienung 29 Transport und Aufbewahrungstasche 30 Trageriemen 31 DMX Kabel 3 polig auf RJ45 32 Netzteil mit Anschlussleitung 33 Rundstecker 34 Kaltgerätekabel 35 zweiter Diffusor 29 31 28 30 32 35 3 33 10 34 1 ...

Страница 13: ...13 Manual 23091 LED Niova 150 F Pro 150W Bi Color 36 An Aus Taste 37 Plus Taste 38 Minus Taste 39 Auswahltaste 40 Kontroll LEDs rot orange 28 38 37 36 39 40 ...

Страница 14: ...ntage der Leuchte auf einem Stativ Benutzen Sie die Leuchte stets auf einem handelsüblichen Lampenstativ mit 5 8 Zoll Spigot Zapfen Stellen Sie das Stativ ordnungsgemäß auf siehe dessen Gebrauchsanleitung Lösen Sie nun an der LED Leuchte die Fixierschraube 9 und setzen die Halterung 8 über den Spigot des Lampenstativs Schrauben Sie die Fixierschraube wieder zu und achten Sie darauf dass diese den ...

Страница 15: ...ten Sie die Leuchte nicht auf einem Stativ montiert haben legen Sie sie mit der Leuchtfläche nach oben auf einen Arbeitstisch und achten Sie darauf dass die Klemmhebel 4 nicht im Weg sind 2 Klappen Sie die Abschirmklappen vor die Leuchtfläche die seitlichen Klappen zuerst 3 Lösen Sie einen der beiden Halteriegel 5 indem Sie die dazugehörige Taste 14 auf der Rückseite des Gerätes bedienen Der Halte...

Страница 16: ...s bedienen Der Halteriegel fällt von alleine ins Gehäuse zurück oder kann mit dem Finger hineingeschoben werden 3 Schieben Sie den Diffusor vorsichtig an der geöffneten Seite in die hinteren inneren der beiden Halteschienen 6 Achten Sie darauf den Diffusor gleichzeitig in die obere sowie die untere Halteschiene des Gehäuses einzuführen Diffusoren sind immer in der hinteren Halteschiene zu montiere...

Страница 17: ...auf die Stellung I BATTERY WARNUNG Akkus können auslaufen oder explodieren wenn sie unsachgemäß gehandhabt werden Nur Akkus verwenden die in dieser Bedienungsanleitung genannt werden siehe Kapitel 12 Akkus nicht ins Feuer legen oder direkter Hitze aussetzen Akkus entfernen wenn Sie das Produkt für längere Zeit nicht verwenden oder wenn die Akkus entladen sind Sollte Akku Flüssigkeit mit Haut oder ...

Страница 18: ...e Stellung 0 OFF 2 Stecken Sie den Rundstecker 33 des mitgelieferten Netzteils 32 auf die mit DC 36V gekennzeichnete Stromanschlussbuchse 27 auf der Rückseite der Leuchte Achten Sie auf die korrekte Positionierung 3 Schrauben Sie die Sicherungsschelle des Steckers auf das Gewinde der Buchse 4 Verbinden Sie das Netzteil 32 mit dem Netzkabel 34 5 Verbinden Sie das Netzkabel 34 mit einer schutzgeerde...

Страница 19: ...rigen Kapiteln beschrieben WARNUNG Gefahr durch Hitze Strom oder Feuer Das Gerät und insbesondere die Leuchtmittel werden im Betrieb bis zu 60 C warm Das Gerät kann überhitzen wenn Sie es mit abgedeckten Lüftungsschlitzen betreiben Bei Überhitzen oder Kurzschluss können das Gerät selbst und leicht entflammbare Materialien in der Nähe des Gerätes zu brennen beginnen Decken Sie die Lüftungsschlitze ...

Страница 20: ... Sie die Helligkeit sowie die Farbtemperatur über den Drehregler 20 regulieren Schalten Sie mit der Wahltaste Dimmer Farbtemperatur 24 zwischen den Funktionen für Dimmer DIMMER und Farbtemperatur COLOR hin und her Die LED Dimmer 17 bzw die LED Farbtemperatur 19 leuchten auf je nachdem welche Option gewählt ist Der Drehregler 20 gibt Ihnen die Möglichkeit die Helligkeit zwischen 10 und 99 in 1 Schr...

Страница 21: ...ch dem letzten Tastendruck wieder ein 5 Mit wiederholtem Drücken der Auswahltaste 39 springen Sie zwischen den Bedienungsmodi hin und her Die Werte ändern Sie mit den Tasten Plus 37 und Minus 38 Es gibt drei Modi o Helligkeit Die rote Kontroll LED 40 links leuchtet Die dargestellte Zahl ist die Helligkeit der Leuchte in Prozent Diese reicht von 10 bis 99 Verändern Sie die Helligkeit mit den Tasten...

Страница 22: ... weitere DMX C 1 Stecken Sie das im Lieferumfang enthaltene 3 PIN DMX Kabel 31 oder ein entsprechend kompatibles DMX Kabel in den 3 PIN Ausgangsanschluss einer geeigneten DMX Fernsteuerungskonsole nicht im Lieferumfang enthalten 2 Stecken Sie das andere Ende des Anschlusskabels RJ45 in die mit DMX IN gekennzeichnete DMX Eingangsbuchse 26 der Leuchte 3 Betätigen Sie die Bedienmodus Taste 23 für den...

Страница 23: ...ießlich das Netzteil von der Leuchte Nehmen Sie die Akkus ab siehe Kapitel 7 2 3 Lassen Sie die Leuchte vollständig abkühlen 4 Reinigen Sie das Gerät falls nötig siehe Kapitel 10 5 Demontieren Sie die gewünschten Elemente siehe Kapitel 6 3 und heben Sie die Leuchte vom Lampenstativ Verstauen Sie Leuchte und Zubehör in der Transporttasche und ggf der Artikelverpackung Lagern Sie die Leuchte stets t...

Страница 24: ...iffusor Abschirmklappen Leichte und hartnäckige Verschmutzungen mit trockenen oder ggf angefeuchteten weichen Tuch nicht fusselnd z B Mikrofasertuch beseitigen Dann vollständig trocknen lassen HINWEIS Benutzen Sie keinerlei Reinigungs oder Lösungsmittel Achten Sie darauf dass keine Feuchtigkeit ins Gehäuse dringt Leuchtmittel Mit Staubpinsel oder trockenen weichen Antistatiktuch abtupfen ...

Страница 25: ... Akkus sind leer Akkus laden Leuchtmittel leuchten nicht Gerät ist ausgeschaltet Gerät einschalten Gerät ist defekt Wenden Sie sich an unseren Service Reparaturen dürfen nur von einer Elektrofachkraft durchgeführt werden Fernbedienung funktioniert nicht Keine Batterien Akkus eingelegt leer Volle Batterien geladene Akkus einlegen Leuchte per Netzschalter ausgeschaltet Gerät einschalten Falsche Kana...

Страница 26: ...om max 15 000 lm Beleuchtungsstärke max ohne Diffusor 3 480 lx 1m 5 600 K 3 110 lx 1m 3 200 K Farbwiedergabeindex CRI Ra TLCI Flimmerfrei Ja mindestens bis 12 000 fps Dimmbar 10 99 Kühlung passiv Synchrone Steuerung mehrerer Leuchten ja DMX DMX 512 3 pin RJ45 Halterung Metall U Halterung 5 8 Zoll Spigot Fassung Abschirmklappen Ja 4x abnehmbar Diffusorscheiben 1x soft 1x ultrasoft Gewicht 4 300 g A...

Страница 27: ...sbedingungen 10 C bis 50 C Lagerbedingungen Trocken und staubfrei in der Originalverpackung oder Tasche bei 20 C bis 50 C Fernbedienung Stromversorgung Fernbedienung 3 0 V 2x AAA 1 5 V Batterien oder Akkus nicht enthalten Frequenz Fernbedienung 2 4 GHz Reichweite Kanäle 99 Standbyzeit 1 Jahr Abmessungen L x B x H 85 x 45 x 28 mm Gewicht 50 g Zulässige Betriebsbedingungen 10 C bis 50 C Lieferumfang...

Страница 28: ...13 1 Entsorgungshinweis Bitte entsorgen Sie die Verpackung und diesen Artikel nach seiner Lebensdauer entsprechend der in Ihrem Land geltenden Gesetze 13 2 Verweis auf die CE Konformitätserklärung Diese kann unter info walser de angefragt oder im Web heruntergeladen werden http media walser de declaration_of_conformity de 23092 pdf WALSER GmbH Co KG Senefelderstraße 23 86368 Gersthofen info walser...

Страница 29: ...29 Manual 23091 LED Niova 150 F Pro 150W Bi Color ENGLISH LED Niova 150 F Pro 150W Bi Color Gebrauchsanleitung Manual 23092 2 2022 ...

Страница 30: ...user 42 20 Power Supply 45 20 1 Power supply by battery 45 20 2 Power supply via mains adapter 46 20 3 Disconnecting the power supply 46 21 Operating and handling the device 47 21 1 Operating the device 47 21 2 Manual control of the light 48 21 3 Controlling the light with the remote control unit 48 21 4 Integrating the device into a DMX network 50 22 Transporting and storing the device 51 23 Clea...

Страница 31: ...luded wireless remote control It can also be integrated into a DMX universe With its standard 5 8 inch spigot connection the luminaire can be mounted standing or hanging on practically any commercially available lamp stand Read these instructions carefully before using your new device for the first time They contain everything you need to know to avoid personal injury and damage to property Observ...

Страница 32: ...of the device at a local collection point 14 2 Markings in this instruction manual Label Meaning Makes you aware of the handling and impact of safety information NOTICE Alerts you to possible material damage and other important information related to your device CAUTION Alerts you to a dangerous situation that may result in a minor to moderate injury if not avoided WARNING Alerts you to a dangerou...

Страница 33: ...re is not suitable as a permanent light source for living rooms offices and similar applications 16 Safety Instructions Read these instructions carefully before using your item for the first time They contain everything you need to know to avoid personal injury environmental damage and damage to property Carefully observe all detailed safety instructions in the operating instructions in their enti...

Страница 34: ...mall children or babies CAUTION Risk of impact crushing burns and fire Make sure to always set up the device in a non tilting and non slip manner Make sure that all fastening screws are tightened firmly and securely Do not cover the ventilation slots of the device and do remove easily flammable materials from the vicinity of the device CAUTION Risk of electric shock and fire due to short circuit A...

Страница 35: ...aired by a qualified electrician CAUTION Risk of electric shock risk of burns Note that the device is still connected to the mains voltage even when it is switched off The device is only truly voltage free when you disconnect it from the power supply by pulling out the mains plug and by removing the batteries Before carrying out any assembly or maintenance work switch off the device and disconnect...

Страница 36: ...onnect the charger from the mains power 17 Unpacking and checking the device 1 Carefully unpack the scope of delivery 2 Check that all the items are included in the delivery a 1x Walimex pro LED Niova 150 F Pro 150W Bi Color b 1x Barn door set c 2x Diffuser soft and ultrasoft d 1x U bracket e 1x Remote control f 1x DMX cable g 1x Power supply unit with mains plug h 1x Transport and storage bag 3 C...

Страница 37: ...ova 150 F Pro 150W Bi Color 18 Component Overview 1 Luminaire Housing 2 Lighting surface with LEDs 3 Diffuser 4 Clamping Lever 5 Retaining bar see 14 6 Guiding rails 7 U Bracket 8 Bracket fo 9 Fixing Screw 8 2 1 4 6 5 3 7 9 ...

Страница 38: ...38 Manual 23091 LED Niova 150 F Pro 150W Bi Color 10 Barn Doors 11 Ventilation slots 12 Battery Dock for V Mount Batteries 13 Battery Release Button 14 Button for Retaining Latch 5 12 11 14 10 13 ...

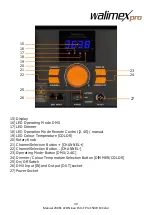
Страница 39: ...ol 2 4G manual 19 LED Colour Temperature COLOR 20 Rotary Knob 21 Channel Selection Button CHANNEL 22 Channel Selection Button CHANNEL 23 Operating Mode Button DMX 2 4G 24 Dimmer Colour Temperature Selection Button DIMMER COLOR 25 On Off Switch 26 DMX Input IN and Output OUT socket 27 Power Socket 15 23 17 16 18 19 20 21 22 24 25 26 27 ...

Страница 40: ...50 F Pro 150W Bi Color 28 Remote Control 29 Transport and Storage Bag 30 Carrying Strap 31 DMX Cable 3 pin to RJ45 32 Power Supply Unit with power cord 33 Round Plug 34 Mains Cable 35 Second Diffuser 29 31 28 30 32 35 33 10 34 1 ...

Страница 41: ...41 Manual 23091 LED Niova 150 F Pro 150W Bi Color 36 On Off Button 37 Plus Button 38 Minus Button 39 Selection Button 40 Control LEDs red orange 28 38 37 36 39 40 ...

Страница 42: ... standard lamp stand with a 5 8 inch spigot Set up the stand properly see its instructions for use Now loosen the fixing screw 9 on the LED lamp and place the holder 8 over the spigot of the lamp tripod Tighten the fixing screw again and make sure that it grips the spigot at the narrowest section to prevent it from slipping off The circular hole in the bracket 8 allows the lamp to be mounted horiz...

Страница 43: ...us surface facing upwards and make sure that the clamping levers 4 are not in the way 2 Fold the barn doors down over the lamp surface the side doors first 3 Release one of the two retaining bars 5 by pressing the corresponding button 14 on the back of the device The retaining latch will fall back into the housing by itself or can be pushed in with a finger 4 Now pull first the barn doors 10 and t...

Страница 44: ... The retaining latch will fall back into the housing by itself or can be pushed in with a finger 3 Carefully slide the open side of the diffuser into the rear inner of the two guiding rails 6 Make sure to insert the diffuser into the upper as well as the lower rail of the housing at the same time Diffusers must always be mounted in the inner guiding rail 4 Carefully slide the barn doors with their...

Страница 45: ... or explode if handled improperly Only use batteries that are specified in these operating instructions see chapter 25 Do not place batteries in a fire or expose them to direct heat Remove batteries if you are not going to use the product for a longer time or if the batteries are discharged If battery fluid comes into contact with skin or clothing rinse immediately with fresh water Do not charge b...

Страница 46: ...r of the plug onto the thread of the socket 4 Connect the mains adapter 32 to the mains cable 34 5 Connect the mains cable 34 to a grounded socket of the local mains supply AC 100 240V 50 60 Hz see chapter 25 Only operate the luminaire if the connection values match the local power supply 6 To switch on set the on off switch 25 to the II ADAPTER position 20 3 Disconnecting the power supply Switch ...

Страница 47: ...ring operation and when cooling down Remove highly flammable materials from the immediate vicinity of the device Do not touch warm or hot parts of the appliance during operation or when cooling down Allow the device to cool down completely and disconnect it from any power supply before starting any assembly or cleaning work 21 1 Operating the device The fixture features two operating modes that ca...

Страница 48: ...een 3 200 and 5 600 K in 100K steps Turn the rotary knob 20 to set the desired value The digits on the display show the set values The left two digits stand for the brightness in percent The right two digits stand for the colour temperature in 100 degrees Kelvin i e 32 for 3 200 degrees K 21 3 Controlling the light with the remote control unit To use the remote control 28 fit it with 2x AAA rechar...

Страница 49: ...Minus 38 keys o Colour temperature The orange control LED 40 centre lights up The number shown indicates the colour temperature in 100K The adjustable values range from 32 3 200 K to 56 5 600 K Select the colour temperature with the plus 37 and minus 38 keys o Channel selection for the remote control no LED lights up The selected channel is displayed Set the same channel on the remote control and ...

Страница 50: ...into the 3 PIN output connector of a suitable DMX remote control console not included 2 Plug the other end of the connection cable RJ45 into the DMX input socket 26 of the fixture marked DMX IN 3 Press the control mode button 23 once or repeatedly to switch between DMX control and remote manual 2 4G DMX control 4 When the DMX control mode LED DMX 16 lights up DMX control is activated 5 The selecte...

Страница 51: ...nit and finally the power supply unit from the fixture Take off the batteries see chapter 20 3 3 Allow the device to cool down completely 4 Clean the device if necessary see chapter 23 5 Dismantle the desired elements see chapter 19 3 and lift the lamp from the lamp stand Stow the lamp and accessories in the transport bag and if necessary the packaging Always store the lamp in a dry and dust free ...

Страница 52: ...ing diffuser barn doors Remove light and stubborn dirt with a dry or if necessary moistened lint free cloth For heavy stains use a slightly moistened cloth then allow to dry completely NOTE Do not use any cleaning agents or solvents Make sure that no moisture penetrates into the housing Illuminants Dab with a dust brush or dry soft antistatic cloth ...

Страница 53: ...Batteries are empty Charge batteries Illuminants are not lit Device is switched off Switch on device Device is faulty Contact our service department Repairs may only be carried out by a qualified electrician Remote control does not work No rechargeable batteries inserted Insert full batteries charged rechargeable batteries Luminaire switched off by mains switch Switch on device Incorrect channel s...

Страница 54: ... Luminous flux 15 000 lm Max Illuminance without diffuser 3 480 lx 1m 5 600 K 3 110 lx 1m 3 200 K Colour rendering index CRI Ra TLCI Flicker free Yes at least up to 12 000 fps Dimmable 10 99 Cooling passive Synchronous control of several luminaires yes DMX DMX 512 3 pin RJ45 Mounting Metal U bracket 5 8 inch spigot mount Barn doors Yes 4x detachable Diffuser panels 1x soft 1x ultrasoft Weight 4 30...

Страница 55: ...ermissible operating conditions 10 C to 50 C Storage conditions Dry and dust free in original packaging or bag at 20 C to 50 C Remote Control Power supply remote control 3 0 V 2x AAA 1 5 V rechargeable batteries not included Frequency remote control 2 4 GHz Range Channels 99 Standby time 1 year Dimensions L x W x H 85 x 45 x 28 mm Weight 50 g Perm operating conditions 10 C to 50 C Scope of Deliver...

Страница 56: ...arge for you 26 1 Disposal notice Please dispose of the packaging and this item after its service life in accordance with the laws in force in your country 26 2 Reference to the CE Declaration of Conformity This can be requested at info walser de or downloaded at http media walser de declaration_of_conformity en 23092 pdf WALSER GmbH Co KG Senefelderstraße 23 86368 Gersthofen info walser de www wa...

Отзывы: