Walimex Pro Flex LED 500 Bi Color Скачать руководство пользователя страница 17

32

33

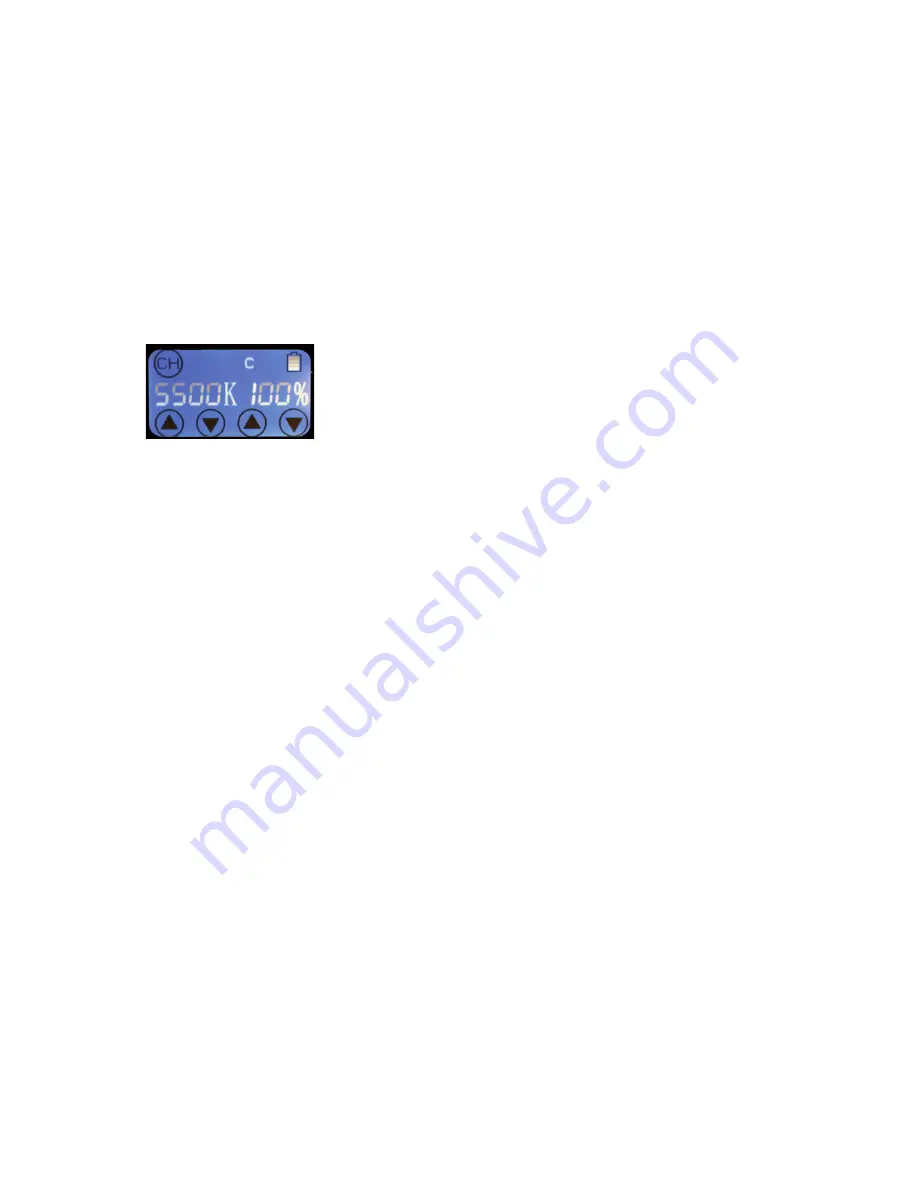
8.  Operating the device, Settings and Display signals

The control unit of the walimex pro Flex LED light is equipped with a touch 

display to show the selected settings and to control the device.

8.1 Switching the device on / off - setting power source

1.   Connect the power supply to the power control unit as described in section 

7 using the power cable or battery.

2.   Select the desired power source with the ON / OFF switch (14) of the 

control unit (7).

<0> OFF

<I> Battery operation mode

<II> AC cable power operation mode

3.  The display lights up and shows the current settings for the brightness,

the color temperature and the selected channel.

4.   The device is ready for use.

8.2 Setting brightness (dimmer function)

The currently selected light intensity is shown in % on the display (10)
1.   To adjust the brightness, tap the arrows up or down to change the desired 

brightness

2.   Tap the arrows to set the values upwards or down

3.   The brightness can be adjusted continuously from 0 to 100%

4.   After pressing the arrow keys on the display, the new value is automatically 

accepted and shown on the display immediately

8.3 Setting color temperature

The currently selected color temperature in Kelvin is displayed on the display (10)

1.   To adjust the color temperature, tap the arrows up or down to change the 

desired values

2.   The range of color temperature can be set from 3000 to 5600 Kelvin

3.   After pressing the arrow keys on the display, the new value is automatically 

accepted and shown on the display immediately

8.4 Synchronous control of several led lights

The lights of the walimex pro Flex LED series 500 and 1000 can be connected 

wirelessly in order to be able to control the values for the color temperature and 

the brightness synchronously.
1.   Screw the antenna (12) to the antenna port (11) of the control unit.

2.   Switch on all the devices to be controlled.

3.   The display shows the currently selected channel next to the channel

symbol <CH>.

4.   The following channel settings can be selected:

OFF / A / B / C / D

6.   Select the desired channel by tapping the <CH> symbol on the touch 

screen.

7.   After pressing the button, the new value is automatically accepted and dis-

played immediately.

8.   Set the same channels on all the lights that are provided for synchronization.

9   The synchronization of all lights with the same channel settings are made 

through the fi rst change of a value for the color temperature or brightness.

10.  To do this, tap the corresponding arrow keys and change a value.

11.  Set the desired brightness and color temperature values.

12.  Now the values of the synchronized devices are adjusted and all connec-

ted lights can be controlled via any control unit.

8.5 Battery Charging indicator

The device must be equipped with a suffi ciently charged battery for operation. 

The control unit has a charge control indicator for the used battery. If the inser-

ted battery is too much discharged, the control unit does not function in the bat-

tery operation mode. Charge the battery before use in the led light and note the 

instructions for use. When operating with cable power (switch position <II>), 

a full battery status is indicated in the display. The display does not show the 

correct, actual battery charge status during cable operation mode. The correct 

battery charge indicator function is generally only available when the battery 

mode is selected (switch is set to <I>) and the battery is suffi ciently charged.

Содержание Flex LED 500 Bi Color

Страница 1: ...ina ES Fabricado en China IT Fabbricato in China WALSER GmbH Co KG Gewerbering 26 86666 Burgheim Germany info walser de www walimexpro de www foto walser de Gebrauchsanleitung Instruction Manual Flex...

Страница 2: ...options 35 13 Disposal and environmental protection 35 14 Technical speci cations 36 EN Instruction Manual 1 So verstehen Sie diese Gebrauchsanleitung richtig 4 1 1 Kennzeichnungen am Ger t 4 1 2 Ken...

Страница 3: ...ER entschieden haben Die exiblen Fl chenleuchten der walimex pro Flex LED Serie berzeugen mit Ihrer Leistungsf higkeit sowie modernsten und innovativen Features zum attraktiven Preis Die variabel ausr...

Страница 4: ...r und Brandgefahr durch Kurzschluss Ein Kurzschluss kann u a durch defekte Kabel und durch Feuchtigkeit oder N sse verursacht werden Bei einem Kurzschluss k nnen sich die Leitungsdr hte so stark erw r...

Страница 5: ...enannt werden Legen Sie den Akku nicht in ein Feuer oder setzen Sie sie direkter Hitze aus Um Sch den am Produkt zu vermeiden stellen Sie sicher dass Sie den Akku entfernen wenn Sie das Produkt f r l...

Страница 6: ...m Sch den am Ger t zu vermeiden WARNUNG Beachten Sie bei allen T tigkeiten die Sicherheitshinweise in den jeweili gen Abschnitten 6 Ger t f r den Einsatz vorbereiten Die Leuchten der walimex pro Flex...

Страница 7: ...n ohne die Streben zu sehr durchzubiegen oder die Ecken der Leuchtmatte zu besch digen Richten Sie die Streben der X Halterung 4 gleichm ig aus Sollten die einzelnen Streben zu leichtg ngig sein ziehe...

Страница 8: ...Akkubetrieb II Netzstrombetrieb 3 Die Beleuchtung des Displays geht an und zeigt die aktuellen Einstellungen f r die Leuchtst rke die Farbtemperatur und den eingestellten Kanal 4 Das Ger t ist einsat...

Страница 9: ...ezeigt 2 Tippen Sie f r die Einstellung der Leuchtst rke auf die Pfeile nach oben oder unten um die gew nschte Helligkeit zu ver ndern und einzustellen 3 Tippen Sie auf den Pfeil nach oben um die Wert...

Страница 10: ...nder Adresse angefordert werden info walser de Anwendungsempfehlungen Durch ein zusammenrollen und leichtes biegen der Leuchtmatte k n nen sie den Abstrahlwinkel dieser LED Leuchte ver ndern Mithilfe...

Страница 11: ...nehmen Wir helfen Ihnen gerne Ihr WALSER Support Team E Mail Homepage support foto walser de www walimexpro de www foto walser de Unsere Postanschrift WALSER GmbH Co KG Gewerbering 26 86666 Burgheim D...

Страница 12: ...eir high performance light power as well as modern and innovative features at an attractive price The variable directional light mat allows you previously inconceivable possibilities for the design of...

Страница 13: ...connecting the device from the power sup ply through pulling out the power cable the device is actually de energized Switch off your device when it is not in use Switch off your device before mounting...

Страница 14: ...with adhe sive backside WARNING Danger of cutting and splintering caused by bursting illuminant Illuminants can break or splinter when banging against the oodlight Splinters can cause eye and skin inj...

Страница 15: ...light emitting mat corners Connect the x frame holding bracket with the bendable stand mount 6 and secure the installed screws Then insert the light mat including brackets into a suitable lamp stand...

Страница 16: ...ttery at the latest when the light starts to icker Switch the device off before removing the battery This also applies for changing or adding another battery in models with several battery mounts Swit...

Страница 17: ...arrow keys on the display the new value is automatically accepted and shown on the display immediately 8 4 Synchronous control of several led lights The lights of the walimex pro Flex LED series 500...

Страница 18: ...in or not plugged in cor rectly Battery are almost exhausted Plug the mains cable in correctly Charge the battery LED lamps or display does not shine The device is switched off Switch on the device Th...

Страница 19: ...r and batterie Flex LED 500 Bi Color Flex LED 1000 Bi Color Compatible battery type V Mount Anton Bauer V Mount Anton Bauer Batterie mount 1 1 AC Power Supply AC 220 230 V 50 60 Hz with DC Power Adapt...

Страница 20: ...38 39...

Отзывы: