


36
Instructions for Use Uplighter DU(S/T/A) “
ATARO
“
GB
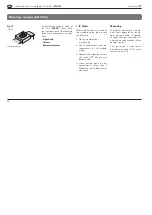
Light head assembly
See Fig. 15.
a) Unscrew both screws at the
centre cover in the light head.
b) Remove the cover.
c) Run the cables present on the
arm [15.2] plus plug through
the lateral opening in the light
chassis [15.1].
Caution: Do not
jam the cable!
d) Slide the arm [15.2] into the
light chassis [15.1] as far as it
will go.
Note on dismounting:
To remove the light head from the
support arm, press the two ends
[15.3] of the support arm [15.2]
together using pliers.
15.2
Fig. 15
15.1
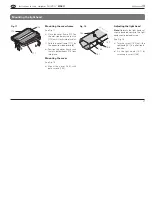
Connecting the light head
Please note:
Depending on the
light, different connection types are
provided in the light head.
Establish the electrical connections
(plug) in the light head:
f) Connect the mains lead to
the light head (see Fig. 16a or
16b).
In addition, for lights equipped
with sensor:
g) Connect the control cable
[16.1] to the plug-in connector
"Tastm." [16.3] on the control
device [16.2] (see Fig. 16c).
Mounting the light head
Fig. 16c
16.2
16.1
16.3
Fig. 16a
Fig. 16b
Fig. 16