WAGNER 4-STEP ELECTRONIC PRO DUTY POWER PAINTER Скачать руководство пользователя страница 8

8

© 2001 Wagner Spray Tech. All rights reserved.

English

STORAGE

1. Slide the spring onto the front end of the piston.
2. Insert the piston into the back of the pump housing
3. Insert the pump housing assembly into the front of the

sprayer.

4. Place the locking nut onto the motor housing.
5. Press in while turning the locking nut 

clockwise 

and tighten

firmly by hand.  

Do not cross-thread the locking nut.  Make certain it is

threaded correctly before tightening.  Make certain that the

pump housing is pushed far enough into the sprayer and

the locking nut is screwed on tightly.  

6. Insert the swirl valve into the front end of the pump housing.
7. Place the spray tip onto the pump housing and turn it

clockwise 

until it is tightened securely.

LUBRICATING THE SPRAYER

1. Turn the sprayer upside-down while the fluid container is

removed.

2. Pour a small amount of standard houshold oil into both the

intake and return openings on the pump housing.  

3. Plug in the sprayer.
4. Squeeze the trigger of the sprayer for 2 to 3 seconds while

sprayer is still inverted as shown above.  This works the
household oil onto the piston and swirl valve.  The oil
protects the sprayer by keeping any extra material from
drying and seizing the piston.

5. Replace the suction set and thread the fluid container onto

the sprayer.

Intake

opening

Return

opening

NOTE: Lubricating your sprayer prior to storage is

important to prolong the life of the pump

housing components.  

CAUTION

4

5

1

2

3

NOTE: Reassemble your sprayer before storing.

MAINTENANCE

Parts of your sprayer wear out with use and require regular
replacement.  They include the swirl valve, piston and spring.
These parts are not covered by your sprayer warranty.
More abrasive materials such as latex paints and stains cause
these parts to wear out faster than less abrasive materials such
as oil-based paints and stains, thin stains and sealers.

REPLACING THE SWIRL VALVE

The swirl valve is shaped to cause the material to spin as it
comes out of the sprayer.  The spinning breaks the material up
into a fine spray.  As more material goes through the swirl valve,
it wears out the valve and the shape of the valve changes.
When it changes too much to produce a good spray pattern, the
valve needs to be replaced.

1. Make certain that the sprayer is unplugged.
2. Turn the spray tip 

counterclockwise 

and remove.

3. Pull the old swirl valve out of the pump housing and insert a

new one.

4. Place the spray tip over the new swirl valve and tighten it

securely by hand.

NOTE: Make sure to tighten all spray tips firmly by

hand.  If the spray tip is not tightened firmly

enough, the sprayer could leak or the tip could

be damaged.  Do not use a tool to tighten the

spray tip.  If the tip is too tight, it may be

damaged.

Pump
housing
opening

Swirl valve

Spray tip

NOTE: The swirl valve that comes with your sprayer

has a clear base.  It is to be used with latex

and oil-based paints only.

If you will be spraying lacquers, make sure to

use the optional swirl valve designed for

lacquers, available for purchase by calling our

toll free number.  It has a grey base.
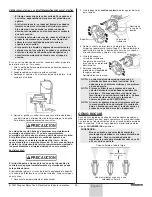
1

1

2

3

Front view of a good swirl valve.

2

Front view of a swirl valve after spraying 7-10 gallons of 
latex paint.  Replace.

3

Front view of a swirl valve after spraying 7-10 gallons of 
latex stain.  Replace.

Содержание 4-STEP ELECTRONIC PRO DUTY POWER PAINTER

Страница 1: ...ttoyage appropri e Llene el envase con la soluci n de limpieza apropiada 3 Spray solution for several seconds Pulv riser la solution pendant plusieurs secondes Roc e la soluci n durante varios segundo...

Страница 2: ...r severe injury PREVENTION Read all instructions and safety precautions for equipment and spray material before operating any equipment Comply with all appropriate local state and national codes gover...

Страница 3: ...ridge goes into the return opening 3 Place the pump housing locking collar over the dual hose fitting and turn the locking collar clockwise unil it locks securely 4 Push the suction hose set onto the...

Страница 4: ...ROL Your sprayer offers you four power levels 100 50 25 and 12 The lower the power level the closer you can get to your work and the less overspray you will have Lower power levels give you greater co...

Страница 5: ...are using Using the suction extension will decrease the material flow so it will take longer to apply the same amount of material to the surface being sprayed If your sprayer is properly cleaned and...

Страница 6: ...of wood or cardboard and make sure that you have drop cloths protecting anything not being sprayed Anything you don t want painted that is in the area of your spraying surface should be covered or rem...

Страница 7: ...irl valve 4 Turn the locking nut counterclockwise until it is removed Locking nut Pump housing opening Swirl valve Spray tip Dual hose fitting Locking collar 5 Slide the pump housing assembly off of t...

Страница 8: ...wear out with use and require regular replacement They include the swirl valve piston and spring These parts are not covered by your sprayer warranty More abrasive materials such as latex paints and...

Страница 9: ...g Locking nut Swirl valve Spray tip Locking nut Pump housing opening Swirl valve Spray tip NOTE Replace the piston if the sprayer takes longer than 15 seconds to prime when well lubricated or if there...

Страница 10: ...e paints 1 No power 2 Module defective 1 Module defective 1 Module defective 1 Seized piston 2 Extension cord too long 3 Operating continously 1 Spray tip is loose 2 Swirl valve not positioned properl...

Страница 11: ...halation de vapeurs dangereuses DANGER G N RALIT S Peut causer des dommages mat riels ou des blessures graves PR VENTION Lire toutes les directives et toutes les mesures de s curit portant sur l quipe...

Страница 12: ...de contenant Adaptateur du dispositif d aspiration Dispositif d aspiration Filtre d entr e Bague de blocage Orifice d entr e Flexible d entr e Orifice de sortie Orifice d entr e Raccord double Sailli...

Страница 13: ...n Les niveau de puissance peu lev s permettent d obtenir un meilleur contr le il faudra toute fois plus de temps pour recouvrir la surface desir e Chaque fois que l on branche le pulv risateur sa puis...

Страница 14: ...AVEC RALLONGE D APIRATION Si on se sert d une rallonge d aspiration le pulv risateur doit tre amorce en retirant l air du syst me Amor age 1 Tourner le bouton de r glage du d bit dans le sens antihora...

Страница 15: ...la forme de jet soit toujours bonne On doit toujours v rifier l efficacit du jet sur un vieux morceau de bois ou de carton en s assurant de prot ger les surfaces environnantes au moyen d une toile Tou...

Страница 16: ...ion Brosse de nettoyage AVERTISSEMENT Piston Ressort Logement le pompe Bague de blocage Soupape rotative Embout du pulv risateur NETTOYAGE DE LA RALLONGE D ASPIRATION 1 S assurer que le pulv risateur...

Страница 17: ...vertes par la garantie du pulv risateur Les produits fortement abrasifs comme les peintures et les teintures au latex usent ces pi ces beaucoup plus rapidement que les produits qui le sont moins comme...

Страница 18: ...er l embout du pulv risateur dans le sens antihoraire jusqu ce qu il puisse tre retir S assurer de ne pas perdre la soupape rotative 3 Retirer la soupape rotative 4 Tourner l crou de blocage dans le s...

Страница 19: ...1 Module d fectueux 1 Module d fectueux 1 Piston bloqu 2 Rallonge trop longue 3 Fonctionnement prolong 1 Embout du pulv risateur desserr 2 Soupape rotative mal positionn e 3 Soupape rotative us e 4 L...

Страница 20: ...PELIGRO GENERAL Puede causar da os a la propiedad o severas lesiones PREVENCI N Antes de operar cualquier equipo lea todas las instrucciones y los avisos de seguridad del equipo y de las substancias...

Страница 21: ...no 3 Coloque el collar n de seguridad de la caja sobre el conector de la manguera doble y g relo en sentido de las agujas del reloj hasta que quede bien fijo 4 Acople la unidad de la manguera de succi...

Страница 22: ...tencia m s podra acercar la pistola al rea de trabajo para evitar el rociado excesivo Los niveles de potencia m s bajos le ofrecen mayor control pero requieren m s tiempo para cubrir una superficie Ca...

Страница 23: ...roducto sobre la superficie en cuesti n Si el aparato fue limpido y engrasado correctamente y se tarda m s de tres minutos en cebar es posible que el pist n o la caja de la bomba est n desgastados y n...

Страница 24: ...el patr n en un pedazo de madera o cart n y aseg rese de usar manas para proteger lo que no quiera manchar Cubra o mueva todo objeto que no desee pintar y que se encuentre en proximidad a la superfici...

Страница 25: ...cia 4 Gire la contratuerca en sentido contrario de las agujas del reloj y ret rela Contratuerca Abertura de la caja de la bomba V lvula de turbulencia Boquilla Conector para manguera doble Collar n de...

Страница 26: ...de turbulencia el mbolo y el resorte Estas piezas no est n cubiertas por la garant a del pulverizador Las substancias m s abrasivas como las pinturas y los tintes vin licos desgastan estas piezas con...

Страница 27: ...ta que puede bien apretada PRECAUCION mbolo Resorte Caja de la bomba Contratuerca V lvula de turbulencia Boquilla Contratuerca Abertura de la caja de la bomba V lvula de turbulencia Boquilla NOTE Reem...

Страница 28: ...1 M dulo defectuoso 1 M dulo defectuoso 1 Embolo agarrotado 2 El cable de extensi n es demasiado largo 3 La unidad opera sin detenerse 1 La boquilla se ha aflojado 2 La v lvula de turbulencia est mal...

Страница 29: ...2001 Wagner Spray Tech All rights reserved 29...

Страница 30: ...RTS LIST LISTE DE PI CES LISTA DE PIEZAS OPTIONAL ACCESSORIES ACCESSOIRES OPTIONAL ACCESORIOS OPCI NAL 1 2 3 5 6 7 4 10 1 2 3 4 5 6 7 8 9 11 12 13 14 15 16 30 2001 Wagner Spray Tech All rights reserve...

Страница 31: ...nidad de succi n 1 13 0285351 Collar n de seguridad de la caja de la bomba 1 14 0280353 Gancho del envase 1 15 0280205 Cepillo de limpieza 1 16 0285198 Boquilla de ngulo abierto 1 Espa ol Fran ais Eng...

Страница 32: ...ours de la dur e applicable de la garantie le renvoyer avec une preuve d achat port pay l un des centres de service autoris par Wagner Une liste des adresses de ces centres accompagne tous les produit...

Отзывы: