


EN-USA_SECUSOL_TI-MA-111013-1121R800
33
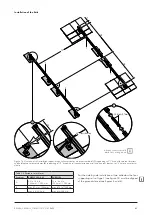
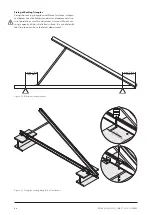
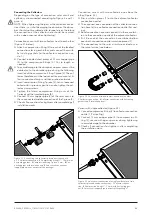
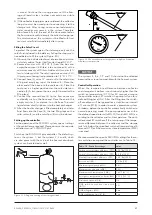
Figure 31 Connecting two collectors placed next to each oth-
er:
1
Collector connection;
2
Compression fitting ½" – 12 mm with
flat sealing gasket;
3
Compression-fitting T-piece, 2 mm;
4
Con-
necting pipes with insulation and
5
Solar circuit connections
(copper pipe pieces, not part of the package).
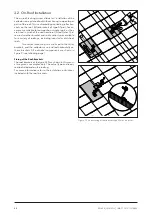
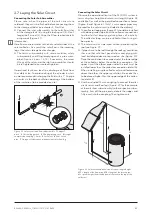
Connecting the Collectors
Depending on the type of connection, solar circuit and
collectors are connected according to Figure 5 and Fi-
gure 6).
NOTE: When tightening the joints at the collector connec-
tions there is a risk of damaging the absorber. The absor-
ber should not be subjected to torque forces, therefore
the connection at the collector side should be secured
with an open spanner when tightening!
Connection variant with two collectors next to each other
(Figure 31 below):
●
Attach a compression fitting (2) to each of the levelled
connections facing each other, and connect them with
flat sealing gaskets to the collector connection noz-
zle 1).
●
Connect included short pieces of 12 mm copper pipe
(4) to the compression fittings (2). Cut to length as
needed.
●
To avoid damage to the absorber, no pressure must be
exerted onto the absorber pipe during the following
insertion of the compression fitting T-piece (3). The col-
lector therefore must be loosened for a moment at its
four connection clamps and then pushed outwards.
●
Insert compression fitting T-piece (3), return loosened
collector to its previous position, and re-tighten the col-
lector clamp screws.
●
Tighten the lateral compression fitting nuts of the
T-piece and the inserted pipes (4).
●
Connect 12 mm copper pipe (5) of the solar circuit to
the unconnected middle connection of the T-piece (3).
●
Check all connections for tightness after completing all
installation works.
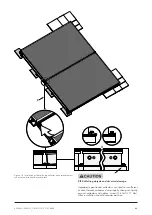
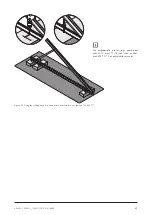
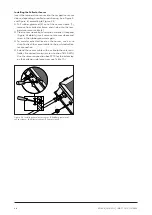
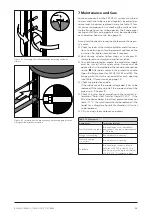
Figure 32 Connection of two collectors, one above the other:
1
Collector connection;
6
Collector connection with flat sealing
gaskets and
7
Insulation pieces.
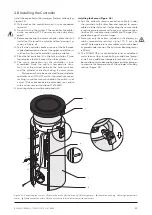
Figure 33 Solar circuit connection of a single collector or of two
collectors placed one above the other:
1
Collector connec-
tion;
2
Compression fitting ½" – 12 mm with flat sealing gas-
ket;
5
Solar circuit copper pipe (not part of the package).
1
5
2
5
3
1
2
2
4
4
Connection variant with two collectors one above the
other (Figure 32):
●
Slip insulation pieces (7) onto the adjacent collector
connection nozzles.
●
Then connect one connection of the collector connec-
tion hose (6) to a collector connection nozzle (flat seal-
ing).
●
Bend connection hose and connect it in the same fash-
ion to the connection nozzle of the adjacent collector.
●
Pull the ends of the connection hose rubber bellow
over both connection nozzle insulation pieces (7).
●
The connections to the solar circuit are carried out in
the same fashion (see below).
1
1
6
7
Variant with single collector (Figure 33):
●
Connect compression fitting (2) to collector connection
nozzle (1, flat sealing).
●
Connect 12 mm copper pipe (5) to compression fit-
ting (2); secure with open spanner during tightening
to avoid damage to the absorber.
●
Check all connections for tightness after completing
the installation work.


