background image

© W

&

W 05/2007 Version 13

19

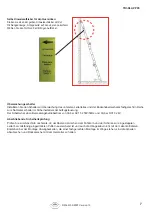
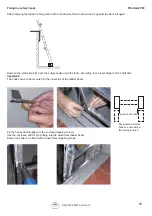
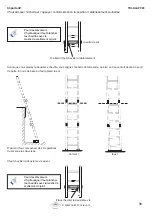
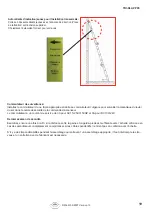
Autocollants d‘indication jaunes pour l‘installation transversale:

Collez un des autocollants jaunes avec l‘annonce de direction „Place 
de la fi xation“ sur l‘échelon supérieur.
Choississez l‘autocollant correct pour votre cas.

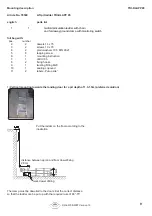
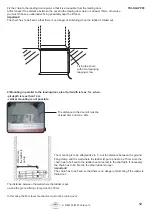
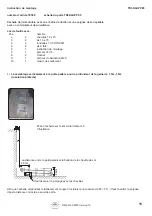
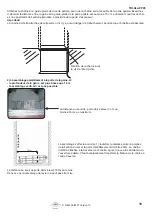
Commutateur de surveillance:

Installez  le commutateur d`une  façon appropriée en série au commutateur d`urgence pour surveiller la mécanique du levier 
du sol  dans le cercle de sécurité de la commande d`ascenseur. 
Le commutateur a un courant de service de 3A pour AC15/ 250V/ 50HZ et 3A pour DC13C/24V.

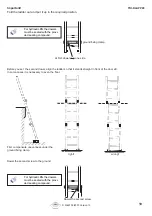
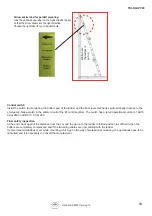
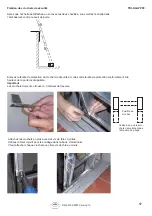
Dernier examen de sécurité

Examinez encore une fois à la fi n si la distance entre la gaine et la garde-pieds est suffi sante vers l`échelle enfoncée en 
cas des amortisseurs complètement comprimés et si les câbles pendentifs n`entrent pas en collision avec l’échelle.

S`il y a des impondérabilités pendant l`assemblage qui entravent  un assemblage approprié, il faut interrompre les tra-
vaux et un entretien avec le fabricant est nécessaire.

TRI-KLAPP 95

Содержание TRI-KLAPP 95

Страница 1: ...g siehe hierzu Pr fetikett auf Leiterholm Maintenance advice Attend the annual inspection interval according to EN131 BGV D 36 GUV 6 4 and your country norm with additional inspection of function of r...

Страница 2: ...die Aufzugmontage zu beachten Montaget tigkeiten im Bereich von Aufzugsanlagen sind nur durch bef higte Personen nach TRBS 1203 durchzuf hren TRI KLAPP 95 ACHTUNG Wenn Leitern in einem Aufzugschacht m...

Страница 3: ...chraube 6 1 Montageanleitung 7 1 Bohrer d 3 5 8 2 Fixierhaken 9 1 W rgnippel M20 10 1 Dichtungskitt 11 2 Aufkleber Anlegeseite 1 Montage senkrecht zur Schachtt re bei Grubentiefe 1 3 1 5m bevorzugte L...

Страница 4: ...Sie den zweiten D bel setzen richten Sie die Leiter so aus dass diese gerade vor der T rschwelle steht Im Bedarfsfall muss der Boden ausgeglichen werden richtig falsch TRI KLAPP 95 Vorab Bodenunebenh...

Страница 5: ...aken ab und kleben Sie diese entsprechend der rtlichen Schachtt rh he an Wichtig Die Haken m ssen auf der Holminnenseite liegen Befestigen Sie die Haken zus tzlich mit den beiliegenden Blechschrauben...

Страница 6: ...N he der Aufzugt re gew hlt werden Wichtig Die Kette ist so zu befestigen dass bei ausgeklappter Leiter keine Stolpergefahr entsteht Der Abstand zur T rschwelle mu min 3cm und max 8cm betragen Die Mon...

Страница 7: ...emsschalter im Sicherheitskreis der Aufzugsteuerung Der Schalter hat einen Bemessungsbetriebsstrom von 3A bei AC15 250V 50Hz und 3A bei DC13 24V Abschlie ende Sicherheitspr fung Pr fen Sie zum Abschlu...

Страница 8: ...sures for lift mounting have to be considered while mounting Assembly operations at lift systems have to be accomplished only by qualified per sons Attention If ladders are mounted in lift shafts the...

Страница 9: ...ng screw 6 1 mounting instruction 7 1 drill d 3 5 8 2 fixing hooks 9 1 twisting fitting M20 10 1 sealing copound 11 2 labels Put up site 1 Vertical mounting towards the landing door for a pit depth of...

Страница 10: ...amp Before you set the second dowel align the ladder so that it stands straight in front of the door sill In some cases it is necessary to even the floor right wrong TRI KLAPP 95 First compensate unev...

Страница 11: ...them according to the local height of the shaft door Important The hooks have to be mounted to the inner side of the ladder beam Fix the hooks additionally with the enclosed tapping screws Use the enc...

Страница 12: ...ing in parallel to the landing door also if pit width is max 1m when pit depth is less than 1 3m vertical mounting is not possible In this case the floor lever mechanics must not be turned over 70cm W...

Страница 13: ...safety circuit of the lift control system The switch has a rated operational current of AC15 3A at 250V and DC13 3A at 24V Final safety inspection At the end check again if the distance from the car...

Страница 14: ...lage dans le secteur des installations TRI KLAPP 95 Attention Si des chelles sont install es dans une gaine d ascenseur ces chelles et leurs fixations ne doivent pas avancer aux pi ces de l ascenseur...

Страница 15: ...tage 7 1 perceur d 3 5 8 2 crochet 9 1 embout d obstruction M20 10 1 mastic de scellement 1 L assemblage verticalement la porte pali re pour la profondeur de la gaine de 1 3m 1 5m la solution pr f r e...

Страница 16: ...que vous placiez la deuxi me cheville vous alignez l chelle de telle sorte qu elle se trouve droit devant le seuil de porte En cas de besoin il faut aplanir le sol Correct faux TRI KLAPP 95 D abord i...

Страница 17: ...ollez cette feuille de protection conform ment la hauteur de la porte locale pali re Important Les crochets doivent se trouver l int rieur de traverse Attachez les crochets en plus avec des vis de t l...

Страница 18: ...e possibilit de fixation alternative proximit de la porte d ascenseur Important La cha ne doit tre attach e de telle sorte qu il n y a aucun danger de tr buchement pendant que l chelle est bascul e La...

Страница 19: ...ier du sol dans le cercle de s curit de la commande d ascenseur Le commutateur a un courant de service de 3A pour AC15 250V 50HZ et 3A pour DC13C 24V Dernier examen de s curit Examinez encore une fois...

Отзывы: