Vye mini-v S41 Скачать руководство пользователя страница 5

2. Touch Screen Display

4. Direction Button

5. Joystick Pointer 

6. Built-in Stereo
     Speakers 

23. 3 in1 Media Slot
24. Microphone Input Jack

25. Headphone Jack 

12. Scroll Button
13. Left & Right select   
       Buttons (Joystick)

21. Status LEDs

20. Touchpad (& L/R buttons)

16. Keyboard

22. Power Status LED 

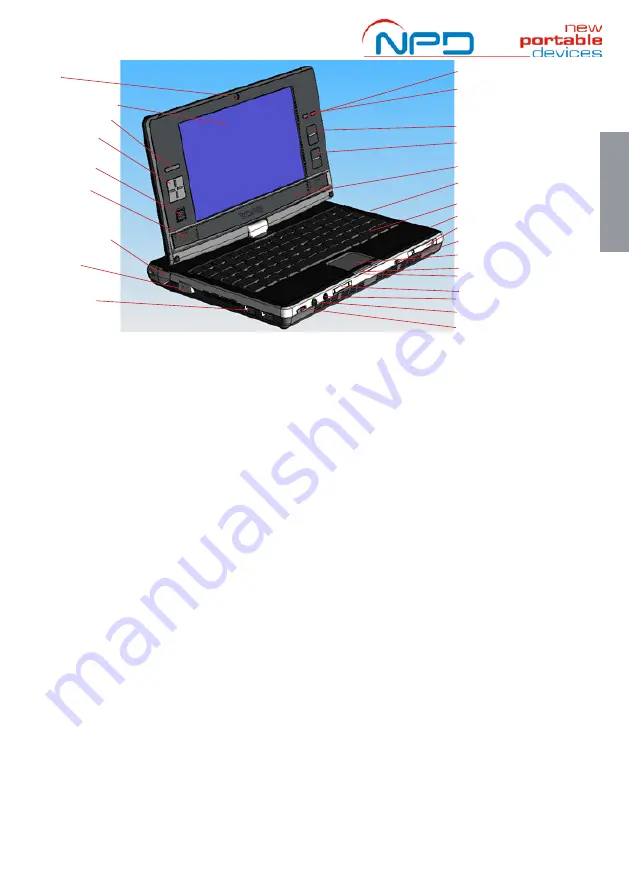
A Glance at your mini-v:

1. Camera

7. 10/100 Connection 

8. Monitor Out

17. Power On/ Off Switch

14. Status LEDs

18. CF slot

19. Wireless LAN On/Off

3. Brightness Selector

11. Enter Button

10. Rotation Button

1. Camera

Take pictures and video conference with the built in camera. 

2. Touch Screen Display

Use the stylus and touch screen to operate your mini-v. 

3. Screen Brightness Button

This allows you to adjust the brightness of the screen

4.  Direction Button

This allows you to step the cursor across the screen.

5.  Joystick Pointer

This allows you to move the mouse cursor on the screen.

6.  Built-in Stereo Speakers

Audio output devices that amplify the sound emitted by the
notebook. 

7. 10/100 LAN Connection 

Connect your mini-v to a cable network.

8. Monitor Out

This allows you to connect a Monitor to your mini-v.

9. USB 2.0

Connect your mini-v to a USB device.

10. Rotate Button

Rotate the mini-v display.

11. Enter Button

Press to action a selection.

12. Scroll Button

This allows you to scroll the content of the activated window
in a  similar way to the PgUp/PgDn buttons. 

10. Power Status LED

When blue your mini-v is on. When flashing your mini-v is in
standby mode.

13. Left & Right select Buttons (Joystick)

This allows you to select an icon or activate its function. These
operate the same as when you right-click/left-click the
touchpad buttons.

14. Screen Status LEDs

Displays the power,  bluetooth and wireless status.

15. DVD / RW Power ON/OFF & Eject buttons

You can turn off your DVD to conserve power consumption
 Open the DVD tray with the Eject button.

16. Keyboard

An input device that allows users to insert data and to control
the notebook. 

17. Power On /Off Switch

Turn your mini-v on and off or place the unit in standby.

18. CF Card slot

Connect your mini-v to a  CF Card.

19. Wireless LAN and Bluetooth On/Off

Turns the wireless receiver on or off.

20. Touchpad and Left and Right Select Buttons

This allows you to move the mouse cursor on the screen and
offers you the same functionality as a mouse. 

21. Status LEDs

Status of  battery charging, hard disk operation,  caps lock,
number lock and scroll lock.

22. Power Status LED

Shows power status of mini-v: on / standby / hibernate

23. 3 in 1 Media Slot

This is used to insert a memory card. 

24. Microphone Input Jack

This allows you to connect a microphone and make a sound
recording.

25. Headphone Jack

This is used to connect stereo headphones for audio output.

26. Volume dial button

This is used to adjust the level of the sound / audio output.

26. Volume dial button

15. DVD / RW Eject and   

       DVD ON/OFF Button

9. USB 2.0 (x 2) 

5

G

etting S

tar
ted

2

Содержание mini-v S41

Страница 1: ...Microsoft Vista and can act as a Phone Notebook MP3 Player and PMP Portable Movie Player as it has been fully tested with iTunes DiVX Skype and comes with CF Compact Flash compatibility to support a...

Страница 2: ...irect sunlight or heat sources Do not expose the notebook to rain or moisture Do not spill water or any other liquid on the notebook Do not place the notebook near magnetic fields Avoid heavy shocks o...

Страница 3: ...e battery is between 0 and 30 C Do not expose the battery to rain or moisture Do not spill water or any other liquid on the battery Avoid heavy shocks to the battery Do not put any heavy objects on to...

Страница 4: ...i v 2 Getting Started U4 Battery Pack Slide Switch U3 Memory Cover U2 Battery Pack Lock Switch U1 Battery pack A Glance at your mini v U1 Battery pack This serves as the main power of this notebook wh...

Страница 5: ...PgUp PgDn buttons 10 Power Status LED When blue your mini v is on When flashing your mini v is in standby mode 13 Left Right select Buttons Joystick This allows you to select an icon or activate its...

Страница 6: ...guide you through the set up of your notebook A B Battery Pack Slide Switch Battery pack Battery Pack Lock Switch IMPORTANT You should lock yo u r b at te r y i n place to prevent damage or electric...

Страница 7: ...rtically up at a right angle 90 Degrees to the keyboards 2 Twist the screen whilst it is vertical do not twist the screen at an angle to avoid damage to the keyboard 3 Twist the screen clockwise until...

Страница 8: ...In advanced settings you may also switch it to stand by mode Fn F3 Select Display Device Switch the notebook to output the display to an externally connected screen Fn F4 Wireless LAN Turns the wirele...

Страница 9: ...The scroll button allows you to scroll documents and or Internet sites that occupy more than one vertical page You can use the scroll functions when you see a slide bar in your active application win...

Страница 10: ...rom satellites Note Although this machine has a built in GPS antenna you can use an external GPS antenna to improve the reception when you use the GPS function in places such as in a car and a buildin...

Страница 11: ...tical drive will read write to the bottom face of the disk NOT the top Close the tray by pushing it back into the mini v The tray will click and lock into place when properly closed If your DVD tray n...

Страница 12: ...O U R TO U C H S C R E E N A N D DAMAGE CAUSED BY SUCH MISUSE WILL NOT BE COVERED BY YOUR WARRANTY Display Touch panel Your mini v is equipped with a touch panel touch screen display You can use the m...

Страница 13: ...nvoice Initial Defect If the product is wrongly delivered missing any items or damaged please contact the store where you purchased the product or our support centre within 2 weeks of the purchase If...

Страница 14: ...Warranty Scope Unless regulated in some other manner the warranty covers all material and labour defects which occur in the respective warranty period The warranty offer depends on the specific produ...

Страница 15: ...nformed of which VYE COMPUTERS service partner he or she will be able to send the device to For this the customer is responsible for the despatch and insurance of the product The transport and insuran...

Страница 16: ...ty minor defects or deviations from the product specifications that are immaterial or negligible as regards to the value or the functioning of the product providing and installing upgrades updates of...

Страница 17: ...tive use by VYE COMPUTERS in case of services repairs or other changes of the product by persons not authorised by VYE COMPUTERS unless the customer proves that any defects occurring thereafter were n...

Страница 18: ...18...

Отзывы: