Vye mini-v S41 Скачать руководство пользователя страница 11

Optical Disk:

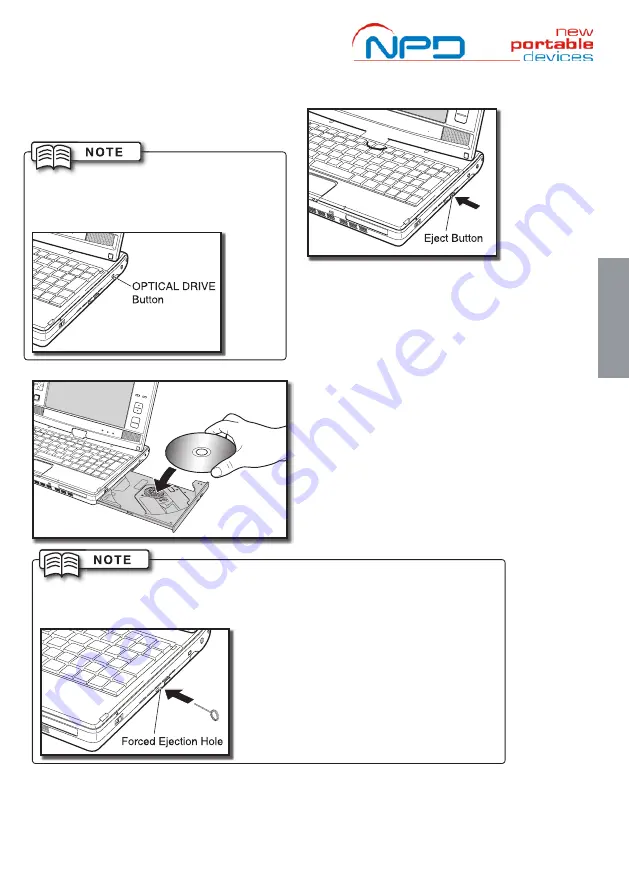
Your mini-v comes fitted with the an optical disk so you can use it to read 

and create Data Disks, Music Disks and DVDs. The optical drive is operated 

as follows:

You can turn the optical drive on and off to 

conserve battery power and to reduce power 

consumption

1. To open the DVD tray use the 

Eject Button

There is a short delay of a few seconds before 

the tray opens, whilst the operating system 

disconnects from the drive. You will hear the 

drive unlocking and the tray will pop out. 

2. Place your CD / DVD in the tray, locating the 

hole in the middle on the spindle in the tray. 

There will be a click, when the disk is seated 

properly.  

Note: The optical drive will read/write to the 

bottom face of the disk, NOT the top!

Close the tray by pushing it back into the mini-v. 

The tray will click and lock into place when 

properly closed.

If your DVD tray not open when the eject button is pressed, you can manually 

release it. 

TURN OFF YOUR MINI-V

 and use a paper clip or small screw-driver to       

disengage the tray’s locking mechanism.

You will hear the drive tray unlock and the 

tray will pop out.

CAUTION: Manually ejecting the tray whilst 

your mini-v is powered on could cause you 

or your mini-v harm.

Important: Your ability to play DVD’s on the optical drive will depend on which 

operating system you have chosen, region of the DVD  and what playback  

software you use. You may have to download additional plug-ins and/or video 

codec files from the internet to suit your configuration.

11

O

per

ation of  y

our mini-v

3

Содержание mini-v S41

Страница 1: ...Microsoft Vista and can act as a Phone Notebook MP3 Player and PMP Portable Movie Player as it has been fully tested with iTunes DiVX Skype and comes with CF Compact Flash compatibility to support a...

Страница 2: ...irect sunlight or heat sources Do not expose the notebook to rain or moisture Do not spill water or any other liquid on the notebook Do not place the notebook near magnetic fields Avoid heavy shocks o...

Страница 3: ...e battery is between 0 and 30 C Do not expose the battery to rain or moisture Do not spill water or any other liquid on the battery Avoid heavy shocks to the battery Do not put any heavy objects on to...

Страница 4: ...i v 2 Getting Started U4 Battery Pack Slide Switch U3 Memory Cover U2 Battery Pack Lock Switch U1 Battery pack A Glance at your mini v U1 Battery pack This serves as the main power of this notebook wh...

Страница 5: ...PgUp PgDn buttons 10 Power Status LED When blue your mini v is on When flashing your mini v is in standby mode 13 Left Right select Buttons Joystick This allows you to select an icon or activate its...

Страница 6: ...guide you through the set up of your notebook A B Battery Pack Slide Switch Battery pack Battery Pack Lock Switch IMPORTANT You should lock yo u r b at te r y i n place to prevent damage or electric...

Страница 7: ...rtically up at a right angle 90 Degrees to the keyboards 2 Twist the screen whilst it is vertical do not twist the screen at an angle to avoid damage to the keyboard 3 Twist the screen clockwise until...

Страница 8: ...In advanced settings you may also switch it to stand by mode Fn F3 Select Display Device Switch the notebook to output the display to an externally connected screen Fn F4 Wireless LAN Turns the wirele...

Страница 9: ...The scroll button allows you to scroll documents and or Internet sites that occupy more than one vertical page You can use the scroll functions when you see a slide bar in your active application win...

Страница 10: ...rom satellites Note Although this machine has a built in GPS antenna you can use an external GPS antenna to improve the reception when you use the GPS function in places such as in a car and a buildin...

Страница 11: ...tical drive will read write to the bottom face of the disk NOT the top Close the tray by pushing it back into the mini v The tray will click and lock into place when properly closed If your DVD tray n...

Страница 12: ...O U R TO U C H S C R E E N A N D DAMAGE CAUSED BY SUCH MISUSE WILL NOT BE COVERED BY YOUR WARRANTY Display Touch panel Your mini v is equipped with a touch panel touch screen display You can use the m...

Страница 13: ...nvoice Initial Defect If the product is wrongly delivered missing any items or damaged please contact the store where you purchased the product or our support centre within 2 weeks of the purchase If...

Страница 14: ...Warranty Scope Unless regulated in some other manner the warranty covers all material and labour defects which occur in the respective warranty period The warranty offer depends on the specific produ...

Страница 15: ...nformed of which VYE COMPUTERS service partner he or she will be able to send the device to For this the customer is responsible for the despatch and insurance of the product The transport and insuran...

Страница 16: ...ty minor defects or deviations from the product specifications that are immaterial or negligible as regards to the value or the functioning of the product providing and installing upgrades updates of...

Страница 17: ...tive use by VYE COMPUTERS in case of services repairs or other changes of the product by persons not authorised by VYE COMPUTERS unless the customer proves that any defects occurring thereafter were n...

Страница 18: ...18...

Отзывы: