VTech ErisTerminal VSP861 Скачать руководство пользователя страница 33

33

Using the Phone

Transferring calls

You can transfer a call to someone else at another phone.
If you talk to the transfer recipient before completing the transfer, you are making 

a “supervised” transfer. 
However, the transfer recipient does not have to talk to you before receiving the 

transferred call. If you do not talk to the transfer recipient before transferring the 

call, you are making a “blind” transfer. 
You can also transfer a call to a held call.

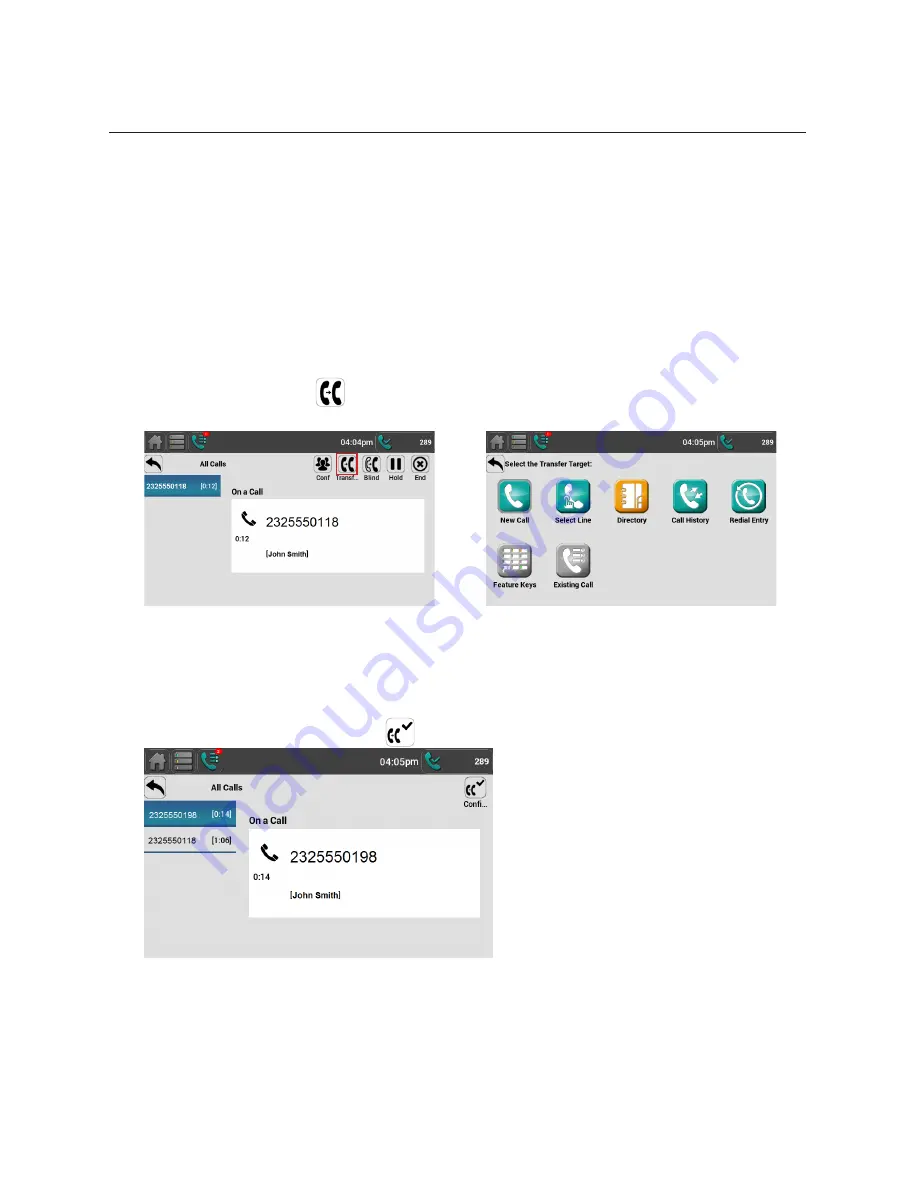
To transfer a call (supervised):

1.  During a call, press 

 . The call is automatically put on hold and the Select 

the Transfer Target screen appears.


2.  Dial the number to which you want to transfer the call. You can also use a 

number from a list, such as the Directory or Call History, or use a Quick Dial 

feature key.

3.  When the second caller answers, you can talk to the caller to notify them of 

the transfer, and then press 

 to transfer the call.

The message 

Call transferred

 appears, and your phone returns to idle 

mode if you have no other active calls.

è

Содержание ErisTerminal VSP861

Страница 1: ...ErisTerminal SIP Deskset VSP861 User Guide VSP861...

Страница 2: ...2...

Страница 3: ...all the feature operations and troubleshooting information necessary to install and operate your product You can also visit our website at businessphones vtech com or call 1 888 370 2006 Please note t...

Страница 4: ...r water such as near a bath tub wash bowl kitchen sink laundry tub or swimming pool or in a wet basement or shower 7 Do not place this product on an unstable table shelf stand or other unstable surfac...

Страница 5: ...e other than cordless during an electrical storm There is a remote risk of electric shock from lightning 16 Do not use the telephone to report a gas leak in the vicinity of the leak Under certain circ...

Страница 6: ...elephone base on the wall by aligning the eyelets with the mounting studs of the wall plate Then slide the telephone base down on both mounting studs until it locks into place Refer to the full instru...

Страница 7: ...ing calls 25 Answering calls 27 Putting a call on hold 29 Managing calls with FLASH 30 Forwarding calls 31 Transferring calls 33 Making a conference call 36 Setting up a Network Conference 37 Retrievi...

Страница 8: ...s 68 Using the User Settings menu 69 Display 70 Audio 71 Setting the date and time 72 Setting the language 73 Setting the Key Unlock PIN 74 Hiding In Call Digits 75 Configuring the Feature keys 76 Cha...

Страница 9: ...paging and call transfers between system extensions and can connect you and two other parties on the same conference call The slot on the back of the phone accepts a micro SD card The SD card allows c...

Страница 10: ...AGE WAITING indicator Flashes when you have a new voice message VSP861 Corded headset input on side SPEAKER Press to turn the speakerphone on or off REDIAL Press to view list of previously dialed numb...

Страница 11: ...11 PoE Class 3 Use only Supplied Adapter 5 1V Quick Reference Guide Rear panel connection ports Ethernet LAN port Power adapter jack PC port Reserved for future use Do not connect to other equipment...

Страница 12: ...screen You may need to press to view additional idle screen icons The first page of 15 feature keys appears Key Number Setting 1 Line 1 2 Line 1 3 Line 1 4 Directory 5 Call History 6 Redial 7 Message...

Страница 13: ...All desksets must reside on a single subnet A Dynamic Host Configuration Protocol DHCP server is recommended and must be on the same subnet as the desksets so that IP addresses can be auto assigned In...

Страница 14: ...er cordless telephones Excessive heat sources Noise sources such as a window with traffic outside motors microwave ovens refrigerators or fluorescent lighting Excessive dust sources such as a workshop...

Страница 15: ...e plug in place if it is plugged into a ceiling under the table or cabinet outlet Router Plug the other end of the Ethernet cable into the router connecting to your console Plug one end of the Etherne...

Страница 16: ...Ethernet cable into the Ethernet port on the rear of the deskset marked by and plug the other end of the cable into your network router or switch If the deskset is not using power from a PoE capable n...

Страница 17: ...place To mount the phone on the wall 1 Prepare the wall mount screws The deskset will fit onto wall mount screws with centers 3 inches 8 2 cm or 4 inches 10 2 cm apart Most standard wall plates have s...

Страница 18: ...r tab of the standard wall plate Push the phone down until it clicks securely in place 7 Bundle the Ethernet cable and power adapter cord neatly with twist ties 8 Plug the Ethernet cable into the rout...

Страница 19: ...If the Ethernet cable and power adapter cord are bundled untie them first 2 Push the phone up to remove it from wall Unplug the Ethernet cable from the router and the power adapter from the power outl...

Страница 20: ...one on page 66 Your system administrator can add a custom background to the Home screen The appearance of your Home screen and the available shortcuts may differ from that shown Home screen shortcuts...

Страница 21: ...alls and dialed calls Select a paging zone for broadcasting a page Broadcast a page to a predefined zone Change the phone settings including Call Settings App Settings and User Settings View the phone...

Страница 22: ...ay be able to access your messages through the Messages menu The phone has one or more calls including active calls held calls incoming calls or pages The number indicates the number of calls Press to...

Страница 23: ...call Held call Shared line key Same as Line except Steady ORANGE Quickly flashing ORANGE Slowly flashing ORANGE The shared line is on a call Rejected incoming call The shared line is on hold Do Not D...

Страница 24: ...RANGE Quickly flashing ORANGE ACD agent wrap up state ACD agent ready state ACD agent unavailable state ACD logged on ACD logged off ACD subscription error Call Handing Profile Off Steady ORANGE Featu...

Страница 25: ...e lift the handset press a New Call or Line icon press HEADSET or press SPEAKER To use a specific line press the Select Line icon You hear a dial tone 2 Use the key pad to enter the desired phone numb...

Страница 26: ...in name as part of the number 2 Dial the number by Pressing Dial The phone will use the preferred audio mode speaker or headset until you lift the handset Lifting the handset Pressing SPEAKER or HEADS...

Страница 27: ...ing call screen you can also press Reject to terminate the incoming call Forward to forward the call to another number Dismiss to return to the home screen The phone stops ringing If you don t respond...

Страница 28: ...continued To answer multiple calls 1 When you have two or more calls the Call Manager appears showing the incoming calls 2 Press the tab for the incoming call you want to answer and then press You ca...

Страница 29: ...e 40 To put a call on hold During a call press HOLD on the deskset or On the screen press The On Hold screen appears From the On Hold screen you can press to end the call to take the call off hold or...

Страница 30: ...s because of the Call Forward No Answer setting you can increase your Call Forward No Answer delay For more information see You can automatically forward incoming calls to another number The following...

Страница 31: ...ued To cancel the forwarding process and answer the call Press and then press the flashing green Line key or Press to open the Call Manager and then press the call slot for the call Press to cancel fo...

Страница 32: ...ys shown below 3 Select the call history list or directory you want to access Pressing REDIAL takes you directly to the Dialed Calls list in the Call History 4 Press to select the contact or call hist...

Страница 33: ...d transfer You can also transfer a call to a held call To transfer a call supervised 1 During a call press The call is automatically put on hold and the Select the Transfer Target screen appears 2 Dia...

Страница 34: ...call is automatically put on hold and the Select the Transfer Target screen appears 2 Dial the number to which you want to transfer the call You can also use a number from a list such as the Director...

Страница 35: ...d the Select the Transfer Target screen appears 2 On the Select the Transfer Target screen press The Call Manager opens showing the call to be transferred and the held call 3 Select the held call 4 Pr...

Страница 36: ...in your conference You can also use a number from a list such as the Directory or Call History or use a Quick Dial feature key 3 When the second call is established press The conference begins and the...

Страница 37: ...call Press one of the following to hang up on both calls to split the conference and put both calls on hold to join both calls The phone returns to idle mode Setting up a Network Conference A Network...

Страница 38: ...ne To listen to your messages 1 Press the New Message alert or Press the Messages shortcut The Messages menu appears 2 Press the desired line to access messages in that mailbox 3 Press to call your vo...

Страница 39: ...does not appear When to Use a Private Line Instead of a Shared Line The feature keys that access lines should be labeled according to the type of line The labels should indicate which keys apply to th...

Страница 40: ...ll on hold As well when you are on a call and you answer another incoming call or retrieve another call on hold your first call is put on private hold automatically To put a call on private hold manua...

Страница 41: ...her participants can continue the bridged call NOTE If you are unable to barge in on a call it may be because the other call is not currently in progess A line key with a steady orange indicator can a...

Страница 42: ...ions they monitor The BLF feature may not be available on your deskset For BLF LED states see Feature key indicators on page 23 To dial a monitored extension Press the BLF key for that extension The m...

Страница 43: ...TE The feature key for paging can have a custom label Intercom Page is the default key label Your phone dials out the Page Feature Access Code 2 Follow the voice prompts to page To send a multicast pa...

Страница 44: ...you pressing this shortcut displays an additional screen where you can select the desired directory To use the local directory see Using the local directory on page 45 Blacklist view add and manage bl...

Страница 45: ...een press the DIRECTORY icon or Press the Directory feature key NOTE If you have one or more server based directories available you may need to select the local directory after pressing the first Dire...

Страница 46: ...s 3 Select a ringtone for incoming calls and the desired line to use when you dial the contact from the directory 4 Press Save To edit a directory entry 1 When viewing the desired directory entry pres...

Страница 47: ...Press to delete incorrect characters 3 Press Search The deskset searches for the first name or last name matching your search entry Search results appear in the left hand column 4 Press entries to vie...

Страница 48: ...rmation screen appears press Yes To delete all directory entries 1 From the Home scree press 2 From the Settings menu press App Settings 3 From the App Settings menu press Directory 4 Press Delete 5 W...

Страница 49: ...Blacklist can be viewed and edited in the same way as the Local Directory but is a completely separate Directory listing To add a number to the Blacklist 1 From the Call History select the desired ca...

Страница 50: ...al list To view the call history 1 On the home screen press the Call History shortcut or Press the Call History feature key The Call History appears 2 Press the desired folder to see call history entr...

Страница 51: ...tes the entry Adds the entry to the blacklist You can edit the caller s information before saving it to the blacklist To delete multiple call history entries 1 From the Home screen press the settings...

Страница 52: ...call recording you will see the record option available during an active call To record a call 1 While on a call press You will hear the Record tone if the tone has been enabled by your administrator...

Страница 53: ...ears 2 In the left hand column select the desired recording 3 Press to listen to the recording The Call Playback screen appears 4 Press PLAY to play back the recording While the recording is playing y...

Страница 54: ...ss the Settings shortcut 2 From the Settings menu press User Settings and scroll down to Storage 3 On the User Settings menu select Storage The SD Card screen appears showing you the card s available...

Страница 55: ...n information for each line available on your phone Product Information Your phone s model number serial number MAC address and software version Cordless accessories Registration status of cordless ac...

Страница 56: ...D silences incoming ringing and paging You can set DND to apply to all lines or you can set it on a per line basis To set Do Not Disturb 1 From the Home screen press 2 From the Settings menu press Cal...

Страница 57: ...ress 2 From the Settings menu press Call Settings and then press Call Forward 3 Select the desired option Call Forward Always Call Forward Busy Call Forward No Answer For each option a Select the line...

Страница 58: ...he phone to make outgoing calls with the Caller ID hidden from the far end To block anonymous callers 1 From the Home screen press 2 From the Settings menu press Call Settings and then press Anonymity...

Страница 59: ...From the Settings menu press Call Settings and then press Anonymity The Anonymity settings appear 3 Press Dial As Anonymous 4 On the Dial As Anonymous menu select the desired line 5 Enable anonymous...

Страница 60: ...ll incoming calls are displayed on the screen When the call waiting alert is disabled incoming calls are rejected and no notification appears on the screen See also Call Waiting Settings on page 84 Se...

Страница 61: ...press 2 From the Settings menu press User Settings and then press DECT The DECT settings appear 3 Press DECT Headset The DECT Headset menu appears 4 Lift the cordless headset out of the charger and th...

Страница 62: ...eadset You can use this method when you cannot use the deskset for standard deregistration The deskset may be out of range or may have been removed from the system To deregister a VSP505 headset on th...

Страница 63: ...ndset screen displays instructions Press NEXT to continue reading the instructions 6 On the deskset from the Home screen press 7 From the Settings menu press User Settings and then press DECT The DECT...

Страница 64: ...d press SELECT 4 Press q to highlight Deregistration and press SELECT 5 Enter the PIN and then press OK to begin deregistration The default PIN is 1592 To deregister using the deskset 1 On the deskset...

Страница 65: ...Settings menu 1 When the phone is idle press 2 Press App Settings The App Settings menu appears The App Settings are Setting Description See page Call History Delete all entries from Call History fol...

Страница 66: ...pending on your preference you can set the screen to the Home screen showing all the app shortcuts the Feature keys or the Call Manager Home Screen Feature keys Call Manager To configure the default s...

Страница 67: ...figure Home screen shortcuts 1 From the App Settings menu press Applications The App Settings menu appears 2 On the Applications menu select the desired page The list of 10 shortcuts for the selected...

Страница 68: ...Key Tone On Off Audio Mode Speaker Headset Date Time Date Time Format Time Zone Daylight Savings Network Time Manual Time Language Deskset Language Phone lock Set Key Unlock PIN In Call Digits Hide i...

Страница 69: ...t the backlight level that applies when the phone is active Under In Use Backlight touch the slider to select Off Low Medium or High To set the backlight level that applies when the phone is idle 1 Un...

Страница 70: ...menu under Ringer Tone select a line for which to select a ringer tone 2 Select one of ten ringtones The currently selected ringtone plays touch it once more to stop it playing To set the key tone Fr...

Страница 71: ...e from the list 3 Press Save To enable daylight time saving 1 From the Date Time menu press Daylight Time Saving 2 Touch the slider to enable or disable automatic daylight time saving adjustments To e...

Страница 72: ...et Time Manually select the desired Year Month Day Hour and Minute 3 Press Save Setting the language The phone menus and other user interface items can be changed to another language The languages ava...

Страница 73: ...y number 911 for example This emergency number is configured for your area by your system administrator If your phone has been locked unnecessarily see your system administrator To change the Unlock P...

Страница 74: ...bers and pass codes for example that you enter during a call By default in call digits are shown To show or hide in call digits 1 From the User Settings menu press In Call Digits The In Call Digits me...

Страница 75: ...he key to configure The Type select menu appears 3 Select a Feature key type Depending on the PFK type the screen may prompt you to configure additional settings For more information see Programmable...

Страница 76: ...ssword The Edit Password menu appears 2 Enter the current password for a new deskset the default password is user 3 Enter and re enter a new password The password is case sensitive and can consist of...

Страница 77: ...the WebUI with your user password you can configure the following features Call Settings User Preferences Programmable Keys Speed Dial Local Directory Blacklist Call History Servicing Passwords PIN M...

Страница 78: ...ser address bar and press ENTER on your computer keyboard A Login page appears 5 Under User Name enter user 6 Under Password enter user or your own password if you have created one You can create or c...

Страница 79: ...your SIP account registration IPv4 and IPv6 network information regarding your phone s network address and network connection Cordless Status indicating whether a cordless headset and or cordless han...

Страница 80: ...tomatically forward incoming calls to another number The following types of call forwarding are available on page 57 When you have finished changing settings on this page click Save to save them Gener...

Страница 81: ...y Select to enable call forwarding for calls when you are on another call on that account Target Number Enter a number to which calls will be forwarded when the line is busy Enable Call Forward No Ans...

Страница 82: ...n a Disabled Call Completion Settings When you call a busy number the Call Completion feature configures the phone to call the number back automatically Setting Description Enable Call Completion Ena...

Страница 83: ...pported by your phone English French Spanish etc English Backlight Timer Sets how long the screen backlight stays on after the last button press 10 to 60 seconds 30 seconds Ringer Volume Sets the ring...

Страница 84: ...ming calls on the screen n a Select to enable Enabled Enable Call Waiting Tone Enables or disables Call Waiting Tone n a Select to enable Enabled Tone Interval secs Sets the interval for the call wait...

Страница 85: ...programmable key default settings see Programmable Feature keys on page 12 Type Description Line Configures the key for accessing a line You can make calls or answer calls by pressing these keys The...

Страница 86: ...ing Quick Dial select the account on which the number will be dialed out and enter the number to be dialed BLF Busy Lamp Field Configures the key to monitor another extension Select the applicable acc...

Страница 87: ...u may then need to enter the number of the ringing extension Lock Key Configures the key to enable the phone lock or disable the phone lock with a PIN Prefix Dialing Configures the key for prefix dial...

Страница 88: ...r entry 10 press 0 For each speed dial number you enter you must assign the account on which the number will be dialed out You can also add speed dial entries using the deskset The Speed dial list is...

Страница 89: ...ne s local directory or import a local directory file The export function lets you back up your contacts to your computer Phone numbers appear as links If your administrator has enabled the click to d...

Страница 90: ...lick Add New Entry The Create Local Directory Entry page appears 2 Enter the required information At minimum a first and last name are required Setting Description Range Default First Name Enter the a...

Страница 91: ...e information about creating or editing a directory file consult your system administrator To import a local directory file 1 Click Choose File 2 In the Choose File to Upload window navigate to the di...

Страница 92: ...ss the three remote XML directories When you select a remote directory to view the deskset syncs with the directory server The deskset displays Sync failed if any of the following failing conditions i...

Страница 93: ...tory page has no configurable settings It displays your Missed Calls Received Calls and Dialed Calls Phone numbers appear as links If your administrator has enabled the click to dial feature you can d...

Страница 94: ...ng and change your phone lock PIN To change the User password 1 Enter the old password for a new deskset the default password is user 2 Enter and re enter a new password The password is case sensitive...

Страница 95: ...mediately Enable Password Dial Enable to hide PIN numbers entered as part of the dial string Enable Delay for Password Dial Enable to add a one second delay before PIN numbers are masked By default th...

Страница 96: ...page automatically See your system administrator if your phone doesn t answer a page automatically Calls are answered on the headset rather than the speakerphone after I press a Line key or Answer to...

Страница 97: ...ical and environmental specifications RF frequency band 1921 536 1928 448 MHz Channels 5 Operating temperature 32 122 F 0 50 C AC adapter output voltage 5 0 Vdc 1 5 A or 5 0 Vdc 2 0 A Ethernet network...

Страница 98: ...Characters Entering special characters When entering text using the dial pad the following special characters are available Press the 1 star 0 or pound sign keys to enter special characters Key Charac...

Страница 99: ...ms Electrical storms can sometimes cause power surges harmful to electronic equipment For your own safety take caution when using electric appliances during storms Cleaning your telephone Your telepho...

Страница 100: ...te 120 Beaverton OR 97008 ATTN Information Technology Group VSP861 GPL code request If your request does not fully comply with the foregoing requirements VTech reserves the right to reject your reques...

Страница 101: ...Communications Inc Beaverton Oregon 97008 VTech is a registered trademark of VTech Holdings Limited ErisTerminal is a registered trademark of VTech Communications Inc Specifications are subject to ch...

Отзывы: