BGPS-4SI User Guide
© BGPS DVR January 2009
Rev B.
January 2009
Specifications and content are subject to change without notice.
42
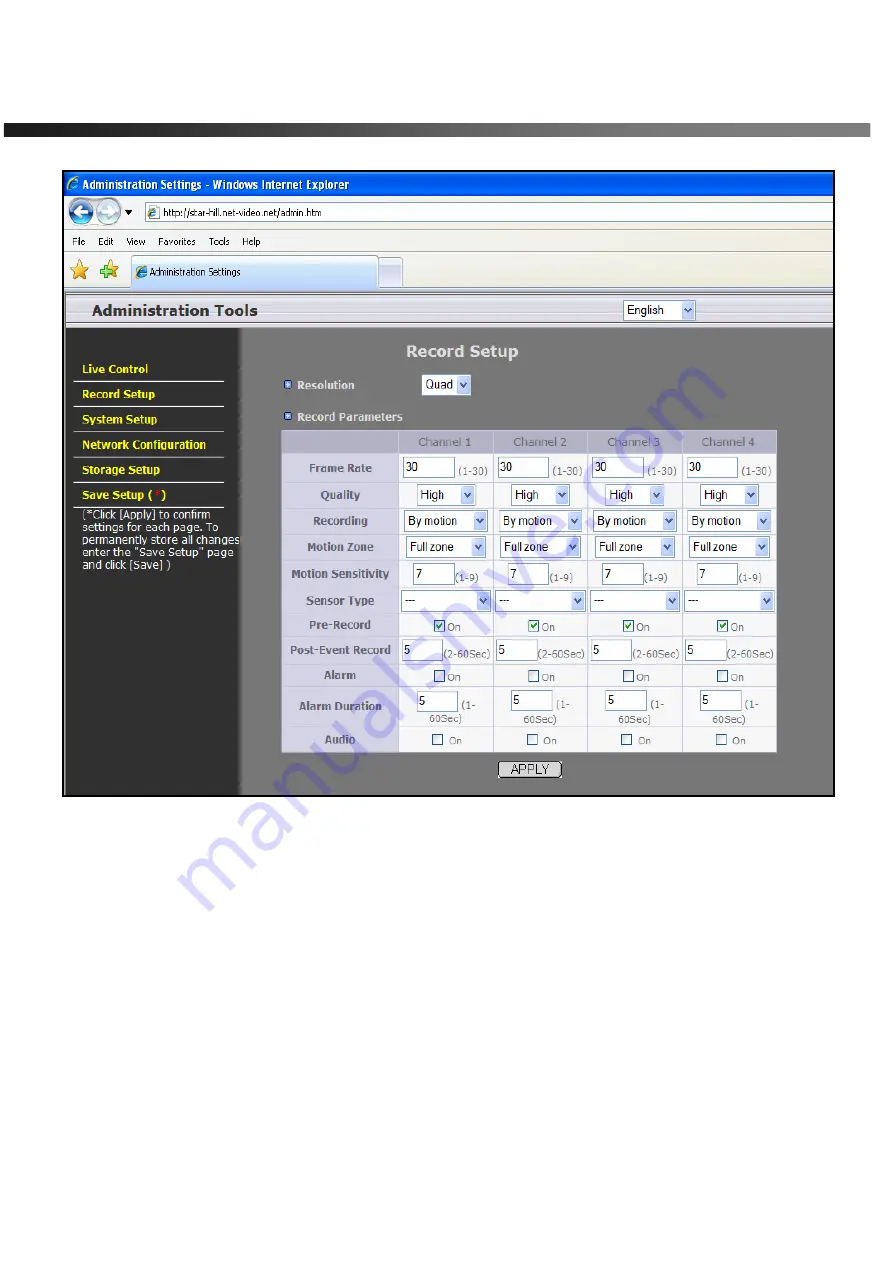
Figure 8.2. Record Setup Page
Страница 1: ...BGPS 4SI User Guide BGPS DVR January 2009 Rev B January 2009 Specifications and content are subject to change without notice...
Страница 2: ...the Specifications of BGPS 4SI 6 1 3 Packing List 8 2 PRODUCT DESCRIPTION 8 2 1 Operation Panel 8 2 2 Rear Panel 9 2 3 Remote Controller 11 3 GETTING STARTED SETTING UP THE DVR 12 3 1 Setup Main Scree...
Страница 3: ...8 4 2 2 TIMELINE Window 30 4 2 3 LOG Window 31 4 3 Play Mode 32 5 ARCHIVING VIDEO VIA USB STORAGE DEVICE 34 5 1 Capturing Images or Video Clip 34 5 2 Transferring Still Images or Video Clips onto USB...
Страница 4: ...ation should be given to installing the equipment in an environment compatible with the maximum ambient temperature Tma specified by the manufacturer B Reduced Air Flow Installation of the equipment i...
Страница 5: ...lly via video outputs Remotely via BGPS network client software and viSync Central Monitoring Software 3 Play Back or File archiving via USB 2 0 port Or 1 Video Recording 2 Remote Playback via BGPS ne...
Страница 6: ...trol eMAP and 2 way communication Remote DVR management via embedded Web Browser for easy adjustments Mobile phone PDA viewing integration Network via LAN DDNS DHCP ADSL Dynamic and Static IP addresse...
Страница 7: ...NTSC 30 frame sec total 704 x 480 resolution Recording Frame Rate Full PAL 25 frame sec total 704 x 576 resolution Record Modes Continuous Motion Schedule Sensor Manual Record Quality Normal High Supe...
Страница 8: ...mote Playback Via BGPS Client Software Power 110 220V 50 60Hz 12V 5A 1 3 Packing List 2 Product Description 2 1 Operation Panel Figure 2 1 Front Panel of BGPS 4SI BGPS 4SI Support CD includes BGPS Net...
Страница 9: ...ors for video input Connect camera output to Video in NTSC PAL VIDEO OUT 1Ch VGA 1 Ch BNC Composite VIDEO Composite video output in NTSC or PAL format VGA Connect to a VGA monitor 15 pin connector LAN...
Страница 10: ...rovides simple On Off switching using relay not included 0 5A 125V or 1A 30V The relay is open when not triggered The relay can be close by either a motion or a sensor input only if enabled in the Rec...
Страница 11: ...Setup Menu SEARCH Search Menu Screen ESC Escape BACKUP Freeze Screen Capture SEQ Sequences Full or Quad View Note Directional buttons are used for the numbers Please follow the number diagram below UP...
Страница 12: ...g the Up button 4 times followed by the SELECT button We recommend that you protect your DVR system by assigning a new password Refer to section 3 6 for instructions After assigning a new password ent...
Страница 13: ...play in full screen mode SEQ DWELL TIME Sets dwell time for each channel in sequential display mode Event Beep Enables Disables beep sound upon Motion Detection Alarm or pressed button OSD CONTRAST Se...
Страница 14: ...Items in Record Mode Setup Menu item Description RESOLUTION Configures resolution as 704x480 or 352x240 NTSC CHANNEL Selects channel to apply settings FRAME RATE Configures the frame rate for selected...
Страница 15: ...may be assigned to an individual channel PRE RECORD Enables disables pre event pre alarm recording Pre event pre alarm recording is 5 sec Only i frames are recorded POST EVENT RECORD Set the length of...
Страница 16: ...Navigate through menu items using the Up Down buttons Change the values using the Left Right buttons Each vertical bar corresponds to one hour See Figure 3 3 3 for a menu example Rules 1 Choosing ALL...
Страница 17: ...et Continuous recording mode F REW Use to Disable recording setting PLAY PAUSE Use to enable Motion detection triggered recording FF Use to enable Sensor triggered recording UP Move up in menu item RI...
Страница 18: ...Storage Size IP Address and MAC Address LOAD DEFAULT Select OFF or ON To load default values choose ON then press the SEL button ADMIN PASSWORD Sets the administrator password Once selected the DVR wi...
Страница 19: ...for the date and time SET DATE TIME Set date and time Launches new menu as shown in Figure 3 5 4 LANGUAGE Select a language for all OSD on screen display SEND MAIL ON ALARM Setting this value to ON i...
Страница 20: ...t to change without notice 20 Figure 3 5 3 DVR Information Display Screen Figure 3 5 4 Set Date Time Setup Screen Table 3 5 4 Menu Items in Date Time Setup SET DATE TIME Warning Changing this setting...
Страница 21: ...buttons Change the values using the Left Right buttons If you do not understand the following settings consult your network administrator Figure 3 7 1 Network Setup Screen Table 3 7 1 Menu Items in N...
Страница 22: ...ess Mail Server Name Enter the name of your SMTP server ID Enter your SMTP server user ID Password Enter your SMTP server password Return Address Warning Some incoming e mail servers block e mail rece...
Страница 23: ...administrator Table 3 7 2 1 Network Parameters for LAN Item Description IP The fixed IP address of the DVR GATEWAY The IP address of the gateway SUBNET MASK The subnet mask for the LAN DHCP Select DHC...
Страница 24: ...device such as router In this case select LAN as the NETWORK type Port forwarding is required in order to access BGPS DVR through a GATEWAY Router and or Firewall See the documentation for your IP sha...
Страница 25: ...record limit Only functions when AUTO DELETE AFTER is on OVERWRITE When enabled the DVR will continue recording and overwrite the oldest existing recorded data once the hard drive is full When disable...
Страница 26: ...without notice 26 Figure 3 9 1 Save Setup Screen Certain changes require that the system is restarted in order to take place These features will ask for a confirmation and are as follows z Load Facto...
Страница 27: ...or a legend Figure 4 1 1 Live Window Table 4 1 1 Indicator ICONS in Live Window Icon Description C Indicates Continuous recording is in progress R Indicates Manual recording is in progress S Indicates...
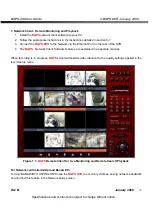
Страница 28: ...the DVR Indicates sequencing mode is enabled Indicates Audio status is enabled disabled Indicates the BGPS DVR is locked 4 2 SEARCH Window Press SEARCH button to launch the search menu The screenshot...
Страница 29: ...EL button to move to CHANNEL selection 4 Use the LEFT RIGHT UP and DOWN buttons to select a specific channel or All Channels 5 Press the SEL button to move to TYPE selection 6 Use the LEFT RIGHT UP an...
Страница 30: ...h window 4 Use LEFT F REW or RIGHT F ADV buttons to select a starting time period on the 24 hour timetable NOTE The modes used during recording are indicated below C Continuous M Motion S Sensor R Eme...
Страница 31: ...er Guide BGPS DVR January 2009 Rev B January 2009 Specifications and content are subject to change without notice 31 Figure 4 2 2 Timeline Search Mode Screen 4 2 3 LOG Window Figure 4 2 3 Log Search M...
Страница 32: ...s and content are subject to change without notice 32 Figure 4 2 4 Log List Search Mode Screen 4 3 Play Mode During recorded event playback BGPS DVR switches from the SEARCH screen to PLAY mode To ret...
Страница 33: ...wn on the bottom right hand corner of the screen F REW Jumps Step Backward The playback position moves 60 seconds backward PLAY PAUSE Plays or pauses recorded video F ADV Jumps Step Forward The playba...
Страница 34: ...mple Figure 6 1 1 Archive Mode Screen The still image is stored on the hard disk drive and may be transferred to a USB storage device by selecting YES or a CD RW disk by selecting CD RW User can selec...
Страница 35: ...ieve a list of archived images or video clips for the selected date 2 Select a file from the archive list by using the UP or DOWN buttons and the RIGHT or LEFT buttons to move between pages 3 Press th...
Страница 36: ...review archived video files saved on the USB storage device or CD 5 2 1 How to install Codec 1 Insert the BGPS installation CD provided with BGPS DVR into the CD drive of your computer 2 Open Codec fo...
Страница 37: ...check Show local captions when present as shown below Figure 6 2 3 Setup Screen for Window Media Player 10 Caution Always backup the contents of your USB storage device before archiving data from BGP...
Страница 38: ...2i 16 channel DVR 6 2 Steps to Complete Upgrade 1 Press the Setup button and enter the password Default password is 1111 2 Select Security menu from the Setup Screen 3 Select Admin Password followed b...
Страница 39: ...to the Network via the Ethernet Port on the rear of the DVR 4 The BGPS Network Client Software features are explained in a separate manual When recording is in progress BGPS streams transmits video i...
Страница 40: ...t admin htm in Microsoft Internet Explorer ex http xxx xxx xxx xxx admin htm Only Microsoft Internet Explorer is supported we do not support other third party browsers i e FireFox Before loading the a...
Страница 41: ...January 2009 Rev B January 2009 Specifications and content are subject to change without notice 41 Figure 8 1 Live Control Setup Page After finishing the set up on the page click on APPLY for tempora...
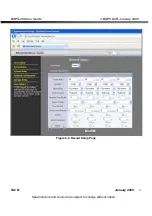
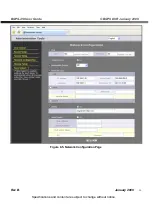
Страница 42: ...BGPS 4SI User Guide BGPS DVR January 2009 Rev B January 2009 Specifications and content are subject to change without notice 42 Figure 8 2 Record Setup Page...
Страница 43: ...BGPS 4SI User Guide BGPS DVR January 2009 Rev B January 2009 Specifications and content are subject to change without notice 43 Figure 8 3 System Setup Page...
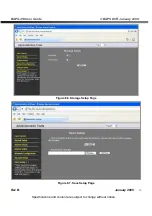
Страница 44: ...BGPS 4SI User Guide BGPS DVR January 2009 Rev B January 2009 Specifications and content are subject to change without notice 44 Figure 8 5 Network Configuration Page...
Страница 45: ...BGPS 4SI User Guide BGPS DVR January 2009 Rev B January 2009 Specifications and content are subject to change without notice 45 Figure 8 6 Storage Setup Page Figure 8 7 Save Setup Page...