
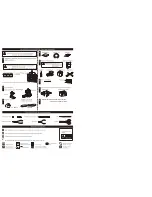

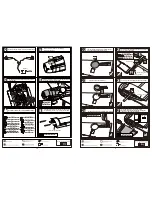


4
4
Clevis
Copper joiner
4
4
Screw (2x10mm)
Nut (2mm )
4
Washer(2x5mm)
Steel wire
Copper joiner
Lock Nut (2mm )
Screw (2x10mm)
Ball joint
Washer(2x5mm)
Install the servo.
Assemble the servos for the rudder and tail wheel to
appropriate position in the fuselage.
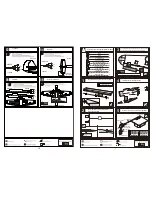
TP Screw (2.3x8mm)
1.5mm
6
TP Screw (2.3x8mm)
Ply (15x15x3mm)
6
Engine mount is a movable cylinder.
268 mm
1
Linkage Stopper
4
12
Washer(5mm)
Spring Washer (5mm)
1
4
Screw (5mm)
Plastic tube (2x650mm)
Washer
4
4
Blind Nut (5mm)
Fuel tank (800cc)
1
(Not included)
(Not included)
(Not included)
(Not included)
The front view when the 50cc engine install completion.
Trim the tail wheel cover and assemble it to
fuselage with screw.
The side view when the engine install completion,
customers can adjust the engine to a appropriate
position by move the engine mount.
51
50
53
54
10
Accessory list for the coming installation steps.
52
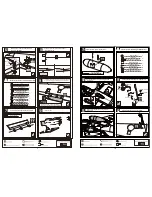
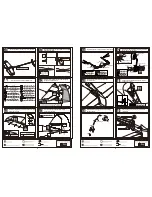
Glue the elevator to the stabilizer by CA and epoxy.
Securely glue together. If coming off during flights, you 'll
lose control of your airplane which leads to accidents!
B'
A
A'
B
Make sure to glue securely.
If not properly glued, a failure in flight may occur.
Temporarily fasten down the main wing and
check its correct position.
Securely glue together.If coming off during flights,
you'll lose control of your airplane which leads
to accidents!
A = A '
B = B '
Assemble the elevator sever to appropriate position
in the fuselage.
1mm
Elevator
Tailing
edge
Make sure they are in
the right position while
installing.
Keep some space about 1mm width between
elevator and tailing edge.
Apply instant type CA glue to elevator and pin hinge.
Make sure hinges are
mounted in the same line.
6
Pin hinge(24x24mm)
3mm
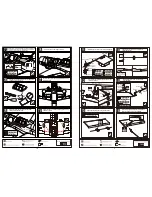
2
2
Clevis
Copper joiner
2
2
Screw (2x10mm)
Nut (2mm )
2
Washer(2x5mm)
Steel wire
Copper joiner
Lock Nut (2mm )
Screw (2x10mm)
Ball joint
Washer(2x5mm)
Install the servo.
Assembly of the stabilizer.
34
35
36
37
33
7
38


