


6mm
2
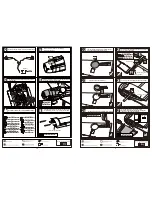
Wood dowel (6x30mm)
Wooden Block(17x17x8mm)
2
15mm
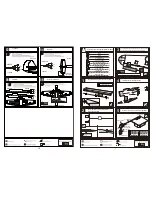
Epoxy wooden block to the relevant position behind the
marked position and drill holes through the marked point
and epoxy the wooden dowel in them.
Open breaches to appropriate position in the cockpit
as illustration.
Epoxy the wooden block to the breaches.
According to the location wooden block drill holes
in the fuselage.
Trim breaches to relevant position in the fuselage for
assembling the cockpit.
Epoxy plies to relevant position below the breaches
in the fuselage.
220mm
15mm
4mm
2
Wooden Block (4mm)
6mm
220mm
15mm
4mm
ply(3mm)
2
69
71
70
68
72
67
13
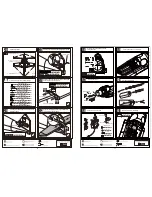
LockNut(4mm)
Bushing (8X4mm)
Wooden Block
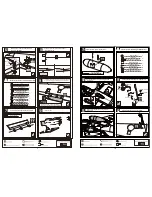
Note:rubber wheels oleo struts
and retracts are optional.
Retracts strut
Wheel (115mm)
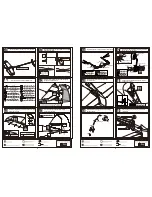
Only use this flap
for landing.
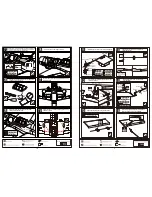
Securely glue together. If coming off during flights, you 'll
lose control of your airplane which leads to accidents!
Linkage Stopper
Washer (2mm)
Nut (2mm)
Set screw (3x4mm)
1
1
1
1
Washer (2mm)
Set screw (3x4mm)
Washer (2mm)
Install the servo and assemble it to the mid wing.
10mm
10mm
4
Wood dowel (6x30mm)
2
Screw (6x50mm)
2
Wheel (115mm)(Not included)
8
TP Screw (3x20mm)(Not included)
2
Nut (4mm)(Not included)
2
Wooden Block(Not included)
2
Wooden Block(Not included)
2
Bushing (8X4mm)(Not included)
1
Rib template (2mm ply)
Mount the gear door and the wheel to the retract.
Cut off the surplus parts from the wheel wells along
the shaded line carefully.
1
Main wing joiner (25x750mm)
Drill a hole to relevant position in the mid wing
and epoxy the flap to the mid wing.
Link the rod to the servo in the mid wing.
1.5mm
18
19
20
21
4
17
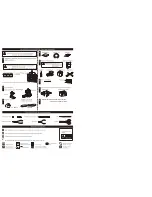
Accessory list for the coming installation steps.


