Manual DINAMO Plug & Play
Control your miniature world
Page 26 of 32
Version 1.2 – Dec 21
st
, 2017
2017 Leon van Perlo
encounter different versions, upgrade all TM44’s to the latest firmware level. How this can
be done is described in the manual TM44 Bootloader.
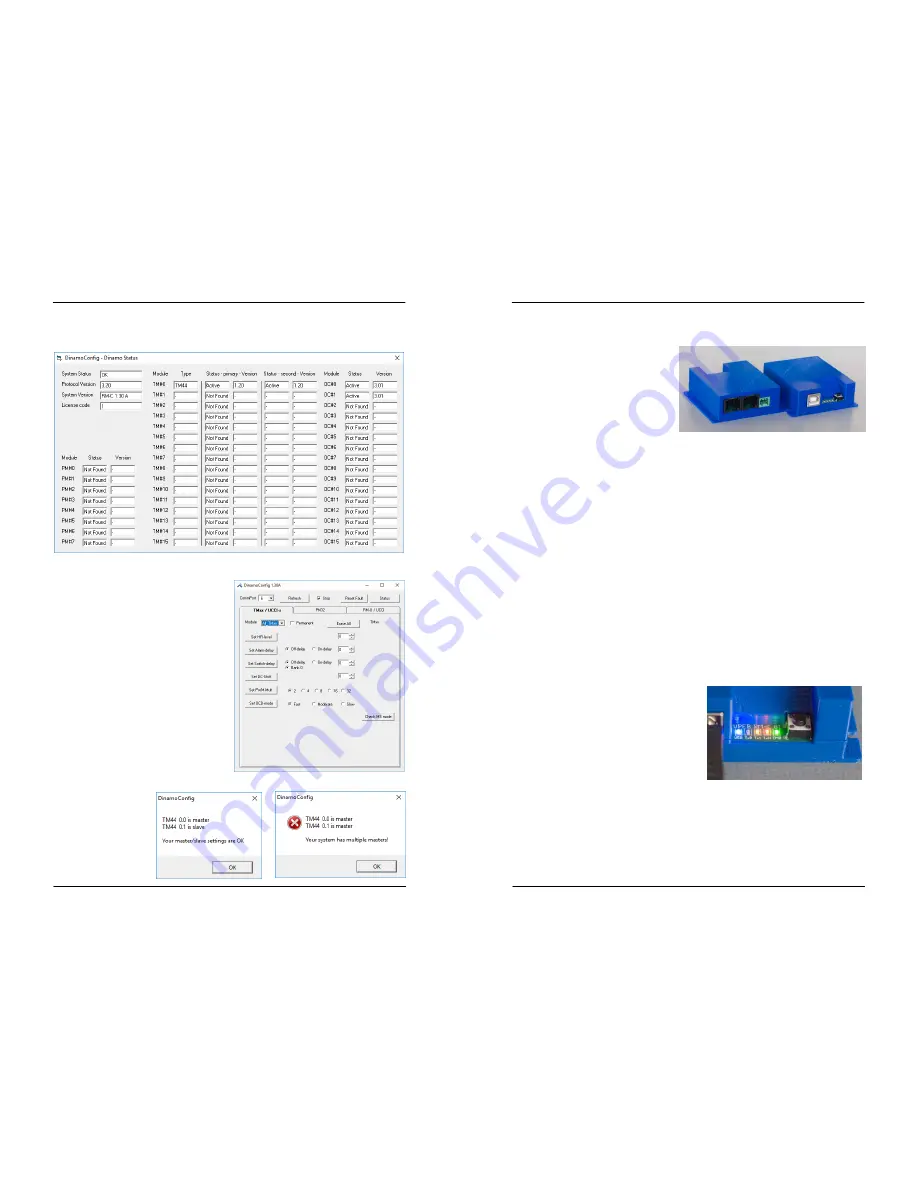
Fig 26: Status window of a live Dinamo P&P system
The version numbers of the OC32’s are less
crucial, however, we suggest that you also
keep your OC32’s on the same firmware level.
At this point you may want to perform one
additional test:
After you have hit the Status button at least
once (you may close the status window after
that, or leave it open), select the Tab
TMxx/UCCI-s and select Module = All_TM in
the upper left corner (fig 26).
A button “Check MS mode” will appear. If you
hit that button, a pop-up window appears
telling you the Master/Slave settings of your
system. If it does not report “OK”, check the
dipswitch settings of your TM44 modules and
remember that they need a reboot if you
change any.
Fig 27: Check Master/Slave settigs from DinamoConfig
Fig 28 (Left):
Master/Slave OK
Fig 29 (Right):
Master/Slave not OK:
Check your TM44 Dipswitches!
Control your miniature world
Manual DINAMO Plug & Play
2017 Leon van Perlo
Version 1.2 – Dec 21
st
, 2017
Page 7 of 32
2
RM-C/1+
2.1
Introduction
The RM-C is the central unit in a Dinamo
Plug & Play control system. A Dinamo
P&P system can be used to control
analogue/digital trains, digital cars or a
combination thereof. This manual however
applies to control of trains only.
The RM-C has the following main
functions:
•
Communicate to the PC via USB
•
Handle TM44 modules to control trains
•
Handle OC32(/NG) modules to control accessories (being everything except the trains
themselves)
2.2
Communication, power supply and mounting
The RM-C communicates with the controlling-PC by means of USB. The power for the RM-C
is supplied from the PC through the USB cable, so you won’t need a separate power supply
for your RM-C.
Communication with the TM44 and OC32 modules on your layout is done through RS485
(more on this in Chapter
5). RS485 is quite insensitive to electromagnetic disturbances and
the (total) length of the RS485 bus can be up to 1.200 meters. USB in the contrary is
much more susceptible to electromagnetic interference. Therefore, place the RM-C as close
to your PC as reasonably possible and keep the length of your USB cable short.
Mount the RM-C using the four screws that come with the unit or use double-sided
adhesive tape if you mount the RM-C on a surface you cannot or do not want to put screws
in.
2.3
LED indicators
On the RM-C you will find 5 LED indicators. From
left to right:
•
USB (Blue): USB Active
•
Tx0 (Yellow): Not Used on the RM-C/1+
•
Tx1 (Yellow): Transmit on RS485
•
TxH (Orange): Transmit on USB
•
CMD (Green): Command Received
To the right you’ll find a pushbutton to reset the
RM-C
2.4
PC Connection
To use USB, of course your PC needs to be equipped with one or more USB ports. Also you’ll
need a driver (software) to communicate with the USB interface on your RM-C. Windows
Vista and later will automatically detect and recognize the USB chip on your RM-C when it is
plugged in.
If
your PC has Internet access, it will automatically download and install the
correct drivers, when you plug in the interface for the first time.
Fig 3: RM-C/1+ (2 modules shown)
Fig 4: RM-C LEDs and Reset button


