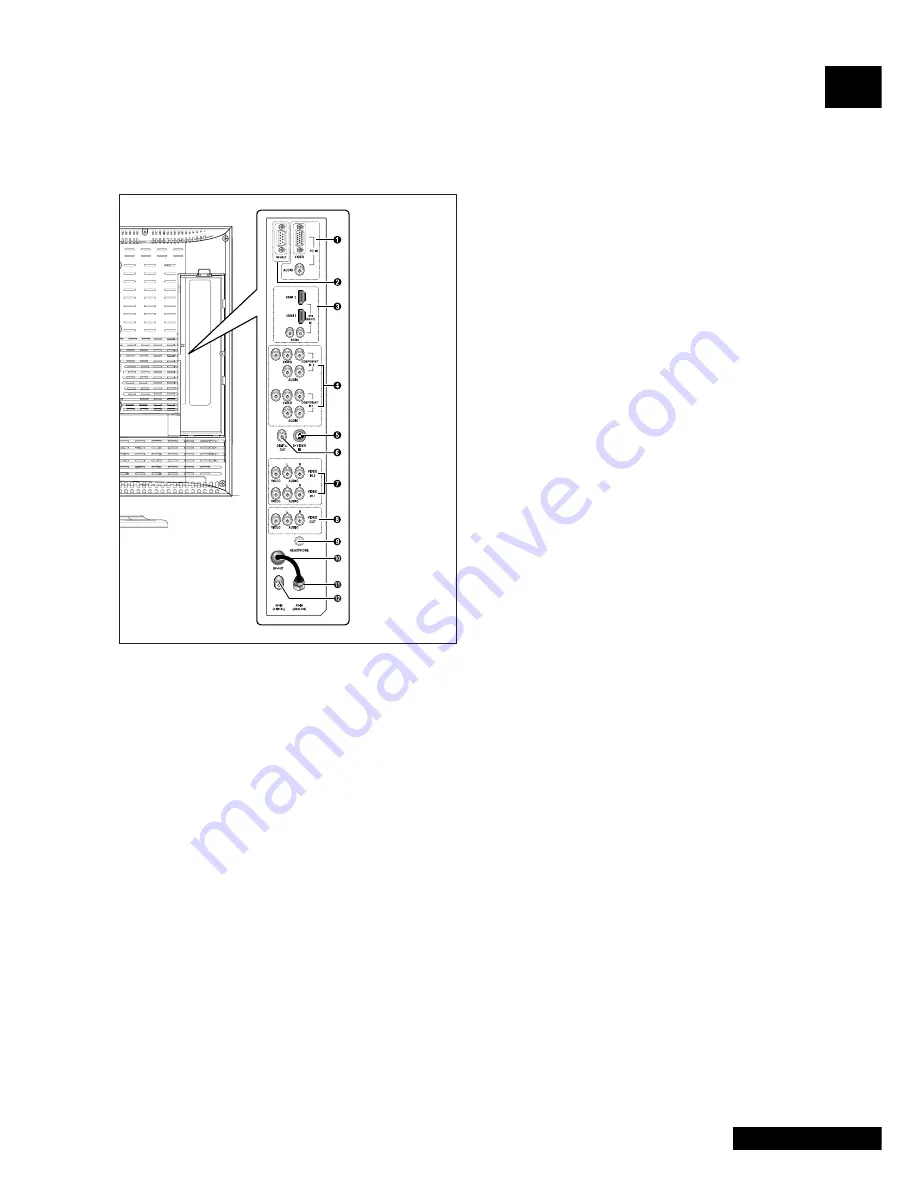
background image

Eng

lish

5

- Eng

Rear Panel Jacks

Œ

PC INPUT (VIDEO/AUDIO) JACKS

´

RS-232C INPUT JACK

ˇ

HDMI INPUT( 1, 2), DVI INPUT(VIDEO/AUDIO:L/R) JACK

¨

COMPONENT JACKS (VIDEO : Y, Pb, Pr/AUDIO : L/R)
: COMPONENT IN 1, 2

ˆ

S-VIDEO INPUT JACK

Ø

DIGITAL AUDIO OUTPUT JACK 

VIDEO1,2 (VIDEO/AUDIO) INPUT JACKS

LINE (VIDEO/AUDIO) OUTPUT JACKS

HEADPHONE JACK 
: Used for headphones that can be purchased 

additionally.

˝

LOOP-OUT CABLE (from ANALOG TV ANTENNA INPUT)

Ô

ANALOG TV ANTENNA INPUT JACK

DIGITAL TV ANTENNA INPUT JACK

For more details on connections see page 7~9.

Содержание VLCD 26D

Страница 1: ...English Before using this product please read the security instructions first and bear them in mind when using the product OWNERS INSTRUCTIONS TFT LCD TV Built in DVD MPEG 4 Option Player 37 42 32 26 ...

Страница 2: ...liquid has been spilled or objects have fallen into the apparatus the apparatus has been exposed to rain or moisture does not operate normally or has been dropped The apparatus shall not be exposed to dripping or splashing and no objects filled with liquids such as vases shall be placed on the apparatus Please keep the minimum distance 100mm from the back side of this product to the back wall Wher...

Страница 3: ...put in the PIP Screen Mode 17 Setting the Clock 18 Setting the On Off Timer 18 Selecting the ON Timer Channel Adjusting the ON Timer Volume 18 Setting the Sleep Timer 19 Melody Function 19 Change Password 19 TTX Function Teletext 20 Displaying the Teletext Information 20 Selecting a Page by Number 21 Using FLOF to Select a Page 21 PC Function Connecting to a PC 22 Adjusting the PC 23 DVD Function ...

Страница 4: ...item on the on screen menu Ø PROGRAM Changes channels or MOVE ADJUST to items on the on screen menu MENU To access or close menus simultaneously TV VIDEO Selects an external device connected to the TV DVD Depend on the model PLAY PAUSE Play the DVD or temporarily stop playback STOP Stop the DVD playback Ô OPEN CLOSE OPEN CLOSE the DVD Overview Eng 4 VLCD 42D VLCD 26D VLCD 32D VLCD 37D Option Optio...

Страница 5: ...AUDIO L R COMPONENT IN 1 2 ˆ S VIDEO INPUT JACK Ø DIGITAL AUDIO OUTPUT JACK VIDEO1 2 VIDEO AUDIO INPUT JACKS LINE VIDEO AUDIO OUTPUT JACKS HEADPHONE JACK Used for headphones that can be purchased additionally LOOP OUT CABLE from ANALOG TV ANTENNA INPUT Ô ANALOG TV ANTENNA INPUT JACK DIGITAL TV ANTENNA INPUT JACK For more details on connections see page 7 9 ...

Страница 6: ...an item of menu Change confirmation VOL PROG up down control ON OFF OPTION Turns PIP on or off SOUND OPTION Changes the audio signal source between the main screen and the PIP window DVD TTX Depend on the model OPEN CLOSE OPEN CLOSE the DVD tray SETUP For initial DVD player settings STOP Stop the DVD playback PLAY PAUSE Play the DVD or temporarily stop playback µ SLOW For fast and slow playback ST...

Страница 7: ... antenna Analog and Digital TV signals provided on two separate antennas 75 ohm coaxial cable 75 ohm coaxial cable Digital Antenna Analog Antenna Connection Procedures Œ Connect the AUDIO CABLES between the AUDIO OUT L and R jacks on the back of your TV and the corresponding AUDIO INPUT jacks on external TV Connect the VIDEO CABLE between the VIDEO OUT jack on the back of your TV and the correspon...

Страница 8: ...f your TV and the corresponding AUDIO INPUT jacks on external TV Connect the VIDEO CABLE between the VIDEO OUT jack on the back of your TV and the corresponding VIDEO INPUT jack on external TV To watch the external TV Œ Turn the external TV on and select VIDEO using the external input button Turn the your TV on Connecting a External TV External TV Video Cable Audio Cable Connection Procedures Œ Th...

Страница 9: ...ing TV Press the DISPLAY button on the remote control The TV will display the input source the picture mode the sound mode the STEREO mode the sleep time the current time and the pip mode Viewing the Status Information MENU PICTURE SIZE PIP TIME MELODY LANGUAGE CHANGE PASSWORD œ WIDE œ OFF œ ENGLISH TV Function Please check the following check list before using the TV Œ Is the antenna cable connec...

Страница 10: ...n and then press the button Repeat Step 5 to 7 for each channel to be stored Manual Storing of Channels Œ Press the TV MENU button The OSD MENU will be displayed Select SETUP using the œ button ˇ Select Program Edit using the button and then press the button Select NAME using the œ button and press the œ buttons to edit the name Select the characters A Z 0 9 œ move on the previous or next letter ˆ...

Страница 11: ...n again to release this function Copy a Program Œ Select a program to the moved with the buttons Press the GREEN button ˇ Move the program to the desired program number with the buttons Press the GREEN button again to release this function Moving a Program Œ Select a program to the skipped with the buttons Press the BLUE button The skipped program turns to YES ˇ Press the BLUE button again to rele...

Страница 12: ...Select MANUAL PROGRAM using the button and then press the button ˆ Select FINE TUNE using the button and then press the œ button to fine tune If you are unable to fine tune a channel check that the SYSTEM settings are correct Ø Select STORE using the button and then press the button Press the EXIT button to exit the menu When the Picture Quality is Poor or Unstable Selecting the Picture Status Œ U...

Страница 13: ...us using the œ button Also the Sound Status is automatically changed to USER mode ˆ Press the EXIT button to exit the menu Adjusting the Balance Œ Press the TV MENU button The OSD MENU will be displayed Select PICTURE using the œ button ˇ Select the desired item to adjust using the button Select the desired status using the œ button In addition PICTURE STATUS is automatically changed to USER mode ...

Страница 14: ...IN SUB STEREO MONO Determines the volume of the frequency range low to high tones Œ Press the TV MENU button The OSD MENU will be displayed Select SOUND using the œ button ˇ Move to the EQUALIZER item using the button and then press the button During the adjustment an additional adjustment window will be displayed Move to the desired frequency using the button ˆ Select the desired status using the...

Страница 15: ... Sets the picture to 4 3 normal mode This is a standard TV screen size ZOOM1 Magnifies the size of the picture on the screen ZOOM2 Magnifies the size of the picture on the screen leaving the subtitles visible Note You can select only WIDE 4 3 screen size in the PC Mode 1 2 Freezing the Picture You can freeze a moving picture on the screen Press the STILL button Whenever you press this button the f...

Страница 16: ...e tuner you cannot watch two TV channels simultaneously when in PIP mode Press the EXIT button to exit the menu Changing the Source of the PIP Window When the PIP window shows normal broadcasting TV and CATV channels you can change the PIP window channel Press the PROG button Whenever you press this button the channel is changed Œ STEP1 STEP4 is the same as that of Viewing Picture in Picture ˆ Sel...

Страница 17: ...lecting the Speaker Output in the PIP Screen Mode You can simultaneously listen to the sound of the main picture using the internal speaker as well as listen to the sound of the sub picture using the headphones by setting up the headphone output configuration or vice versa Œ STEP1 STEP4 is the same as that of Viewing Picture in Picture ˆ Select HEADPHONE OUTPUT using the button and then press the ...

Страница 18: ... to 10 using the button Press the button to finish the ON TIME configuration Press the EXIT button to exit the menu For Off timer setting select OFF TIME instead of ON TIME Setting the Clock Setting the On Off Timer You can configure the channel and volume to play when the TV is turned on by the Timer Œ ˇ STEP1 STEP3 is the same as that of Setting the clock Select PROGRAM NO using the button ˆ Sel...

Страница 19: ... STEP1 STEP3 is the same as that of Setting the clock Select SLEEP using the button ˆ Configure the SLEEP time using the œ button Ø Press the EXIT button to exit the menu Setting the Sleep Timer If the MELODY function is turned on a melody plays whenever the TV is turned on or off Œ Press the TV MENU button The OSD MENU will be displayed Select FUNCTION using the œ button ˇ Select MELODY using the...

Страница 20: ...isplay Teletext information at any time on your television For Teletext information to be displayed correctly channel reception must be stable otherwise Information may be missing Some pages may not be displayed Œ Select the channel providing the Teletext service using the PREPAGE or NEXTPAGE button Press the TTX button to activate the teletext mode Result The contents page is displayed It can be ...

Страница 21: ...again A secondary page SUBPAGE by entering its 4 digit number The next page NEXTPAGE The previous page PREPAGE Selecting a Page by Number The various topics included in the teletext pages are colour coded and can be selected by pressing the coloured buttons on the remote control Œ Display the teletext contents page by pressing the MIX button Press the coloured button corresponding to the topic tha...

Страница 22: ...C screen through the TV Œ Turn the PC on and check that the PC settings are correct If the PC settings are incorrect the screen may display a duplicated or distorted picture For PC configuration procedures refer to page 36 Press the LINE button and select PC INPUT mode ˇ Adjust the PC screen For adjustment procedures refer to page 23 Eng 22 PC Function VESA Standard Mode Resolution 640x480 640x480...

Страница 23: ...he Vertical Position ˇ Select V POSITION using the button and adjust the vertical position using the œ button Initialising Settings RESET ˇ Select RESET using the buttons and then select using the button This returns you to the factory default screen Press the EXIT button to exit the menu Auto Adjust You can adjust the frequency and the phase of the PC screen automatically ˇ Select AUTO ADJUST usi...

Страница 24: ...nning of the current chapter during DVD playback and to the previous chapter when it is pressed again Slow Forward Reverse Œ Press the PLAY PAUSE button to resume normal playback Press the œœ or button For disc playback pressing the button executes the function in the following order X1 2 X1 4 X1 8 X1 16 X1 32 X1 64 NORMAL ˇ Press the PLAY PAUSE button to resume normal playback STEP Frame by Frame...

Страница 25: ...elect the audio language Œ Press the AUDIO button For DVD playback Each time you press the AUDIO button the language is changed For CD playback Mono Left Mono Right Mix Mono Stereo Changing the Subtitle Language It is possible to change the subtitle language to a different language from the one selected at the initial settings This operation works only with discs on which multiple subtitle languag...

Страница 26: ...etimes these are displayed automatically when you start playback others only appear when you press MENU or TITLE remote control Œ Press the MENU button The menu contained on the disc will appear on the screen The menu appears differently with different disc Press the TITLE button The title contained on the disc will appear on the screen The title menu appers differently with different disc Additio...

Страница 27: ...select ISO9660 level 1 as the writing software format Playing MP3 Discs Playback of a CD CD RW disc that contain a MPEG 4 files CAUTION This subtitle is selectable only when it s name is same with the title s To Play a MPEG 4 File Œ Insert the MPEG 4 disc Make sure that the disc s label is facing up Using the button to find the desired folder ˇ Using the button to select the desired a MPEG 4 files...

Страница 28: ...de 4 It displays from center to top and buttom in turn mode 5 It displays from vertical blind mode 6 It displays from from left to right in turn mode 7 It displays from right to left in turn mode 8 It displays from left and right to center in turn mode 9 It displays from center to left and right in turn mode 10 It displays from outside to inside in turn mode 11 It displays from horizontal blind mo...

Страница 29: ...tton to select desired item TV DISPLAY 4 3 PS Choose this setting if you want the movie to fill the entire screen of your TV This might mean that the left and right edges won t be seen 4 3 LB Choose this setting if you want to see movies in their original aspect ratio The movie might appear with black bars at top and bottom of the screen 16 9 WIDE Choose this setting if you want the movie to be se...

Страница 30: ...ginal initial screeen JPG Logo To use the initial screen downloaded from CD If you use MPEG 4 option the JPG logo is applied If you use DVD option the JPG logo is not applied Parental Set a password and select rating level for DVD s unsuitable for children Password Change Œ Press the SETUP button during stop mode and Press the œ button to move to Password Setup Press the button and press the ENTER...

Страница 31: ... 4 5 content MPEG 4 simple profile bi directional frames Qpel and GMC are not supported AUDIO MPEG 4 certified devices can play back any interleaved MP3 audio at any bitrate both CBR and VBR The audio must be sampled at standard frequencies such as 32khz 44 1khz and must conform to the AVI file specification Note Our solution support a maximum constant 6Mbps bitrate Support all resolution up 720 X...

Страница 32: ...ou down load files through internet Please make sure to insert registration code before the down loading Burn the down loaded file to CD R or CD RW Playback CD R or CD RW disc to the set You will see below message This rental video has X view left A view ends when you stop playback play a different video or trun off your player Do you want to use one of your X views now If you select YES button it...

Страница 33: ...ls This is not a problem Possible Solution Check the power cable connectivity to the power connector Press the power switch again Depend on the model Adjust the brightness and the contrast so that a picture is displayed brightly The flores cent tube of a LCD TV has a lifetime of about 50 000 hours To replace the fluorescent tube contact a service center Adjust the input switch location Turn up the...

Страница 34: ...ctory There may be flickering when you watch still images from a PC This is not a problem of the product The remote control does not work properly Are the polarities of the installed batteries correct Has the battery discharged completely Is the power cord plugged in properly or is there a power failure Is fluorescent lighting or a neon sign near the unit Warning If a problem has been detected unp...

Страница 35: ...or Cathode 8 bit 16 7M D sub HDMI DVI D Less than 3 W AC 100 240V 50 60Hz Remote control Battery AAA User s Guide Power Cord RCA Cable LCD Screen Size Panel Type Display Colour DVD Applicable disc Do not insert 8Cm 3inch disc MPEG4 ASP Video OPTION Aspect Ratio Language Audio Outputs TV Receiver Channels VIDEO Antenna Interface Video Signal Colour Active Matrix TFT LCD 8 bit 16 7M loader Option DV...

Страница 36: ...y KHz 31 469 37 861 37 5 31 469 37 879 48 077 46 875 49 726 48 363 56 476 47 693 Vertical Frequency Hz 59 94 72 809 75 70 087 60 317 72 188 75 74 551 60 004 70 069 59 992 Clock Frequency MHz 25 175 31 5 31 5 28 322 40 50 49 5 57 284 65 75 80 125 Polarity H V PC X X X X X X X X X X DVD option O O O X X O O O O O S VIDEO X X X X X X X X O X COMPONENT 2 O O O X X X X X O X PIP Screen Configuration Ta...

Страница 37: ...Note ...

Отзывы: