


INSTALLATION
~ 10 ~
2.4 D
AISY
-
CHAIN
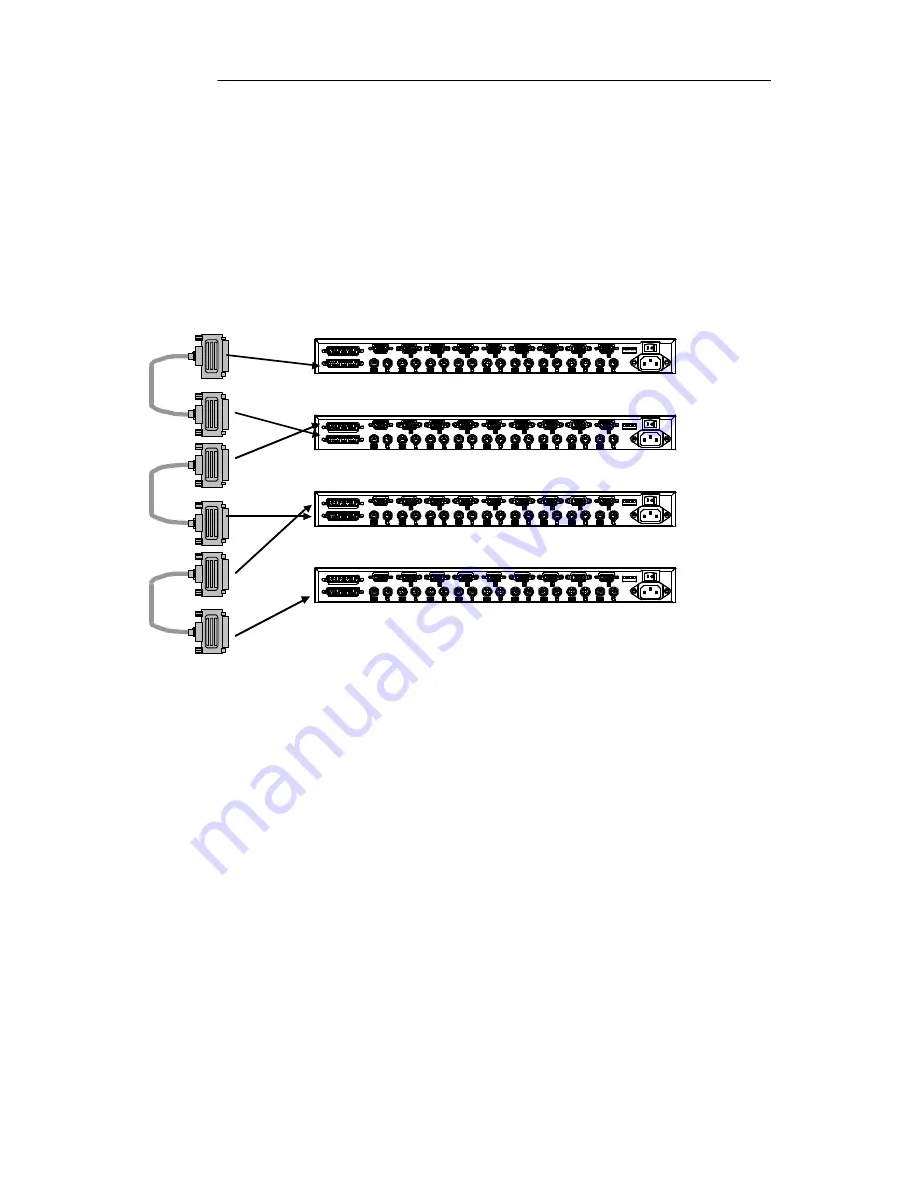
The KVM
08 can be daisy-chained with additional KVM08 units through the DB-25
daisy-chain ports. The daisy-chain cable is required (not included) for proper operation.
Please refer to the example below. Here, four KVM
08 units are cascaded together for
control over 32 computers. Recall that a maximum of 16 KVM08 units can be cascaded
together for control over 128 computers. Recall that the DIP-switch on the MASTER unit
must be set to BANK 0, and the SLAVE units set to a unique BANK (any from 1 through
F). See the beginning of this section for this section for more information on the
DIP-switch settings.
ON/OFF
SW
PC8
PC7
AC
90-240VAC
LINE
PC6
PC5
PC4
PC3
Console
PC2
PC1
Input
Input /Slave
Master
Slave Input
ON/OFF
SW
PC8
PC7
AC
90-240VAC
LINE
PC6
PC5
PC4
PC3
Console
PC2
PC1
Input
Input /Slave
Master
Slave Input
ON/OFF
SW
PC8
PC7
AC
90-240VAC
LINE
PC6
PC5
PC4
PC3
Console
PC2
PC1
Input
Input /Slave
Master
Slave Input
ON/OFF
SW
PC8
PC7
AC
90-240VAC
LINE
PC6
PC5
PC4
PC3
Console
PC2
PC1
Input
Input /Slave
Master
Slave Input
l
After setting the DIP-switch on the SLAVE unit, connect the computers using the same
procedure outlined in step 5 to 9 in the previous section.
DO NOT POWER UP THE
COMPUTER YET.
l
Using the daisy-chain cable, connect one end to the “Master Input / Slave Output” port
of the unit. Refer to the diagram above.
n
If the previous unit is the MASTER, then the other end of the cable connects to the
“Master Input / Slave Output” port of the MASTER (such as cable 1 in the diagram
above)
n
If the previous unit is a slave, then the other end goes to the “Slave Input” port of
the previous slave unit (such as cable 2 and 3 in the diagram above)
l
Upon connecting the daisy-chain cable to the previous unit, it should automatically
power up if the previous unit is powered up. However, it is still recommended that the
power supply be used with the slave unit. You will see the LED display on the front
panel show the units bank address setting.
MASTER
(Bank 0)
SLAVE
(Bank 1)
SLAVE
(Bank 2)
SLAVE
(Bank 3)
Cable 1
Cable 2
Cable 3
Содержание KVM08
Страница 1: ...KVM08 Keyboard Mouse Monitor Switch...
Страница 2: ......
Страница 4: ......
Страница 6: ......


