background image

26

6.3 Boost function

1. Hold down the green button (8) to activate the boost function.

2. Release the green button (8) to return to normal mode.

6.4 Function indicator

Function indicator (7)

Status

Off

Off or finished charging

On

Normal operation or boost function

Flashes briefly

Please recharge

Pulsates

Charging in progress

Flashes quickly

Fault

6.5 Storage

The handheld vacuum cleaner can remain in the charging unit.

Note If you are not going to use the handheld vacuum cleaner for a long

period of time, unplug the mains charger from the power socket.

7

Maintenance

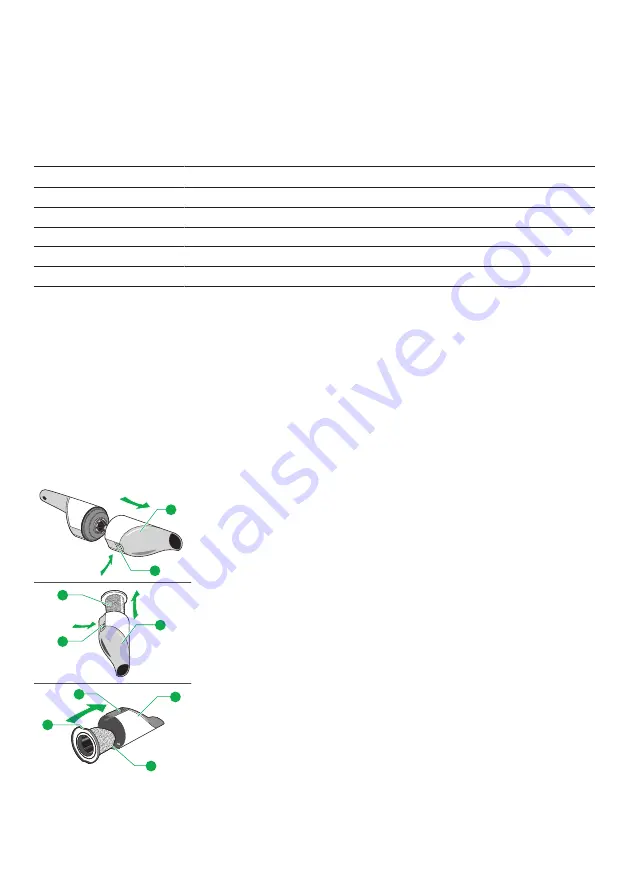
7.1 Cleaning the filter

1

2

1

2

5

1

5a

2

5

1.

Press the release key (2) and remove the dust chamber from the
device.

2.

Hold the dust chamber with the nozzle pointing downwards.

3.

Press the release key (2) again and remove the filter unit (5) from
the dust chamber.

4.

Empty the contents of the dust chamber (1) into a bin.

5.

If necessary, clean the dust chamber with a damp cloth and
allow the dust chamber to dry completely before reassembling.

6.

When inserting the filter unit (5), make sure that the indentation
(5a) on the rim of the filter unit is aligned with the release key (2)
on the dust chamber (1).

7.

Hold down the release key and push the filter unit into the dust
chamber as far as it will go.

Содержание kobold vc100

Страница 1: ...Gebrauchsanleitung Gebrauchsanleitung User manual Manuel d utilisation Manual de instrucciones N vod k pou it Istruzioni per l uso DE EN FR ES CZ IT V1 0 20039 08 VC100...

Страница 2: ...Inhaltsverzeichnis Deutsch 3 English 17 Fran ais 31 Espa ol 45 esky 59 Italiano 71...

Страница 3: ...Gebrauchsanleitung VC100...

Страница 4: ...Nutzers 10 4 Bestimmungsgem e Verwendung 10 5 Vor dem Start 11 6 Bedienung 12 6 1 Aufladen 12 6 2 Ein und Ausschalten 12 6 3 Boost Funktion 12 6 4 Funktionsanzeige 13 6 5 Aufbewahren 13 7 Wartung 13...

Страница 5: ...s und muss ihm beiliegen wenn Sie es anderen Personen berlassen 2 Produkt bersicht 1 2 3 8 6 7 5 4 1 Staubkammer 5 Filtereinheit 2 Entriegelungstaste f r Staubkammer 6 Abluft ffnung 3 Ladeger t 7 Funk...

Страница 6: ...Brand oder zu einer Explosion f hren Saugen Sie keine hei e Asche oder glimmende Zigarettenstummel auf Saugen Sie keine explosiven oder leicht entflammbaren Stoffe auf Gefahr eines Stromschlags Wenn S...

Страница 7: ...fweist Schlie en Sie das Akkupack keinesfalls kurz Verletzungsgefahr bei Arbeiten am Ger t Wenn das Ger t nicht ausgeschaltet ist k nnen Sie sich an Einzelteilen verletzen Schalten Sie das Ger t vor a...

Страница 8: ...g durch unsachgem en Gebrauch Der unsachgem e Gebrauch des Ger ts kann zu Besch digungen am Ger t f hren Verwenden Sie zum Aufladen des Ger ts nur das original Netzladeger t von Vorwerk das im Lieferu...

Страница 9: ...ewahren Sie das Ger t im Temperaturbereich zwischen 5 C und 35 C auf Gefahr der Besch digung des Ger ts Befindet sich das Ger t nicht in einwandfreiem Zustand kann dies zu Besch digungen f hren Benutz...

Страница 10: ...nd vom Hersteller beheben 4 Bestimmungsgem e Verwendung Verwenden Sie das Ger t und das Zubeh r nur sach und bestimmungsgem um Gefahren f r sich selbst oder Dritte sowie Sch den am Ger t und an andere...

Страница 11: ...ch eine autorisierte Vorwerk Organisation vertrieben wurde Bei der Verwendung des Ger ts in einem anderen Land als dem Verkaufsland kann die Einhaltung rtlicher Sicherheitsstandards des anderen Landes...

Страница 12: ...en Akkusauger auf die Ladestation 4 4 Falls Sie den Akkusauger direkt am Kabel und nicht auf der Station laden wollen dr cken Sie kr ftig den Zapfen a an der Ladestation um diese zu ffnen 5 Stecken Si...

Страница 13: ...Sie die D sen ffnung der Staubkammer nach unten 3 Dr cken Sie erneut die Entriegelungstaste 2 und entnehmen Sie die Filtereinheit 5 aus der Staubkammer 4 Leeren Sie den Inhalt der Staubkammer 1 in ein...

Страница 14: ...enfrei unter www kobold altgeraeteentsorgung de ein R cksendeetikett zur Verf gung Ihr altes Ger t schicken Sie dann bitte an folgende Adresse Alba Electronics Recycling GmbH Waldstra e 130 67363 Lust...

Страница 15: ...fnen Sie den Akkusauger und entfernen Sie die Abdeckung 4 Entfernen Sie die 4 Schrauben 5 Ziehen Sie den Motorblock mit Akkus heraus 6 Durchtrennen Sie jeden Verbindungsdraht einzeln und nehmen Sie di...

Страница 16: ...S006BAV1080050 Nennleistung des Motors ca 65 Watt max Saugleistung 13 Watt max Luftmenge 15 l s Gewicht 650 g ohne Ladestation und Ladeger t Abma e L nge mit Wandhalterung 425 mm L nge Sauger 417 mm D...

Страница 17: ...User manual VC100...

Страница 18: ...3 3 Obligations of the user 23 4 Intended use 24 5 Before you start 24 6 Operation 25 6 1 Charging 25 6 2 Switching on and off 25 6 3 Boost function 26 6 4 Function indicator 26 6 5 Storage 26 7 Maint...

Страница 19: ...f the appliance and must be kept with it if you pass it on to someone else 2 Product overview 1 2 3 8 6 7 5 4 1 Dust chamber 5 Filter unit 2 Release key for dust chamber 6 Air outlet 3 Mains charger 7...

Страница 20: ...ends Do not vacuum up explosive or readily inflammable substances Risk of electric shock Improper use of the device could cause an electric shock Do not insert any sharp objects into the electrical c...

Страница 21: ...lastic components have been damaged due to falling or impacts Protect yourself against fragments with sharp edges Risk of injury from leaking batteries Leaking batteries could cause injury Leaking bat...

Страница 22: ...For this reason it is advisable to hold the dust chamber with the nozzle pointing downwards Risk of damage to the battery Incorrect use of the battery could damage it Do not attempt to remove the bat...

Страница 23: ...ion of safety warning messages The safety warning messages that precede each action are shown as follows WARNING Type and source of hazard Explanation of type and source of hazard consequences Measure...

Страница 24: ...permitted The manufacturer bears no responsibility for damages resulting from improper use If the appliance is subject to technical modifications the warranty and liability for material defects shall...

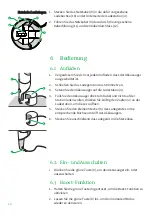
Страница 25: ...12 6 Operation 6 1 Charging 4 8 7 a b 1 Ensure that the handheld vacuum cleaner is switched off before every charge 2 Connect the mains charger to the power supply 3 Place the handheld vacuum cleaner...

Страница 26: ...ger from the power socket 7 Maintenance 7 1 Cleaning the filter 1 2 1 2 5 1 5a 2 5 1 Press the release key 2 and remove the dust chamber from the device 2 Hold the dust chamber with the nozzle pointin...

Страница 27: ...ories via unsorted domestic waste Use the return options provided free of charge instead Contact your city or municipal administration for more information 9 2 Information on the disposal of the batte...

Страница 28: ...he Customer Services www vorwerk co uk 12 Technical data Kobold VC100 Handheld Vacuum Cleaner Safety symbols Housing High quality recyclable thermoformed plastic Motor Maintenance free DC motor approx...

Страница 29: ...pprox 12 minutes Charging time approx 4 5 h Mains charger Output current max 0 5 A Output power max 5 4 W Average efficiency rate 79 60 Efficiency at low load 10 68 01 No Load Power consumption 0 073...

Страница 30: ...30...

Страница 31: ...Manuel d utilisation VC100...

Страница 32: ...38 4 Utilisation conforme 38 5 Avant la premi re utilisation 39 6 Utilisation 40 6 1 Chargement 40 6 2 Mise en marche et arr t 40 6 3 Fonction Boost 41 6 4 Affichage des fonctions 41 6 5 Stockage 41 7...

Страница 33: ...oduit si vous le c dez d autres personnes 2 Vue d ensemble du produit 1 2 3 8 6 7 5 4 1 Compartiment poussi re 5 Unit filtrante 2 Touche de d verrouillage du compartiment poussi re 6 Sortie d air 3 Ch...

Страница 34: ...tration de substances br lantes ou l g rement inflammables dans l appareil peut entra ner un incendie ou une explosion N aspirez pas de cendres br lantes ni de m gots incandescents N aspirez aucune su...

Страница 35: ...ents Ne mettez jamais la batterie en court circuit Risque de blessure en effectuant des travaux sur l appareil Vous risquez de vous blesser avec les pi ces d tach es si l appareil n est pas teint teig...

Страница 36: ...dommagement d une utilisation non conforme L utilisation non conforme risque d endommager votre appareil Pour recharger l appareil utilisez uniquement le chargeur secteur de Vorwerk fourni avec l appa...

Страница 37: ...z l appareil ni au feu ni la chaleur ni au rayonnement solaire direct Ne placez pas l appareil proximit d une source de chaleur cuisini re radiateur ou l ment chauffant chaud Chargez et utilisez l app...

Страница 38: ...accessoires Vorwerk respectez les points suivants 1 Lisez attentivement le manuel d utilisation et tous les documents associ s 2 Conservez le manuel proximit de l appareil 3 Faites imm diatement r pa...

Страница 39: ...tu sur l appareil l ensemble des documents associ s ainsi que les affichages de l appareil doivent tre observ s Le fabricant ne r pond pas des dommages pouvant d couler d une utilisation non conforme...

Страница 40: ...t chargement assurez vous que l aspirateur de table est teint 2 Raccordez le chargeur secteur au r seau lectrique 3 Posez l aspirateur de table sur le support de charge 4 4 Si vous souhaitez charger l...

Страница 41: ...rise de courant 7 Entretien 7 1 Nettoyage du filtre 1 2 1 2 5 1 5a 2 5 1 Appuyez sur la touche de d verrouillage 2 et retirez le compartiment poussi re de l appareil 2 Maintenez l ouverture du compart...

Страница 42: ...e votre commune 9 2 Consignes pour la mise au rebut des batteries Les consignes suivantes sont uniquement destin es l liminateur de l appareil et non pas au client Les batteries lithium ion int gr es...

Страница 43: ...phone 02 518 547 47 www vorwerk kobold fr Par e mail serviceclient vorwerk fr Service en Suisse Les collaborateurs de notre service client sont votre disposition info vorwerk schweiz ch repairs vorwer...

Страница 44: ...r e en condition de champ libre sur un plan de travail Batteries Lithium Ion Autonomies Mode normal env 20 minutes Boost env 12 minutes Temps de charge env 4 5 heures Chargeur secteur Courant de sorti...

Страница 45: ...Manual de instrucciones VC100...

Страница 46: ...Utilizaci n conforme a lo previsto 52 5 Antes de empezar 53 6 Uso 54 6 1 Carga 54 6 2 Encendido y apagado 54 6 3 Funci n Boost 54 6 4 Indicador de funcionamiento 54 6 5 Guardado 55 7 Mantenimiento 55...

Страница 47: ...5 4 1 Compartimento para el polvo 5 Unidad de filtro 2 Tecla de desbloqueo del compartimento para el polvo 6 Abertura de salida de aire 3 Unidad de alimentaci n 7 Indicador de funcionamiento 4 Estaci...

Страница 48: ...o colillas encendidas No aspire sustancias explosivas o f cilmente inflamables Peligro de descarga el ctrica Si no utiliza el aparato para el fin previsto puede sufrir una descarga el ctrica No inser...

Страница 49: ...visibles o problemas de funcionamiento No cortocircuite la bater a en ning n caso Peligro de lesiones al trabajar en el aparato Si el aparato no se apaga puede sufrir lesiones con algunas piezas Desc...

Страница 50: ...orwerk suministrada Utilice la unidad de alimentaci n solo con la corriente alterna y la frecuencia de red especificadas en la placa de caracter sticas Utilice el cargador solamente en una toma correc...

Страница 51: ...ice el aspirador de mano solamente con la unidad de filtro original colocada 3 2 Clasificaci n de las indicaciones de seguridad Las indicaciones de advertencia de este manual se resaltan mediante icon...

Страница 52: ...ilizado por ni os a partir de 8 a os de edad o por personas con alg n tipo de discapacidad f sica sensorial o mental o sin experiencia con este tipo de aparatos si est n siendo supervisados o si recib...

Страница 53: ...ar Cargue totalmente el aspirador de mano antes de la primera puesta en marcha Colgar la estaci n de carga Para fijar la estaci n de carga en la pared se necesita un tornillo Elija el material de fija...

Страница 54: ...n en la toma correspondiente del asa del aspirador de mano 6 A continuaci n conecte la unidad de alimentaci n a la toma de corriente 6 2 Encendido y apagado Pulse el bot n verde 8 para encender o apag...

Страница 55: ...i es necesario limpie el compartimento para el polvo con un pa o h medo y deje que se seque completamente antes de volver a montarlo 6 Al introducir la unidad de filtro 5 aseg rese de que la muesca m...

Страница 56: ...ecogida de bater as Retire la bater a solo cuando est completamente descargada En ning n caso la bater a puede entrar en contacto con metal ATENCI N Peligro de lesiones por bater as con fugas Las bate...

Страница 57: ...10 8 V CC Tipo de unidad de alimentaci n S006BAV1080050 Potencia nominal del motor Aprox 65 W Potencia de aspiraci n m x 13 W Caudal de aire m x 15 l s Peso 650 g sin estaci n de carga ni unidad de al...

Страница 58: ...58...

Страница 59: ...N vod k pou it VC100...

Страница 60: ...65 4 Pou it v souladu s ur en m 65 5 P ed prvn m pou it m 66 6 Obsluha 67 6 1 Nab jen 67 6 2 Zapnut a vypnut 67 6 3 Funkce Boost 67 6 4 Indik tor stavu 67 6 5 Ulo en 68 7 dr ba 68 7 1 i t n filtru 68...

Страница 61: ...en p enech te li jej jin m osob m 2 Popis v robku 1 2 3 8 6 7 5 4 1 Prachov komora 5 Filtra n jednotka 2 Odji ovac tla tko prachov komory 6 Vyfukovac otvor 3 S ov nab je ka 7 Indik tor stavu 4 Nab je...

Страница 62: ...snadno vzn tliv l tky Nebezpe zasa en elektrick m proudem Pokud nepou v te p stroj v souladu s ur en m m e to v st k razu elektrick m proudem Do elektrick ch kontakt nevkl dejte ostr p edm ty Neprov d...

Страница 63: ...po kozeny p dem nebo n razem Chra te se p ed ostrohrann mi lomky Nebezpe razu v d sledku vyt kaj c ch bateri Vyt kaj c baterie mohou zp sobit zran n Vyt kaj c baterie by se nem ly dostat do kontaktu s...

Страница 64: ...n Nepokou ejte se baterii vyjmout a vym nit ji za jinou P stroj alespo jednou za rok zcela nabijte abyste zabr nili hlubok mu vybit a po kozen bateri Nebezpe po kozen baterie Extr mn horko nebo chlad...

Страница 65: ...nostn ho symbolu V stra n upozorn n ud vaj c z va nost nebezpe Upozorn n na po kozen majetku 3 3 Povinnosti u ivatele Chcete li zajistit spr vnou funkci p stroje a p slu enstv Vorwerk dodr ujte n sle...

Страница 66: ...V p pad nespr vn ho po n n v robce neodpov d za vznikl kody P stroj odpov d bezpe nostn m p edpis m zem ve kter je prod v n prost ednictv m autorizovan organizace Vorwerk P i pou it p stroje v jin zem...

Страница 67: ...z str ku b s ov nab je ky do odpov daj c z suvky na rukojeti ru n ho vysava e 6 Pot zapojte s ovou nab je ku do z suvky 6 2 Zapnut a vypnut Stisknut m zelen ho tla tka 8 zapn te nebo vypn te ru n vysa...

Страница 68: ...a uschnout 6 P i vkl d n filtra n jednotky 5 se ujist te e v t vybr n 5a filtra n jednotky sm uje k uvol ovac mu tla tku 2 na prachov komo e 1 7 Podr te uvol ovac tla tko a zatla te filtra n jednotku...

Страница 69: ...d sledku vyt kaj c ch bateri Vyt kaj c baterie mohou zp sobit zran n Vyt kaj c baterie by se nem ly dostat do kontaktu s o ima a sliznicemi Umyjte si ruce a opl chn te o i istou vodou Pokud budete m...

Страница 70: ...W max objem vzduchu 15 l s Hmotnost 650 g bez nab jec stanice a s ov nab je ky Rozm ry D lka s n st nn m dr kem 425 mm d lka vysava 417 mm pr m r 82 mm Hlukov emise 75 dBA m eno ve voln ch podm nk ch...

Страница 71: ...Istruzioni per l uso VC100...

Страница 72: ...re 78 4 Utilizzo conforme 78 5 Prima di iniziare 79 6 Utilizzo 80 6 1 Ricarica 80 6 2 Accensione e spegnimento 80 6 3 Funzione boost 80 6 4 Display di funzionamento 80 6 5 Conservazione 81 7 Manutenzi...

Страница 73: ...i sua cessione 2 Panoramica del prodotto 1 2 3 8 6 7 5 4 1 Camera di raccolta della polvere 5 Unit filtro 2 Pulsante di sblocco per la camera di raccolta della polvere 6 Apertura di sfiato 3 Dispositi...

Страница 74: ...o all interno dell apparecchio ci pu provocare incendio o esplosione Non aspirare cenere calda o mozziconi di sigaretta accesi Non aspirare sostanze esplosive o facilmente infiammabili Pericolo di sco...

Страница 75: ...malie di funzionamento Non provocare mai un cortocircuito del set di batterie Pericolo di lesioni in caso di interventi sull apparecchio Se l apparecchio non spento i singoli componenti possono causar...

Страница 76: ...nito in dotazione Utilizzare il dispositivo di ricarica solo con la tensione alternata e la frequenza indicate sulla targhetta identificativa Collegare il dispositivo di ricarica solo a prese installa...

Страница 77: ...io non completamente assemblato Utilizzare l Aspiratore da tavolo esclusivamente con l unit filtro originale montata 3 2 Struttura delle avvertenze di pericolo Le avvertenze di pericolo in questo manu...

Страница 78: ...i apprendimento solamente sotto supervisione o se istruiti circa il suo utilizzo in sicurezza e consapevoli dei pericoli che esso comporta I bambini non devono giocare con l apparecchio La pulizia e l...

Страница 79: ...na vite Scegliere il materiale di fissaggio adatto al tipo di parete 1 Fissare la vite nella parete Verificare che la distanza dal pavimento sia di almeno 50 cm 2 Infilare la stazione di ricarica sull...

Страница 80: ...positivo di ricarica nella presa corrispondente sull impugnatura dell Aspiratore da tavolo 6 Quindi inserire il dispositivo di ricarica nella presa 6 2 Accensione e spegnimento Per accendere o spegner...

Страница 81: ...rla asciugare perfettamente prima di rimontarla nell apparecchio 6 Quando si inserisce l unit filtro 5 verificare che la parte concava pi grande 5a dell unit filtro sia rivolta verso il pulsante di sb...

Страница 82: ...lo ATTENZIONE Pericolo di lesioni a causa della fuoriuscita di materiale dalle batterie Le batterie che presentano perdite possono causare ferite Le batterie che presentano perdite non devono essere p...

Страница 83: ...positivo di ricarica 10 8 V DC Tipo di dispositivo di ricarica S006BAV1080050 Potenza nominale del motore ca 65 Watt Potenza di aspirazione max 13 Watt Portata d aria max 15 l s Peso 650 g senza stazi...

Страница 84: ...84 12 1 Produttore Vorwerk Elektrowerke GmbH Co KG M hlenweg 17 37 42270 Wuppertal Germania...

Страница 85: ...85...

Страница 86: ...86...

Страница 87: ...87...

Страница 88: ...88...

Страница 89: ...89...

Страница 90: ...90...

Страница 91: ......

Страница 92: ...DE EN FR ES CZ IT 20039 08 V1 0 VC100...

Отзывы: