Vook VDT2304SS-B Скачать руководство пользователя страница 77

DVR User Manual


71 


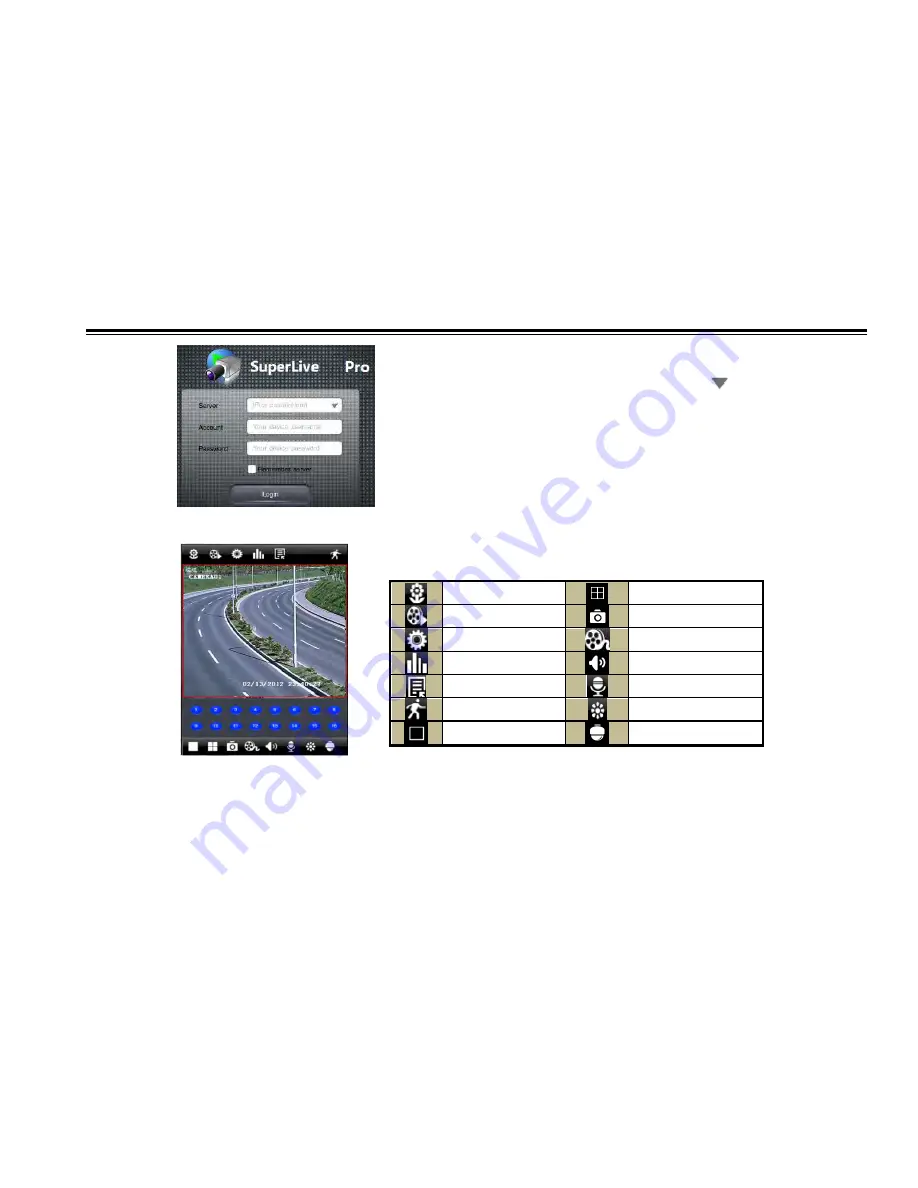
Enter server‘s IP address (or domain name), user name and password 
Click ―Remember server

 to save the setting; click 

  button can quick input 

saved server address, user name and password. 


2.


Main Interface 


Image view 


Four channel 


Playback 


Snap 


Setting 


Record 


Information view 


Audio 


Server list 


Talk 


Logoff 


Color 


Single channel 


PTZ 

VOOK

Содержание VDT2304SS-B

Страница 1: ...DVR USER VDT2304SS B VDT2308SS B VDT2316SS B VOOK...

Страница 2: ...the DVR when the device is functioning The correct operation to shut down the DVR is to first stop recording and then use shut down button from the menu and finally switch off the main power This mac...

Страница 3: ...4 Remote Controller 7 2 5 Control with Mouse 10 2 5 1 Connect Mouse 10 2 5 2 Use Mouse 11 3 Basic Function Instruction 12 3 1 Startup Shutdown 12 3 1 1 Startup 12 3 1 2 Shutdown 12 3 2 Login 13 3 3 L...

Страница 4: ...ion 23 4 4 1 Schedule 23 4 4 2 Motion 24 4 5 Alarm Configuration 24 4 5 1 Motion 24 4 5 2 Video Loss 26 4 5 3 Other Alarm 26 4 5 4 Alarm Out 27 4 6 Network Configuration 27 4 6 1 Network 27 4 6 2 Sub...

Страница 5: ...em Information 43 6 1 2 Event Information 43 6 1 3 Log Information 43 6 1 4 Network Information 43 6 1 5 Online Information 43 6 1 6 Record Information 44 6 2 Disk Management 44 6 3 Upgrade 44 6 4 Log...

Страница 6: ...Phones with Windows mobile OS 64 8 2 By Phones with Symbian OS 65 8 3 By phones with iPhone OS 67 8 4 By phones with Android OS 75 8 5 By Phones with Blackberry OS 80 Appendix A FAQ 86 Appendix B Cal...

Страница 7: ...h stability Due to these distinctive characteristics it is widely used in banks telecommunication transportation factories warehouse and irrigation and so on 1 2 Main Features COMPRESSION FORMAT Stand...

Страница 8: ...playback in Network Client through LAN or internet ALARM Support schedule for motion detection alarm Support pre recording and post recording Support linked channels recording once motion or alarm tr...

Страница 9: ...nd environment Support picture snap and color adjustment in remote live Support remote time and event search and channel playback with picture snap Support remote PTZ control with preset and auto crui...

Страница 10: ...recommend specially for security and safe field 2 Please calculate HDD capacity according to the recording setting Please refer to Appendix B Calculate Recording Capacity Step1 Unscrew and Open the t...

Страница 11: ...ect external USB devices like USB flash USB HDD for backup or update firmware or connect to USB mouse 2 3 Rear Panel Instructions Fig 2 3 Rear Panel for 4 ch Item Name Description 1 Audio in 2 CH Audi...

Страница 12: ...em Name Description 1 Audio in 2 CH Audio inputs 2 Video in Video input channels from 1 8 3 Audio out Audio output connect to the sound box 4 Video out Connect to monitor 5 VGA port VGA output connect...

Страница 13: ...tor 5 HDMI port Connect to high definition display device 6 VGA port VGA output connect to monitor 7 LAN Network port 8 USB port Connect USB mouse or connect external USB devices 9 DC12V POWER INPUT 1...

Страница 14: ...el Here we will take the bigger remote controller as an example to describe Fig 2 6 Remote Controller Button Function Power Button Switch off to stop DVR Use it before turning off the power Record But...

Страница 15: ...enter into track setting in PTZ mode Wiper Button To enable wiper function in PTZ mode Light Button To enable light function in PTZ mode Clear Button To return to the previous interface Fn2 Button Una...

Страница 16: ...mote is to be used to control a single DVR However when controlling multiple DVRs with multiple remote controllers you would need to configure the device ID please refer to below steps Activate remote...

Страница 17: ...ymbols as inputs Click Shift button to input Capital letters and symbols click Shift button again to return You can change some values using the mouse wheel such as time Move cursor onto the value and...

Страница 18: ...nd disk management User can setup here and refer to the concrete setup steps from the corresponding chapters If users don t want to setup Wizard please click Exit button to exit Press and hold Fn key...

Страница 19: ...isplay Notice The default user name and password is admin and 123456 For complete operational steps for changing password adding or deleting users please refer to section 4 7 User Management Configura...

Страница 20: ...DVR User Manual 14 3 3 1 Live Playback Click Play button to play the record Refer to Figure3 3 User can do complete operation by clicking the buttons on screen Fig 3 3 Live Playback VOOK...

Страница 21: ...nt cameras in a sequence The images may be displayed as a single channel or in a grid fashion from different cameras Dwell mode is enabled only when the chosen display mode is not able to display all...

Страница 22: ...play as below Device Name The name of the device as it may display on the client end or on CMS this would help the user to recognize the device remotely Device ID This ID is used to map the DVR with I...

Страница 23: ...gout and return to the login interface No Image When Logout If selected there will be no image showing when logout 4 1 2 Date Time Step1 Enter into Menu Setup Basic Date Time tab Refer to Fig 4 4 Step...

Страница 24: ...oft keyboard will pop up by clicking the camera name User can self define the camera name Step2 For a particular camera channel setting please click setting button to see a window as Fig 4 7 Step3 In...

Страница 25: ...ve the setting click Exit to exit the current tab Fig 4 8 Main Monitor 4 2 3 Mask You can setup private mask area 3 areas at most on the live image picture Setup mask area Click Setting button enter i...

Страница 26: ...te Step1 Enter into Menu Setup Record Record bit rate tab Refer to Fig 4 11 Step2 Setup rate resolution and quality Step3 Select All to set same settings for all channels Step4 Click Default button to...

Страница 27: ...80s and 300s Expire time The time till which the records would be retained If the set date is overdue the recorded files will be deleted automatically Step2 Select All to setup all channels with the s...

Страница 28: ...channels with the same parameters Fig 4 13 Record Stamp Setup Before Drag After Drag 4 3 5 Recycle Record This option is used to recycle the HDD space once it is full If enabled the system will automa...

Страница 29: ...the grid to do relevant setup A highlighted area denotes selected timeline Step1 Enter into Menu Setup Schedule tab Refer to Fig 4 14 Step2 Select channel and double click to pop up a window as Fig 4...

Страница 30: ...ls Fig 4 16 Schedule Configuration Motion 4 5 Alarm Configuration Alarm configuration includes four sub menus motion video loss other alarm and alarm out 4 5 1 Motion Motion includes two sub menus mot...

Страница 31: ...6 Enter into To PTZ tab Set preset cruise and track options for a PTZ in case of a motion based alarm Single or multiple PTZ units could be programmed to perform this function on the same alarm Step7...

Страница 32: ...20 Motion Schedule 4 5 2 Video Loss Step1 Enter into Menu Setup Alarm Video Loss tab Refer to Fig 4 21 Step2 The setup steps of video loss trigger are similar to alarm handling You can refer to Chapte...

Страница 33: ...server and other settings Network settings must be configured if DVR is used for monitoring over network 4 6 1 Network Step 1 Enter into Menu Setup Network Network tab Refer to Fig4 24 Step 2 HTTP por...

Страница 34: ...you should test the effectiveness of the network by clicking Test button after you setup the network Step 5 If the network is well connected please click Apply button to save settings 4 6 2 Sub strea...

Страница 35: ...6 4 Server This function is mainly used for connecting ECMS The setting steps are as follows Step 1 In the server tab select enable as shown in the Fig 4 27 Step 2 Check the IP address and port of th...

Страница 36: ...er is a banding domain name of DVR User should logon the website which provided by the server supplier to register a user name and password firstly and then apply for a domain name on line Once applie...

Страница 37: ...R via network Step 1 Enter into Main menu Network other settings checkmark DDNS select Dyndns at the DDNS Sever pull down list box and input user name and password Step 2 Login IE browser and input re...

Страница 38: ...and setup user authority Step 1 Enter into Menu Setup User management configuration Refer to Fig 4 29 Step 2 Click Add button to display a dialog box as Fig 4 30 Step 3 In General tab input username p...

Страница 39: ...o change password of a user please select the user in the user list box and then click Change Password button 4 8 P T Z Configuration P T Z configuration includes two submenus serial port and advanced...

Страница 40: ...dialog box as Fig 4 34 Parameter Meaning Address The address of the PTZ device Baud rate Baud rate of the PTZ device Range form 110 300 600 1200 2400 4800 9600 19200 34800 57600 115200 230400 460800...

Страница 41: ...st support wiper and light function and these two buttons are just available when selecting PELCOP or PELCOD Click Save button to save the settings click icon to hide the tool bar right click to view...

Страница 42: ...the current interface Step5 In the Advanced tab while clicking track Setting button a dialog box will pop up as Fig 4 38 Fig 4 37 Cruise Setting Modify Cruise Line Fig 4 38 Track Setting User can cont...

Страница 43: ...user can prohibit computer users within a certain IP address range from accessing DVR or allow computer users within a certain IP address range to access DVR For example if an admin don t want comput...

Страница 44: ...p1 Enter into Menu Search Time search tab Refer to Fig 5 1 Fig 5 1 Search Configuration Time Search Step2 Select date and channels on the right hand side and press Search button A date with highlighte...

Страница 45: ...rface will be hidden Click the Expand to button to expand the whole interface The method of record backup during a certain period in the playback interface Select the start time by dragging the slider...

Страница 46: ...rderline indicates presence of data Step 3 Then checkmark Motion You can search for motion based recording Step 4 Press Search button to display the searched event information in the event list box St...

Страница 47: ...an unlocked file and click Delete button to delete this file Step 4 Use All button to lock unlock or delete all files in the file management column Step 5 Double click an unlocked item to playback 5...

Страница 48: ...ect channels and click Search button to display the searched data in the data backup list box Step3 Select a required file or checkmark All to select all data files Click Backup button to display Back...

Страница 49: ...d a channel based search This report can further be saved on a USB flash drive as an html file using the export button 6 1 3 Log Information In this tab you can search for relevant logs as per the set...

Страница 50: ...ace at the bottom of screen Step2 Click Refresh button to refresh the disk information in the list box Step3 Select a hard disk and click Format button to start format Note All recorded files in the h...

Страница 51: ...click upgrade button It will upgrade automatically Note Please wait for a while when the system reboots Never cut off power during upgrading The original configuration will be reserved after upgrade...

Страница 52: ...rd in the subsequent window Notice If HTTP port is not 80 other number instead need add the port number after IP address For example set HTTP port as 82 need input IP address like 192 168 0 25 82 User...

Страница 53: ...me and password Input name and password correctly and enter to view Note If you cannot download and install ActiveX please refer to FAQ Q8 Fig 7 1 View with IE Browser 2 Connect the DVR to internet th...

Страница 54: ...VR or router Step 4 The following setting steps are as the same as Step3 and Step4 in Point 1 7 2 Remote Surveillance through Apple PC Note Because the current plug in version of client end just only...

Страница 55: ...p 1 After starting Apple computer click Apple icon The following window will pop up Please select System Preferences Internet Wireless click Network Step 2 Enter into Network interface and then click...

Страница 56: ...as the PC If using DHCP please enable DHCP in the DVR and router Step 4 After finishing the above information users can enter LAN IP and http port in the Safari browser For example input http 192 168...

Страница 57: ...e DVR to internet through router or virtual server Step 1 The network setups are the same as step one to step four of point 1 on WAN of IE remote surveillance Step 2 Enter WAN IP and http port in the...

Страница 58: ...w Fig 7 2 Remote Live Preview Symbol and function Definitions Channel indicator Screen display mode Volume Snapping picture Start manual record Start IE record Bidirectional talk Playback Color PTZ co...

Страница 59: ...Saturation Click Default to reset them to original value Buttons Description Drag the scroll bar to adjust the brightness of channel Drag the scroll bar to adjust the contrast of channel Drag the scro...

Страница 60: ...Click button near Iris button to increase light of the dome Click button near Iris button to decrease light of the dome Zoom button Click button near Zoom button to zoom in the locale picture of this...

Страница 61: ...er stream or sub stream Enable audio Enable or disenable audio Full screen The live preview picture will display in full screen and the tool bar will be hidden double click left or click right mouse t...

Страница 62: ...DVR User Manual 56 Fig 7 5 Play Record File Interface This DVR supports remote time search event search and file management By Time Search Step1 Enter into Search Time search Refer to Fig 7 6 VOOK...

Страница 63: ...nnels in area Step3 Click Search button The record data will be displayed in the data information list box Step 4 Set the Start time and display mode in the area as required Step 5 Click play button t...

Страница 64: ...DVR User Manual 58 Fig 7 7 Time Search Playback By Event Search Step1 Enter into Search Event Search Refer to Fig 7 8 VOOK...

Страница 65: ...Interface Step 2 Click the highlight date and select record channels Step 3 Checkmark the event type motion Step 4 The events will be display in the event list box by clicking Search button Step 5 Dou...

Страница 66: ...search the recorded files Fig 7 9 File Management Interface Lock Select certain file item in the file list box and then click Lock button to lock this file that ca not be deleted or overlaid Unlock S...

Страница 67: ...click search button to display the file information in the file list box Step2 Select backup files and click browse button to set the path Then click backup button to start backup The backup files wi...

Страница 68: ...up at a given point of time Click Config tab to enter into the below interface as Fig 7 11 Fig 7 11 Remote System Configuration The sub menu list and the options in every menu are similar to that of t...

Страница 69: ...vent Log Network and Online users The sub menu list and the options in every menu are similar to that of the DVR Please refer to Chapter 6 System information for more details Fig 7 12 Remote Informati...

Страница 70: ...end for five OS 8 1 By Phones with Windows mobile OS Step1 Firstly activate the network access on mobile phone and then run Internet Explorer Input the server s address and the connection is built up...

Страница 71: ...Symbian S60 3rd Edition Symbian OS v9 1 support Symbian S60 3rd Edition with FP 1 Symbian OS v9 2 support Symbian S60 3rd Edition with FP2 Symbian OS v9 3 support Symbian S60 5th Edition Symbian OS v...

Страница 72: ...ft Step7 Click System setting Login Setting to enter login interface Refer to the picture on the right Step8 Input the server s address ID and password respectively Then save Notice About Access point...

Страница 73: ...DVR User Manual 67 8 3 By phones with iPhone OS 1 Install through iPhone Step 1 Open App Store function of iPhone Step 2 Enable s earch function to search Superlive VOOK...

Страница 74: ...l 68 Step 3 Click Superlive pro enter into introduce interface and then click FREE it will change into INSTALL Step 4 Input iTunes Store password and then click OK The software will be installed autom...

Страница 75: ...f it is the first time for user to operate please enter user ID if there is no Store account user needs to apply for one 2 Install through PC Step 1 Install iTunes store in PC and then login Step 2 Co...

Страница 76: ...uperlive pro Step 4 Click free application button Step 5 Input apple ID and password then click acquire Step 6 Checkmark synchronously apply program and Superlive pro and then click Apply button Opera...

Страница 77: ...d password Click Remember server to save the setting click button can quick input saved server address user name and password 2 Main Interface Image view Four channel Playback Snap Setting Record Info...

Страница 78: ...ter into the next interface To return to the previous interface Preset select the preset point Cruise Set the cruise line Speed Rotate speed of the PTZ 3 Image View After the image is snapped you can...

Страница 79: ...yback and click button Now you can see the local file list Select a file and click play button to playback You can also copy or delete the file Finally click Close button to return to the previous int...

Страница 80: ...click icon to edit the server information and click icon to delete this server information 6 Configuration interface Click icon to enter into Settings interface You can set many properties such as lo...

Страница 81: ...tion of device name device ID hardware version MCU version and so on In the network interface you can see the information of http port server port IP address gateway network status etc In the online u...

Страница 82: ...Manual 76 Step 3 Press Install button Step 4 Click OK button Step 5 User can view the download and install process in notifications Once finishing downloading the software will install automatically L...

Страница 83: ...ting click button can quick input saved server address user name and password Main menu Playback playback record file Image image view Log log record Server List device list Live live view Settings so...

Страница 84: ...e view Image view Stop playing Single channel display Screen mode Four channels display Snap PTZ Talk Record Live audio Hide The first picture The previous picture Next picture The last picture Zoom i...

Страница 85: ...ce First choose channel Second select the record file and click it to playback Finally click Return button to return to the previous interface Server list Config interface Play Pause Stop Fast forward...

Страница 86: ...dio alarm is enabled when Video Loss Motion happen sound alarm will be triggered If shake Alarm is enabled when Video Loss Motion happen shake alarm will be triggered Storage setting User can setup th...

Страница 87: ...o download please check in accordance with the following steps 1 Check whether the network of mobile phone is normal or not 2 Check whether DVR server connect network normally or not 3 Modify the opti...

Страница 88: ...This problem will be solved Login Enter server s IP address or domain name user s ID and password Click Remember server to save the setting click button can quick input saved server address user name...

Страница 89: ...DVR User Manual 83 Live view Note User can click Return button on the Blackberry phone to return the previous interface VOOK...

Страница 90: ...ch to Fig 2 interface Snap Full screen Background alarm Stop rotating the PTZ Upward rotates the PTZ Downward rotates the PTZ Leftward rotates the PTZ Rightward rotates the PTZ Zoom In Focus In Iris A...

Страница 91: ...DVR User Manual 85 Software configuration Information view VOOK...

Страница 92: ...e is no output a The power from the adapter may be not enough for operating the DVR Please use the power adaptor supplied along with the DVR b It could be a wiring issue Please check the connection fo...

Страница 93: ...ne bad Please change another one Q7 Mouse does not work a The mouse should be connected to the USB port at the rear side b After connecting the mouse allow the DVR to detect the mouse for seconds If n...

Страница 94: ...s also possible that the DVR was forced to stop because HDD has a bad sector and it may have caused the system to halt Check with a good known HDD or try formatting the existing HDD Q10 How to input p...

Страница 95: ...tains a HDD the migrated disk being installed would have to be formatted In general migrating disks from one DVR to another is not recommended Q12 What is the minimum configuration required for remote...

Страница 96: ...g 14 1 click Turn User Account on or off Cancel Use User Account Control UAC to help protect your computer b Right click IE browser refer to Fig 14 2 select Run as administrator to run browser Fig 14...

Страница 97: ...th button to open your backup file Next click play button to play the backup file Double click the image and then right click to enable audio If you save your backup files in AVI format you can direct...

Страница 98: ...F 25 Highest 2M 910 Higher 1 5M 712 Medium 1M 468 Low 768K 297 Lower 512K 241 Lowest 256K 112 The calculation format is Total Recording capacity Used space per hour MB h coverage rate of hard disk rec...

Страница 99: ...SSK 512MB 1G 2GB Netac 4GB Kingston 2GB Aigo 2GB Smatter vider 1GB SanDisk 4GB 2 Compatible HDD list Brand Capacity Seagate Barracuda 80G 160G 250G 320G 1 5T 2TB Seagate SV35 3 1T Seagate Pipeline HD...

Страница 100: ...704 480 NTSC Display Frame Rate 100FPS PAL 120FPS NTSC Record Frame Rate 100FPS PAL 120FPS NTSC Audio input RCA X2 Audio output RCA X1 Record Mode Manual Timer Motion detection Simplex Duplex Triplex...

Страница 101: ...480 NTSC Display Frame Rate 200FPS PAL 240FPS NTSC Record Frame Rate 125 200FPS PAL 150 240FPS NTSC Audio input RCA X2 Audio output RCA X1 Record Mode Manual Timer Motion detection Simplex Duplex Trip...

Страница 102: ...480 NTSC Display Frame Rate 400FPS PAL 480FPS NTSC Record Frame Rate 100 400FPS PAL 120 480FPS NTSC Audio input RCA X2 Audio output RCA X1 Record Mode Manual Timer Motion detection Simplex Duplex Tri...

Страница 103: ...A1 VOOK...

Отзывы: