background image

Bedienungsanleitung

VC251TRMS Digital Multimeter

Best.-Nr. 


Seite 2 - 32

Operating Instructions

VC251TRMS Digital Multimeter

Item No. 


Page 33 - 63


Mode d’emploi

Multimètre numérique VC251TRMS

N° de commande 


Page 64 - 94

Gebruiksaanwijzing

VC251TRMS digitale multimeter

Bestelnr. 


Pagina 95 - 125

1647180

1647180

1647180

1647180

Содержание VC251TRMS

Страница 1: ...Seite 2 32 Operating Instructions VC251TRMS Digital Multimeter Item No Page 33 63 Mode d emploi Multim tre num rique VC251TRMS N de commande Page 64 94 Gebruiksaanwijzing VC251TRMS digitale multimete...

Страница 2: ...ungsmessung V 13 d Gleichspannungsmessung V 14 e LoZ Spannungsmessung 14 f Strommessung 15 g Widerstandsmessung 18 h Diodentest 19 i Durchgangspr fung 20 j Batterietest 20 10 Zusatzfunktionen 21 a REL...

Страница 3: ...Voltcraft werden Sie als anspruchsvoller Bastler ebenso wie als professioneller Anwender auch schwierigen Aufgaben gerecht Voltcraft bietet Ihnen zuverl ssige Technologie zu einem au ergew hnlich g n...

Страница 4: ...Messungen an elektrischen und elektronischen Ger ten welche ber einen Netzste cker direkt mit Netzspannung versorgt werden Diese Kategorie umfasst auch alle kleineren Kategorien z B CAT I zur Messung...

Страница 5: ...eter mit einer handels blichen 9 V Block Batterie Typ 6F22 NEDA 1604 oder baugleich Der Betrieb ist nur mit dem angegebenen Batterietyp zul ssig Ein Akku sollte aufgrund der geringeren Kapazit t nicht...

Страница 6: ...sen Um diesen Zustand zu erhalten und einen gefahrlosen Betrieb sicherzustellen muss der Anwender die Sicherheitshinweise und Warnvermerke beachten die in dieser Gebrauchsanweisung enthalten sind Aus...

Страница 7: ...ist Die beiliegenden Messkabel haben einen Verschlei indikator Bei einer Besch digung wird eine zweite andersfarbige Isolierschicht sichtbar Das Messzubeh r darf nicht mehr verwendet werden und muss a...

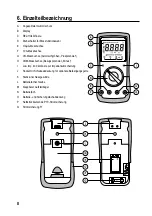
Страница 8: ...bei Gleichgr en Pluspotenzial H COM Messbuchse Bezugspotenzial Minus I Low Imp 400 k Taste zur Impedanzumschaltung J Sockel mit Schiebeabdeckung f r optionale Befestigungsgurte K Stativ Anschlussgewi...

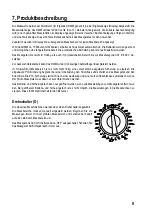
Страница 9: ...das DMM mit dem r ckseitigen Aufstellb gel ideal platziert werden Im mA A Strom Messbereich ist es nicht mehr n tig eine versehentlich ausgel ste Sicherung zu ersetzen Die eingebaute PTC Sicherung be...

Страница 10: ...Hertz Einheit der Frequenz 7 Symbol f r Milli exp 3 8 Volt Einheit der elektrischen Spannung 9 Symbol f r Micro exp 6 10 Ampere Einheit der elektrischen Stromst rke 11 Automatische Abschaltung ist ak...

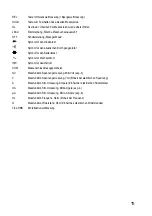
Страница 11: ...rietest Symbol f r Wechselstrom Symbol f r Gleichstrom COM Messanschluss Bezugspotenzial mV Messfunktion Spannungsmessung Milli Volt exp 3 V Messfunktion Spannungsmessung Volt Einheit der elektrischen...

Страница 12: ...en durchgef hrt werden die mit den einschl gigen Vorschriften und den daraus resul tierenden Gefahren vertraut sind Sobald OL f r Overload berlauf im Display erscheint haben Sie den Messbereich bersch...

Страница 13: ...en muss Folgende Fehlanschl sse werden erkannt Messfunktion V mA A 10 A Anschluss Messbuchsen mA A 10 A 10 A mA A Unterbrechen Sie bei einer Warnmeldung sofort den Messaufbau und kontrollieren Sie die...

Страница 14: ...ngangswiderstand von 10 MOhm der mV DC Mess bereich 1000 MOhm auf Entfernen Sie nach Messende die Messleitungen vom Messobjekt und schalten Sie das DMM aus e LoZ Spannungsmessung Die LoZ Messfunktion...

Страница 15: ...m A Bereich auf keinen Fall Str me ber 10 A bzw im mA A Bereich Str me ber 200 mA da sonst die Sicherungen ausl sen Der A mA Messeingang weist eine selbstr ckstellende PTC Sicherung auf bei dem ein Si...

Страница 16: ...200 mA 10 A COM 10A Stecken Sie die rote Messleitung in die mA A oder 10A Messbuchse Die schwarze Messleitung stecken Sie in die COM Messbuchse Verbinden Sie die beiden Messspitzen im stromlosen zust...

Страница 17: ...200 mA 10 A COM 10A Stecken Sie die rote Messleitung in die mA A oder 10A Messbuchse Die schwarze Messleitung stecken Sie in die COM Messbuchse Verbinden Sie die beiden Messspitzen im stromlosen zust...

Страница 18: ...n nicht in die folgende Widerstandsmessung einflie en zu lassen Die Anzeige zeigt 0 Verbinden Sie nun die beiden Messspitzen mit dem Messob jekt Der Messwert wird sofern das Messobjekt nicht hoch ohmi...

Страница 19: ...iode in Sperr richtung UR gemessen oder die Diode ist defekt Un terbrechung F hren Sie zur Kontrolle eine gegenpolige Messung durch Entfernen Sie nach Messende die Messleitungen vom Messobjekt und sch...

Страница 20: ...M ein und w hlen den Messbereich Stecken Sie die rote Messleitung in die mA A Messbuchse E die schwarze Messleitung in die COM Messbuchse H In der Anzeige erscheint die Einheit V Verbinden Sie die rot...

Страница 21: ...sonst ein falsches Messergebnis vorget uscht Zum Einschalten der Hold Funktion dr cken Sie kurz die Taste HOLD ein Signalton best tigt diese Aktion und es wird H im Display angezeigt Um die Hold Funk...

Страница 22: ...n von Teilen au er wenn dies von Hand m glich ist k nnen spannungsf hrende Teile freigelegt werden Vor einer Reinigung oder Instandsetzung m ssen die angeschlossenen Leitungen vom Messger t und von al...

Страница 23: ...bst bei ge ffnetem Batterie und Sicherungsfach nur den Zugriff auf Batterie und Sicherungen zu Das Geh use muss nicht mehr wie blich komplett ge ffnet und zerlegt werden Diese Ma nahmen erh hen die Si...

Страница 24: ...ie die defekte Sicherung gegen eine neue des selben Typs und Nennstromst rke Die Sicherung F1 hat folgende Werte Keramik Superflink 6FF 12 A 1000 V Abmessungen 32 mm x 6 4 mm Verschlie en Sie das Geh...

Страница 25: ...NSGEFAHR Lassen Sie keine verbrauchten Batterien im Messger t da selbst auslaufgesch tzte Batterien korrodieren k nnen und dadurch Chemikalien freigesetzt werden k nnen welche Ihrer Gesundheit schaden...

Страница 26: ...h Batterieverordnung zur R ckgabe aller gebrauchten Akkus verpflichtet eine Entsorgung ber den Hausm ll ist untersagt Schadstoffhaltige Akkus sind mit nebenstehendem Symbol gekennzeichnet die auf das...

Страница 27: ...C Kontrollieren Sie die Anzeige AC DC und schalten die Funktion ggf um Wurden die falschen Messbuchsen verwendet Kontrollieren Sie die Buchsenbelegung bzw den korrekten Sitz der Messleitungen Ist die...

Страница 28: ...pannung 9V Blockbatterie Arbeitsbedingungen 0 bis 40 C 75 rF Betriebsh he max 2000 m ber NN Lagertemperatur 10 C bis 50 C Gewicht ca 382 g Abmessungen LxBxH 178 x 85 x 40 mm Messkategorie CAT III 600...

Страница 29: ...stschutz 600 V Impedanz 400 k max 250 V 3s Bei kurzgeschlossenem Messeingang ist eine Anzeige von 10 Counts m glich Nach der Verwendung der LoZ Funktion ist eine Regenerationszeit von 1 Minute erforde...

Страница 30: ...zeit von 1 Minute erforderlich TrueRMS Scheitelwert f r Nicht Sinusf rmige Signale zzgl Toleranzaufschlag TrueRMS Scheitelwert Crest Factor CF 3 CF bis 600 V CF 1 0 2 0 3 CF 2 0 2 5 5 CF 2 5 3 0 7 Gle...

Страница 31: ...actor CF 3 CF ber den gesamten Bereich TrueRMS Scheitelwert f r Nicht Sinusf rmige Signale zzgl Toleranzaufschlag CF 1 0 2 0 3 CF 2 0 2 5 5 CF 2 5 3 0 7 Widerstand Bereich Aufl sung Genauigkeit 200 0...

Страница 32: ...r Messbereich Aufl sung 200 0 1 10 Dauerton 100 kein Ton berlastschutz 600 V Pr fspannung ca 1 V Pr fstrom 0 7 mA berschreiten Sie auf keinen Fall die max zul ssigen Eingangsgr en Ber hren Sie keine S...

Страница 33: ...LoZ voltage mode 45 f Taking current measurements 46 g Measuring resistance 49 h Conducting a diode test 50 i Conducting a continuity test 51 j Conducting a battery test 51 10 Additional functions 52...

Страница 34: ...user Voltcraft products provide the optimal solution for the most demanding tasks Moreover our reliable technology all comes at a very affordable price We are confident that your purchase of this Vol...

Страница 35: ...ategory II For measuring electrical and electronic devices that are directly supplied with a mains voltage via a mains plug This category also includes all lower categories e g CAT I for measuring sig...

Страница 36: ...restrict the flow of current to protect the multimeter You do not need to replace the fuses The multimeter is powered by a standard 9 V block battery type 6F22 NEDA 1604 or identical specifications O...

Страница 37: ...rantee This device was shipped in a safe condition To ensure safe operation and avoid damaging the device always observe the safety information and warn ings in these instructions The unauthorized con...

Страница 38: ...ads come with a wear indicator Asecond layer of insulation will become visible if the lead is damaged the second layer of insulation is a different colour If this occurs discontinue use and replace th...

Страница 39: ...surement terminal positive potential for direct voltages H COM measurement terminal reference potential negative I Low Imp 400 k button for changing the impedance J Base with sliding cover for optiona...

Страница 40: ...using the fold out stand for better readability It is not necessary to replace a triggered fuse for mA Acurrent measurements The built in PTC fuse restricts the cur rent flow in the event of an overf...

Страница 41: ...tance 6 Hertz unit of frequency 7 Milli symbol exp 3 8 Volt unit of electrical voltage 9 Micro symbol exp 6 10 Ampere unit of electrical current 11 Automatic power off function is enabled 12 Measured...

Страница 42: ...de test symbol Acoustic continuity tester Battery test Alternating current Direct current COM Connection for reference potential mV Millivolt mode exp 3 V Voltage mode Volt unit of electrical voltage...

Страница 43: ...sonnel who are familiar with the relevant regulations and the associated hazards OL overload indicates that the measuring range has been exceeded The display shows the correct connection sequence of t...

Страница 44: ...onnected The multimeter triggers the alarm when the terminals are con nected as follows Measurement mode V mA A 10 A Connected terminals mA A 10 A 10 A mA A If the alarm is triggered check that you ha...

Страница 45: ...V DC AC voltage range has an input resist ance of 10 MOhm the mV DC range has an input resistance of 1000 MOhm After taking a measurement remove the leads from the measured object and switch off the D...

Страница 46: ...ts above 200 mA in the mA A range as this will trigger the fuses The A mA input has a resettable PTC fuse meaning that you do not need to replace the fuse in the event of an overload Current measureme...

Страница 47: ...OM mA A mA 200 A 199 mA COM mA A A 200 mA 10 A COM 10A Insert the red lead into the mA A or 10 A terminal Plug the black test lead into the COM terminal Connect the two measuring probes in series to t...

Страница 48: ...OM mA A mA 200 A 199 mA COM mA A A 200 mA 10 A COM 10A Insert the red lead into the mA A or 10A terminal Plug the black test lead into the COM terminal Connect the two measuring probes in series to th...

Страница 49: ...e inherent resistance of the test leads does not affect the resistance measurement The display should show 0 Connect the measuring probes to the object that you want to measure The measurement will be...

Страница 50: ...e biased or defec tive Try taking the measurement again in the opposite polarity After taking a measurement remove the leads from the measured object and switch off the DMM i Conducting a continuity t...

Страница 51: ...on the DMM and select the measurement range Plug the red lead into mA A terminal E and the black lead into the COM terminal H V will appear on the display Connect the red measuring probe to the positi...

Страница 52: ...t will be incorrect Press the HOLD button to enable this feature The multimeter will beep and H will be displayed To disable the hold feature press the HOLD button or change the measuring mode c Auto...

Страница 53: ...oduct or removing parts that cannot be removed by hand may expose voltage carrying components Before cleaning or servicing the multimeter disconnect all cables from the multimeter and meas ured object...

Страница 54: ...ccess the battery fuse com partment The casing does not need to be opened and disassembled This makes the multimeter safer and easier to use Follow the steps below to open the battery fuse compartment...

Страница 55: ...see Opening the battery fuse compartment Replace the defective fuse with a new fuse of the same type and nominal voltage The F1 has the following speci fications Ceramic Superflink 6FF 12 A 1000 V Di...

Страница 56: ...FATAL INJURY Do not leave empty batteries in the device Even leakproof batteries may corrode and destroy the device or release chemicals that are detrimental to your health Do not leave batteries una...

Страница 57: ...required by law to return all used batteries They must not be placed in household waste Batteries that contain hazardous substances are labelled with this symbol to indicate that disposal in household...

Страница 58: ...k the display AC DC and select another mode if necessary Did you use the wrong terminals Check that the test leads are con nected to the correct terminals Is the hold function enabled Disable the hold...

Страница 59: ...tage 9V block battery Operating conditions 0 to 40 C 75 RH Operating altitude max 2000 m above sea level Storage temperature 10 C to 50 C Weight approx 382 g Dimensions L x W x H 178 x 85 x 40 mm Meas...

Страница 60: ...ge 600 V overload protection Impedance 400 k max 250 V 3 secs The multimeter may display 10 counts if a measuring input is short circuited After using the LoZ feature leave the multimeter for 1 minute...

Страница 61: ...e the multimeter for 1 minute before using it again TrueRMS peak for non sinusoidal signals plus tolerance TrueRMS peak Crest Factor CF 3 CF to 600 V CF 1 0 2 0 3 CF 2 0 2 5 5 CF 2 5 3 0 7 Direct curr...

Страница 62: ...CF over the entire range TrueRMS peak for non sinusoidal signals plus tolerance CF 1 0 2 0 3 CF 2 0 2 5 5 CF 2 5 3 0 7 Resistance Range Resolution Accuracy 200 0 0 1 1 3 3 2 000 k 0 001 k 1 0 8 20 00...

Страница 63: ...Measurement range Resolution 200 0 1 10 continuous tone 100 no tone Overload protection 600 V Test voltage approx 1 V Test current 0 7 mA Never exceed the maximum permitted input values Never touch c...

Страница 64: ...on continue V 76 e Mesure de tension LoZ 76 f Mesure de courant 77 g Mesure de la r sistance 80 h Test de diodes 81 i Test de continuit 81 j Essai de pile 82 10 Fonctions compl mentaires 83 a Fonction...

Страница 65: ...son innovation permanente Voltcraft permet de r pondre aux t ches exigeantes du bricoleur ambitieux autant qu l utilisateur professionnel Voltcraft vous offre une technologie fiable un rapport qualit...

Страница 66: ...on du r seau via une fiche d alimentation Cette cat gorie comprend aussi toutes les petites cat gories p ex CAT I pour la mesure des tensions des signaux et des commandes CAT III Cat gorie de mesure I...

Страница 67: ...de mesure permet ainsi d viter d avoir changer les fusibles Le multim tre fonctionne avec une pile 9 V usuelle type 6F22 NEDA 1604 ou identique L appareil est con u pour fonctionner uniquement avec l...

Страница 68: ...n bon tat et d en assurer l utilisation correcte sans risques l utilisateur doit te nir compte des consignes de s curit des remarques et avertissements contenus dans ce mode d emploi Pour des raisons...

Страница 69: ...e arrach e etc Les c bles de mesure fournis ont un indicateur d usure En cas de dommage une deuxi me couche isolante de couleur diff rente est visible L accessoire de mesure ne doit pas tre utilis et...

Страница 70: ...mesure V pour grandeurs continues potentiel positif H Borne de mesure COM potentiel de r f rence n gatif I Bouton Low Imp 400 k pour commuter l imp dance J Socle avec cache coulissant pour sangle de...

Страница 71: ...r la lisibilit de l appareil Pour la plage de mesure du courant mA A il n est plus indispensable de remplacer un fusible d clench accidentel lement En cas de surcharge le fusible PTC int gr limite le...

Страница 72: ...rtz unit de fr quence 7 Symbole pour Milli exp 3 8 Volt unit de tension lectrique 9 Symbole pour Micro exp 6 10 Amp re unit d intensit de courant lectrique 11 Arr t automatique activ 12 Affichage des...

Страница 73: ...e test de piles Symbole pour le courant alternatif Symbole pour le courant continu COM Potentiel de r f rence de raccord de mesure mV Fonction de mesure de tension Millivolt exp 3 V Fonction de mesure...

Страница 74: ...professionnels ou des personnes initi es qui connaissent les consignes de s curit et qui sont inform s des dangers qui en r sultent Vous avez d pass la plage de mesure d s que OL pour Overload surcha...

Страница 75: ...tre corrig e Les mauvais raccordements suivants sont d tect s Fonction de mesure V mA A 10 A Raccordement des bornes mA A 10 A 10 A mA A En cas d alerte d branchez l appareil imm diatement et v rifiez...

Страница 76: ...esure mV CC une r sistance de 1000 Mohms Quand la mesure est termin e d branchez les c bles de mesure de l objet mesurer et teignez le DMM e Mesure de tension LoZ La fonction de mesure LoZ permet la m...

Страница 77: ...ges Ne mesurez en aucun cas des courants sup rieurs 10 A dans la plage A ou sup rieurs 200 mA dans la plage mA A sinon les fusibles se d clenchent L entr e de mesure A mA dispose d un fusible PTC r ar...

Страница 78: ...A COM mA A A 200 mA 10 A COM 10A Branchez le cordon de mesure rouge dans la borne mA A ou 10 A Branchez le c ble noir dans la borne de mesure COM Raccordez en s rie les deux pointes de mesure hors ten...

Страница 79: ...mA COM mA A A 200 mA 10 A COM 10A Branchez le cordon de mesure rouge dans la borne mA A ou 10 A Branchez le c ble noir dans la borne de mesure COM Raccordez en s rie les deux pointes de mesure hors te...

Страница 80: ...ne soit incluse dans la mesure de la r sistance L affichage indique 0 Raccordez maintenant les deux pointes de mesure l objet mesurer La valeur de mesure s affiche l cran condition que l objet mesurer...

Страница 81: ...ctueuse interruption Effec tuez en guise de contr le une mesure de polarit oppos e Quand la mesure est termin e d branchez les cordons de mesure de l objet mesurer et teignez le DMM i Test de continui...

Страница 82: ...1 2 V etc Allumez le DMM et s lectionnez la gamme de mesure Branchez le cordon de mesure rouge dans la borne mA A E et le cordon de mesure noir dans la borne COM H L unit V appara t l cran Raccordez...

Страница 83: ...tiv e en d but de test Sinon un r sultat de mesure inexact sera affect Pour activer la fonction Hold appuyez bri vement sur la touche HOLD un bip sonore valide cette action et H s affiche l cran Pour...

Страница 84: ...pi ces risquent de mettre nu des pi ces sous tension sauf lorsqu il est possible d effectuer ces proc dures manuellement Avant toute manipulation de nettoyage ou d entretien il convient de d brancher...

Страница 85: ...uvert le compartiment pile et fusibles est con u de fa on permettre uniquement l acc s la pile et aux fusibles Le bo tier ne doit plus tre ouvert com pl tement ni d mont Ces mesures renforcent la s cu...

Страница 86: ...ble d fectueux par un fusible neuf du m me type et de m me intensit de courant nominal Le fusible F1 poss de les valeurs suivantes C ramique super rapide 6FF 12 A 1000 V Dimensions 32 mm x 6 4 mm Refe...

Страница 87: ...E MORT Ne laissez jamais des piles usag es dans l instrument de mesure car m me les piles prot g es contre les fuites peuvent s oxyder et ainsi lib rer des produits chimiques qui nuiront votre sant ou...

Страница 88: ...r glementaires sur l limination des piles usag es de d poser dans les points de collecte toutes les accumulateurs usag s il est interdit de les jeter dans les ordures m nag res Les batteries contenan...

Страница 89: ...est activ e AC CC V rifiez l affichage AC CC et activez la fonction si n cessaire Avez vous utilis les mauvaises bornes de mesure Contr lez l affectation des bornes et la bonne connexion des cordons...

Страница 90: ...utilisation pile 9 V Conditions d utilisation 0 40 C 75 rF Altitude de fonctionnement 2000 m max au dessus du niveau de la mer Temp rature de stockage de 10 C 50 C Poids env 382 g Dimensions L x l x H...

Страница 91: ...00 V imp dance 400 k max 250 V 3s Si l entr e de mesure est court circuit e il est possible que l cran indique un affichage 10 points Apr s utilisation de la fonction LoZ une dur e de r g n ration de...

Страница 92: ...de r g n ration de 1 minute est n cessaire Valeur de cr te TrueRMS pour signaux non sinuso daux majoration de tol rance Valeur de cr te TrueRMS Crest Factor CF 3 CF jusqu 600 V CF 1 0 2 0 3 CF 2 0 2 5...

Страница 93: ...l ensemble de la plage Valeur de cr te TrueRMS pour signaux non sinuso daux majoration de tol rance CF 1 0 2 0 3 CF 2 0 2 5 5 CF 2 5 3 0 7 R sistance Plage R solution Pr cision 200 0 0 1 1 3 3 2 000 k...

Страница 94: ...tinuit Plage de mesure R solution 200 0 1 10 bip continu 100 pas de bip Protection contre la surcharge 600 V Tension de v rification env 1 V Courant d essai 0 7 mA Ne d passez jamais les valeurs d ent...

Страница 95: ...selspanning V 106 d Meten van gelijkspanning V 107 e LoZ spanningsmeting 107 f Stroommeting 108 g Meten van weerstand 111 h Diodetest 112 i Continu teitstest 112 j Batterijtest 113 10 Extra functies 1...

Страница 96: ...gen op het vlak van meet laad en netwerktechniek Met Voltcraft kan zowel de kieskeurige hobbyist als de professionele gebruiker zelfs de moeilijkste taken probleem loos uitvoeren Voltcraft biedt u bet...

Страница 97: ...nische apparaten die via een netstekker worden voorzien van netspanning Onder deze categorie vallen ook alle lagere categorie n bijv CAT I voor het meten van signaal en stuurspanningen CAT III Meetcat...

Страница 98: ...e vervangen De multimeter werkt op een standaard 9V blokbatterij type 6F22 NEDA 1604 of identiek Gebruik het apparaat alleen met het aangegeven batterijtype Oplaadbare batterijen mogen door de lagere...

Страница 99: ...erlaten Volg de in deze gebruiksaanwijzing opgenomen veiligheidsinstructies en waarschuwingen op om deze toestand van het apparaat te behouden en te zorgen voor een veilig gebruik ervan Om redenen van...

Страница 100: ...n slijtage indicator Bij beschadiging wordt er een tweede isolatielaag van een andere kleur zichtbaar De meetapparatuur mag dan niet langer worden gebruikt en moet worden vervangen Gebruik de multimet...

Страница 101: ...l voor gelijkstroom H COM meetbus referentiepotentiaal negatief potentiaal I Low Imp 400 k toets voor omschakeling van de impedantie J Aansluiting met schuifafdekking voor optionele bevestigingsriem K...

Страница 102: ...e standaard aan de achterzijde zo worden neergezet dat deze beter kan worden afgelezen In het mA A stroommeetbereik is het niet meer nodig een onbedoeld geactiveerde zekering te vervangen De inge bouw...

Страница 103: ...eenheid van frequentie 7 Symbool voor milli macht 3 8 Volt eenheid van elektrische spanning 9 Symbool voor micro macht 6 10 Amp re eenheid van elektrische stroom 11 Automatische uitschakeling is geac...

Страница 104: ...voor de batterijtest Symbool voor wisselstroom Symbool voor gelijkstroom COM Meetaansluiting referentiepotentiaal mV Meetfunctie spanningsmeting millivolt macht 3 V Meetfunctie spanningsmeting volt ee...

Страница 105: ...r mensen die vertrouwd zijn met de geldende voorschriften en de eruit voortvloeiende gevaren Zodra er OL Overload overbelasting op het display verschijnt hebt u het meetbereik overschreden Voor elke m...

Страница 106: ...ddellijk moet worden gecorrigeerd De volgende verkeerde aansluitingen worden herkend Meetfunctie V mA A 10 A Aansluitingen mA A 10 A 10 A mA A Onderbreek bij een waarschuwing onmiddellijk de meetproce...

Страница 107: ...angs weerstand van 10 MOhm het mV DC meetbereik is 1000 MOhm Verwijder na het meten de meetsnoeren van het te meten object en zet de multimeter uit e LoZ spanningsmeting Met de LoZ meetfunctie kunt u...

Страница 108: ...tromen hoger dan 10 A en in het mA A bereik hoger dan 200 mA omdat anders de zekeringen worden geactiveerd De A mA meetingang heeft een zelfherstellende PTC zekering waardoor u deze bij overbelasting...

Страница 109: ...A A A 200 mA 10 A COM 10 A Steek het rode meetsnoer in de mA A of 10 A meetbus Steek het zwarte meetsnoer in de COM meetbus Verbind nu de twee meetpennen stroomvrij in serie met het te meten object ba...

Страница 110: ...A A A 200 mA 10 A COM 10 A Steek het rode meetsnoer in de mA A of 10A meetbus Steek het zwarte meetsnoer in de COM meetbus Verbind nu de twee meetpennen stroomvrij in serie met het te meten object bat...

Страница 111: ...e weerstandsmeting niet mee te laten tellen Het display geeft 0 weer Verbind nu de twee meetpennen met het te meten object Als het gemeten object niet hoogohmig is of wordt onderbroken verschijnt de m...

Страница 112: ...om UR gemeten of is de diode defect onderbroken Voer ter controle nog een meting met om gekeerde polen uit Verwijder na het meten de meetsnoeren van het te meten object en zet de multimeter uit i Con...

Страница 113: ...en van 1 2 V Zet de multimeter aan en selecteer het meetbereik Steek het rode meetsnoer in de mA A meetbus E en het zwarte meetsnoer in de COM meetbus H Op het display verschijnt de eenheid V Verbind...

Страница 114: ...erkeerde metingen kunnen leiden Druk kort op de HOLD toets om de HOLD functie te activeren er klinkt ter bevestiging een pieptoon en op het display verschijnt H Druk om de HOLD functie uit te schakele...

Страница 115: ...nen van afdekkingen of het verwijderen van onderdelen behalve als dit met de hand mogelijk is kunnen onder spanning staande onderdelen blootgelegd worden Koppel voor reiniging of onderhoud de aangeslo...

Страница 116: ...at wanneer het vak voor de batterij en de zekeringen open staat men alleen toegang heeft tot de batterij en de zekeringen De behuizing hoeft niet zoals gebruikelijk volledig worden geopend en gedemont...

Страница 117: ...enen Vervang de defecte zekering door een nieuwe zekering van hetzelfde type en nominale stroomsterkte De zekering F1 heeft de volgende kenmerken Keramik Superflink 6FF 12 A 1000 V Afmetingen 32 mm x...

Страница 118: ...AAR Laat geen lege batterijen in de multimeter zitten Zelfs lekbestendige batterijen kunnen gaan roes ten waardoor er chemicali n uit kunnen lekken die schadelijk zijn voor de gezondheid en het appa r...

Страница 119: ...KCA voorschriften wettelijk verplicht alle lege batterijen in te leveren verwijde ring via het huisvuil is niet toegestaan Batterijen die schadelijke stoffen bevatten zijn gemarkeerd met het hiernaas...

Страница 120: ...s er een verkeerde meetfunctie ingesteld AC DC Controleer het display AC DC en schakel zo nodig om naar een andere functie Zijn de meetbussen verkeerd aangesloten Controleer of de meetsnoeren goed zij...

Страница 121: ...sspanning 9V blokbatterij Gebruikscondities 0 tot 40 C 75 rel vochtigheid Gebruikshoogte max 2000 m boven zeeniveau Opslagtemperatuur 10 C tot 50 C Gewicht ca 382 g Afmetingen l x b x h 178 x 85 x 40...

Страница 122: ...Overbelastingsbeveiliging 600 V impedantie 400 k max 250 V 3s Bij een kortgesloten meetingang is een weergave van 10 tellingen mogelijk Na het gebruik van de LoZ functie is een herstellingstijd van 1...

Страница 123: ...ingstijd van 1 minuut nodig TrueRMS piekwaarde voor niet sinusvormige signalen plus tolerantie TrueRMS piekwaarde Crest Factor CF 3 CF tot 600 V CF 1 0 2 0 3 CF 2 0 2 5 5 CF 2 5 3 0 7 Gelijkstroom A D...

Страница 124: ...st Factor CF 3 CF over het gehele bereik TrueRMS piekwaarde voor niet sinusvormige signalen plus tolerantie CF 1 0 2 0 3 CF 2 0 2 5 5 CF 2 5 3 0 7 Weerstand Bereik Resolutie Nauwkeurigheid 200 0 0 1 1...

Страница 125: ...ereik Resolutie 200 0 1 10 continue pieptoon 100 geen pieptoon Overbelastingsbeveiliging 600 V Testspanning ca 1 V Teststroom 0 7 mA Overschrijd nooit de maximaal toegestane ingangswaarden Raak schake...

Страница 126: ...126...

Страница 127: ...127...

Страница 128: ...e time of printing Copyright 2018 by Conrad Electronic SE Ceci est une publication de Conrad Electronic SE Klaus Conrad Str 1 D 92240 Hirschau www conrad com Tous droits r serv s y compris de traducti...

Отзывы: