background image

FW 1.

49

.

57

英文版

FW 1.

49

.

57

英文版

FW 1.

49

.

57

英文版

FW 1.

49

.

57

英文版

Voltage

Boost

Use UP and DOWN buttons to 

adjust voltage readings.


With Engine OFF and Ignition

ON, tap the ZERO button to set

ambient pressure.

Speedmeter

Use the UP and DOWN buttons 

to adjust speedmeter.

Settings

Features

Tire Size

Gearing

For vehicles with modified differential 
gear ratios only. Individually enter your 
New and Old Gearings to correct the 
speed deviation. 

Individually enter your OEM and 
New Tire Sizes to correct the speed 
deviation.

35

36

Содержание VP-16

Страница 1: ...VP 16 VP 16 VP 16 Performance Chip Performance Chip Performance Chip Installation Instructions FW 1 49 57 FW 1 49 57 FW 1 49 57 ...

Страница 2: ...pdate Process Installation Un installation Re installation and Re programming Major Features Gauges Customize Gauges Performance Tests Tuning Dyno PWM Mode Diagnosis Settings P 02 P 03 P 06 P 08 P 11 P 14 P 15 P 16 P 21 P 27 P 28 P 29 P 31 P 32 P 33 P 34 1 ...

Страница 3: ...run or acceleration tests should only be performed on a closed circuit A loss of control from speeding could occur causing serious or fatal injuries to yourself or other motorists Potential Risk of Damage Performance Testing tuning is inherently stressful to your vehicle s engine and drivetrain It is your responsibility to ensure your vehicle is in good working order and capable of handling these ...

Страница 4: ...Volo VP 16 Performance Chip OBD Cable Windshield Mount Micro SD Card USB adaptor Parts 3 ...

Страница 5: ...Auxiliary Port Reset Button Auxiliary Port Setup Micro SD Card Slot USB Port The Auxiliary Port can be used to control external devices based on engine parameters Visit www volochip tw vp 16 for a detailed Auxiliary Port setup guide 4 ...

Страница 6: ...specific information and is also used to update firmware Removal Do Not format the SD card otherwise the VP 16 will not work properly USB Adaptor Insert Card into Reader Then Plug Reader into USB If you need to replace the SD card please contact Volo Performance Inc or your local distributors 5 ...

Страница 7: ...plug the adapter into your PC Visit www volochip tw vp 16 to download and install VLINK 16 program VP 16 Setup If you select dealer program then you can skip this step 1 Remove Micro SD Card 2 Install VLINK 16 Do Not format the SD card otherwise the VP 16 will not work properly 6 ...

Страница 8: ...le tuning data to your Micro SD Card Return the Micro SD Card to Vp16 Each time when you start VLINK 16 program it will automatically run updates if your computer stays connected with the Internet It will not be notified if there are any differences between the installation instructions and the actual updates Follow your VP16 s on screen instructions to complete the tuning and calibration If you n...

Страница 9: ...pdated from time to time If there is a firmware update follow this page to update it FW 1 49 57 Please follow the official volochip Facebook site to receive updates www facebook com volochip Please confirm your current firmware version before running updates 8 ...

Страница 10: ...hen plug the SD card adapter into your PC The Update Available will show up automatically on the left side of the screen On the next page click Install Latest to proceed update Please wait for the update process to be finished to unplug the SD card adapter You don t need to re download the settings for the vehicle Or you can choose the firmware versions from the list as recommended or preferred Do...

Страница 11: ... use the update features After the update is completed insert the SD card back into the VP 16 install it back in the car and start the engine The VP 16 will be automatically updated It will take 5 15 minutes to update there is no need to perform performance tune adjustment after the update is completed 10 ...

Страница 12: ...ecured so it cannot interfere with vehicle operation Connect the OBD Cable to your OBD II port usually found on the driver s side under the dash Remove the protective film from the suction cup Make sure your windshield is clean and dry Raise the lever then press the suction cup mount firmly against your windshield then press lever down Placement must not interfere with your view of road 11 ...

Страница 13: ...t refresh delay unless advised by Volo performance Inc or your local distributors and Advanced Mode After the advanced mode is checked and turned on more advanced data will be added to the customize gauges 1 Go to to set the language you prefer Settings Language Turn on your engine press the reset button then behind the VP16 performance chip VP16 will reboot Follow the steps below while engine is ...

Страница 14: ...ted to change tune modes or to add remove performance modifications 5 The calibration takes around 5 6 minutes to complete Keep engine at idle and vehicle stationary for the duration of the calibration process After calibration completes the VP16 requires an adjustment period represented by a progress bar on the lower left corner All performance enhancements will be optimized after the adjustment ...

Страница 15: ...se also redo for best Tuning results If you disconnected the VP 16 performance chip from temparally your vehicle please behind the screen to re press the reset button connect Re programming for a new vehicle If you need to install VP 16 Performance Chip please to a new vehicle follow the steps P6 P13 to re program the vehicle settings before using it Before disconnecting or changing your battery p...

Страница 16: ...e Diagnosis and Code Clearing Various parameter settings All New 8 Major Features Free Firmware Updates for Life New features coming soon Gauges Various types of vehicle data display Performance Tuning Diagnostics PWM Settings Dyno External device settings MODE Fast switching of driving modes FW 1 49 57 15 ...

Страница 17: ...he customize gauges for customize gauges see P 21 26 Features Default Shows the vehicle s instantaneous speed engine rpm and instant horsepower output The left area graphs speed engine rpm and instant horsepower output on the lower right corner is dimmer control day night time Power Graph Gauge 16 ...

Страница 18: ...uel consumption is lower then average on the lower right corner is dimmer control day night time Tap on MPG Average Trip Cost Trip Miles you can change the data you wish to display from the customize gauges for customize gauges see P 21 26 After each refueling please tap on Fill Up to enter the fuel sale amount and the number of liters to help the VP 16 accurately calculate your fuel consumption a...

Страница 19: ...wer then average on the lower right corner is dimmer control day night time Tap on MPG Average Cost Per Mile Trip Cost Trip Miles you can change the data you wish to display from the customize gauges for customize gauges see P 21 26 After each refueling please tap on Fill Up to enter the fuel sale amount and the number of liters to help the VP 16 accurately calculate your fuel consumption and Trip...

Страница 20: ...ol day night time Tap on Speed MPH Coolent Temp F Power HP and Torque FTLB you can change the data you wish to display from the customize gauges for customize gauges see P 21 26 After each refueling please tap on Fill Up to enter the fuel sale amount and the number of liters to help the VP 16 accurately calculate your fuel consumption and Trip Costs Tap on to zero Trip Cost and Reset Trip Miles 19...

Страница 21: ...s Multi Gauge 6 Tap on Speed MPH Intake Temp F Power HP Torque FTLB Coolent Temp F and Volts you can change the data you wish to display from the customize gauges for customize gauges see P 21 26 Digital display of the vehicle s Speed MPH Intake Temp F Power HP Torque FTLB Coolent Temp F and Volts on means your instant fuel consumption is lower then average on the lower right corner is dimmer cont...

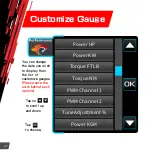
Страница 22: ...isplay from the list of customize gauges Please note the units behind each options Customize Gauge Tap on and down to scroll up Tap to choose Power HP Power KW Torque FTLB Torque NM PWM Channel 1 PWM Channel 2 Tune Adjustment Power KGM 21 ...

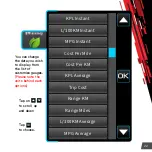
Страница 23: ...tant L 100KM Instant MPG Instant Cost Per Mile Cost Per KM KPL Average Trip Cost Range KM Range Miles L 100KM Average MPG Average You can change the data you wish to display from the list of customize gauges Please note the units behind each options 22 ...

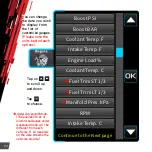
Страница 24: ...d Coolant Temp C Fuel Trim ST 1 3 Fuel Trim LT 1 3 Manifold Pres kPa RPM Intake Temp C Continue to the Next page You can change You can change the data you wish the data you wish to display from to display from the list of the list of customize gauges customize gauges Please note the Please note the units behind each units behind each options options You can change the data you wish to display fro...

Страница 25: ...It all depends on the data streams the vehicles provide Intake Flow G S Throttle Pos O2 Short Term B1 1 Sec Since Start Fuel Pressure Commanded Evap O2 F A Rat Sens 1 Cat Temp B1 1 Absolute Load A F Target Ratio O2 Sec LT Trim Intake Temp Please note the units behind each options You can change the data you wish to display from the list of customize gauges 24 ...

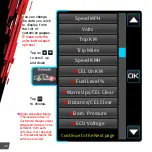
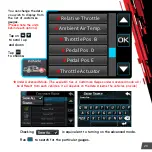
Страница 26: ...ind each options You can change the data you wish to display from the list of customize gauges to scroll up and down Tap on Tap to choose Under Advanced Mode The availabilities of Customize Gauges under Advanced mode will be different from each vehicles It all depends on the data streams the vehicles provide Continue to the Next page Speed MPH Volts Trip KM Trip Miles Speed KMH CEL On KM Fuel Leve...

Страница 27: ...for the particular gauges and down to scroll up Tap on Tap to choose Under Advanced Mode The availabilities of Customize Gauges under Advanced mode will be different from each vehicles It all depends on the data streams the vehicles provide Please note the units behind each options You can change the data you wish to display from the list of customize gauges 26 ...

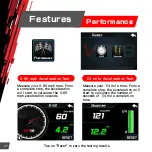
Страница 28: ... 4 mile time From a complete stop the acceleration will start to calculate the number of seconds of 1 4 mile completion time Measure your 0 60 mph time From a complete stop the acceleration will start to calculate the 0 60 mph acceleration seconds Tap on Reset to zero the testing results 27 ...

Страница 29: ...een checkmarks then press start to begin calibration The Tuning process must be repeated to change tune modes or to add remove performance modifications Tuning Features Each time when changing the driving mode and or vehicle settings adjustment progress must take places to optimize the performance enhancement 28 ...

Страница 30: ...Test horsepower and torque outputs of your vehicle Please follow the on screen instructions to run the tests The test should only be performed on a closed circuit New Dyno Features Dyno 29 ...

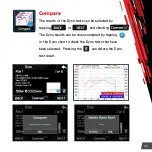
Страница 31: ...f the Dyno tests can be selected by tapping or and checking The Dyno results can be cross compared by tapping in the Dyno chart to check the Dyno tests that have been selected Pressing the can delete the Dyno test result 30 ...

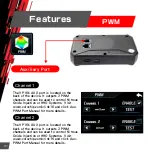
Страница 32: ...sit www volochip com vlink16 and click Aux PWM Port Manual for more details Auxiliary Port Channel 1 PWM Features The VP16 s AUX port is located on the back of the device It outputs 2 PWM channels and can be used to control Nitrous Oxide Injection or HHO Systems Visit www volochip com vlink16 and click Aux PWM Port Manual for more details Channel 2 31 ...

Страница 33: ... your preference no need to go through other fuel load tire size modified parts setting process Verify you have three green checkmarks then press start to begin calibration Each time when changing the driving mode adjustment progress must take places to optimize the performance enhancement 32 ...

Страница 34: ...lear Code Features Vehicle diagnosis Clear the vehicle s fault code Ensure the source of the code has been resolved before clearing Code viewing and clearing are only for the international general code of the engine and gearbox 33 ...

Страница 35: ...ECU Refresh Rate Initial 100 Do not adjust refresh delay unless advised by Volo performance Inc or your local distributors and Advanced Mode After the advanced mode is checked and turned on more advanced data will be added to the customize gauges Please note there are 2 pages on Device settings 34 ...

Страница 36: ...ize Gearing For vehicles with modified differential gear ratios only Individually enter your New and Old Gearings to correct the speed deviation Individually enter your OEM and New Tire Sizes to correct the speed deviation 35 ...

Страница 37: ...oltage Boost Use UP and DOWN buttons to adjust voltage readings With Engine OFF and Ignition ON tap the ZERO button to set ambient pressure Speedmeter Use the UP and DOWN buttons to adjust speedmeter 36 ...

Страница 38: ...Settings Features Units set the units you prefer Language set the language you prefer ...

Страница 39: ...o default CC02 Disable sleep mode until reset CC08 Create vehicle data log CC10 Get chip Unique Identifier CC16 Please contact Volo Performance Authorized Dealers for Technical Support Used for advanced functions and troubleshooting Please contact your Volo dealer before proceeding ...

Страница 40: ...6 Alley 5 Lane 212 ZhongZheng Road ADD No 6 Alley 5 Lane 212 ZhongZheng Road Shinlin District Taipei City 111 45 Taiwan R O C Shinlin District Taipei City 111 45 Taiwan R O C ADD No 6 Alley 5 Lane 212 ZhongZheng Road Shinlin District Taipei City 111 45 Taiwan R O C ...

Отзывы: