background image

ENG - 26

Legal & Compliance

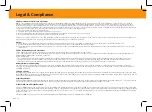
FCC Class B Radio Interference Statement

NOTE: This equipment has been tested and found to comply with the limits for a Class B digital device, pursuant to Part 15 of the FCC Rules. These limits are designed to 

provide reasonable protection against harmful interference in a residential installation. This equipment generates, uses and can radiate radio frequency energy, and if not 

installed and used in accordance with the instructions, may cause harmful interference to radio communications. However, there is no guarantee that interference will not 

occur in a particular installation. If this equipment does cause harmful interference to radio or television reception, which can be determined by turning the equipment off and 

on, the user is encouraged to try to correct the interference by one or more of the following measures:

1.  Reorient or relocate the receiving antenna.

2.  Increase the separation between the equipment and receiver.

3.  Connect the equipment into an outlet on a circuit different from that to which the receiver is connected.

4.  Consult the dealer or an experienced radio/TV technician for help.

This device complies with Part 15 of the FCC Rules. Operation is subject to the following two conditions: (1) this device may not cause harmful interference, and (2) this device 

must accept any interference received, including interference that may cause undesired operation.

Notice:

1.  Any Changes or modifications not expressly approved by the party responsible for compliance could void the user’s authority to operate the equipment. 

2.  Shielded interface cables and AC power cord, if any, must be used in order to comply with the emission limits.

3.  The manufacturer is not responsible for any radio or TV interference caused by unauthorized modification to this equipment. It is the responsibilities of the user to correct such 

interference.

FCC RF Radiation Exposure Statement

1. This transmitter must not be collocated or operating in conjunction with any other antenna or transmitter.

2. This equipment complies with FCC radiation exposure limits set forth for an uncontrolled environment. This equipment should be installed and operated with minimum 

distance 20cm between the radiator & your body. 

3.  FCC RF Warning 

This equipment must be installed and operated in accordance with provided instructions and the antenna(s) used for this transmitter must be installed to provide a 

separation distance of at least 20cm from all persons and must not be co-located or operating in conjunction with any other antenna or transmitter. End-users and 

installers must be provided with antenna installation instructions and transmitter operating conditions for satisfying RF exposure compliance.

Battery Disposal and Recycling

You must dispose of this product properly, according to local laws and regulations. Because this product contains electronic components and/ or a battery, it must be 

disposed of separately from household waste. Contact local authorities to learn about disposal and recycling options.  For more information, visit vizio.com/environment or 

call (800) 374-3473.. 

Software Licenses

All software is provided subject to software license agreements and you agree that you will be bound by such license agreements in addition to other applicable terms of use. By using 

the VIZIO products, you agree to the VIZIO Terms of Service and Privacy Policy. The VIZIO Terms of Use and Privacy Policy may be updated from time to time and are available to view at  

vizio.com/terms and vizio.com/privacy, respectively.

Export Regulations

Customer acknowledges that the VIZIO  products,  which  include  technology and software, are subject to customs and export control laws in the United States (“US”). The products may 

also be subject to the customs and export control laws and regulations of the country in which the products are manufactured and/or received.

© 2021 VIZIO, Inc. All Rights Reserved.

This User Manual may not be copied in whole or in part without the written permission of VIZIO, Inc.  VIZIO, Inc. has made reasonable efforts to ensure the accuracy of the information 

provided herein.  All product specifications, functionality, features, configurations, performance, design and other product information described herein are subject to change without 

notice.  VIZIO, Inc. is not responsible for typographical, technical, or descriptive errors. To review the most updated version of this User Manual and the associated Quick Start Setup 

guide, go to vizio.com. 

VIZIO, the VIZIO logo, the V logo, and other terms and phrases are trademarks or registered trademarks of VIZIO, Inc.

Содержание V 2.0 Series

Страница 1: ...V Series 2 0 User Manual Scan to learn more Model V20x J8 Please read this guide before using the product Please read this guide before using the product 72 SBV20X DFUB1 ...

Страница 2: ...ENG ii Acc Con Ema Pho Bindi This p Class By us You ha days o Terms ...

Страница 3: ...g Binding Arbitration Agreement and Class Action Waiver which may be viewed at vizio com en terms terms of service By using this device you accept those Terms and Conditions You have the right to opt out of the Binding Arbitration Agreement and Class Action Waiver within 60 calendar days of your purchase Please refer to the Limited Warranty section of this User Manual or view the full VIZIO Terms ...

Страница 4: ...n exposed to rain or moisture does not operate normally or has been dropped To reduce the risk of electric shock or component damage switch off the power before connecting other components to your Unit Unplug the power cord before cleaning your Unit A damp cloth is sufficient for cleaning Do not use a liquid or a spray cleaner on your Unit Do not use abrasive cleaners Always use the accessories re...

Страница 5: ...filled with liquid near the equipment such as a vase or flower pot or expose it to dripping splashing rain or moisture CAUTION Danger of explosion or fire if batteries are mistreated Replace only with the same or specified type Do not leave the batteries exposed to direct sunlight for a long period of time with doors and windows closed Do not disassemble the batteries or dispose of it in fire If t...

Страница 6: ... Mode Level Settings 10 Using Button Combinations 12 Programming the Sound Bar 13 Bluetooth Pairing 14 Using Bluetooth Mode 15 Connecting to a Voice Assistant 16 Advanced Setup 18 Connecting with HDMI ARC 19 Product Registration and Support 21 Help Troubleshooting 22 Limited Warranty 23 Legal Compliance 26 Specifications 27 ...

Страница 7: ...ENG 1 Package Contents Wireless Subwoofer HDMI Cable User Manual Quick Setup Steps Power Cable VIZIO Sound Bar Remote Control with 2x AAA Batteries ...

Страница 8: ... to connect a Voice Assistant device See Connecting to a Voice Assistant on page 16 for more information Controls Connections Back of Sound Bar Power Port AUX VA Analog Audio In Stereo 3 5mm AUX In Analog Audio In Stereo 3 5mm ...

Страница 9: ...ENG 3 Controls Connections Supports WAV and MP3 file format playback only Digital Optical Audio In USB In HDMI ARC to TV ...

Страница 10: ...nections Top of Sound Bar Volume Increase or decrease the loudness of the audio Bluetooth Input Hold to pair See Bluetooth Pairing for more information Input Press to change the audio source Power Press to turn on or off ...

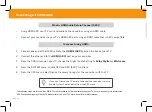
Страница 11: ...ome TVs do not pass through digital audio When using the digital input if there is no audio try setting the TV output to PCM or connecting directly to your Blu ray or other source Not all TVs have the audio outputs shown To connect the sound bar directly to your other devices Blu ray player game system etc see your device s user manual HDMI ARC Cable BEST 3 5mm to RCA cable Digital Optical Cable O...

Страница 12: ...ENG 6 2 Connect the power cable to the sound bar AC IN as shown Plug the power cable into an electrical outlet First time Setup Back of Sound Bar ...

Страница 13: ...iding it away from the remote 4 Insert the included batteries and gently slide the battery cover back into place 5 Top Top Occurs only during first time set up Auto detect function only occurs once when the sound bar is first powered on To enable this feature again you must do a Factory Reset see the Using Button Combinations on page 12 for more information or press and hold the INPUT button for 4...

Страница 14: ...io settings Up Down Change to previous next track Virtual X Turn Virtual X on or off EQ Settings Change equalizer settings Mute Mute unmute Long press to turn LED power indicator and voice notifications on off Bass Use the Previous Next buttons to increase decrease the bass level Volume Increase and decrease volume Night Mode Turns Night Mode on or off Treble Use the Previous Next buttons to incre...

Страница 15: ...ENG 9 us input nput tons to e level Proper Placement For the best sound experience position the sound bar as shown The sound bar should be close to ear level Sound bar should be centered below the TV ...

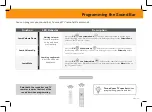
Страница 16: ... discoverable for 15 minutes You can now search for the sound bar VIZIO V20 using your Bluetooth Device The sound bar will power down if no device is found Note Set your Bluetooth device into pairing mode prior to the Sound Bar DTS TruVolume TruVolume On Press the TVOL button to enable disable TruVolume When enabled On TruVolume provides a consistent and comfortable volume level for a more enjoyab...

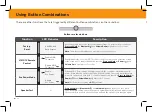
Страница 17: ...nd bar is turned on Night Mode Off Treble Level Two center LEDs indicate treble level 0 Press the TREB button and use the Next Previous buttons to increase decrease the treble level The LED indicators will move to the top with increasing level and to the bottom with decreasing level Auto VA Press and Hold the INPUT button on the remote for 10 seconds to enable disable AUX VA or Press and Hold the ...

Страница 18: ...ble disable this function Press and Hold the Power and Volume Up buttons for 5 seconds Disable VIZIO TV remote Eco Power Mode Enable Eco Power When the Eco Power mode setting is enabled the sound bar will automatically power down after a period of inactivity When disabled the sound bar will remain powered on until you turn it off To enable disable this function Press and Hold the Power and Volume ...

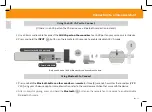
Страница 19: ...ns at the same time to put the sound bar into learning mode While the sound bar is in learning mode press the Volume Down button on the TV remote control Learn Volume Up Press the OK and Volume Up buttons at the same time to put the sound bar into learning mode While the sound bar is in learning mode press the Volume Up button on the TV remote control Learning confirmed All of the LEDs will blink ...

Страница 20: ...mentation that came with the device 3 Now you can play audio from your Bluetooth device Volume can be controlled on both your source device and the sound bar The LED indicators on the display panel on the front of the sound bar will light up sequentially from bottom to top and back again Once the device is paired the LED indicators will stop flashing Bluetooth Device Button Located at the Top of S...

Страница 21: ...aring Your sound bar is not equipped with a microphone so it cannot operate as a hands free device for a smartphone A Bluetooth signal has a range of up to 30 feet Keep in mind that Bluetooth is a compressed audio format so streamed music may lose some integrity when compared to a wired connection Try the following if your sound quality is less than optimal If you hear any break up or disconnect w...

Страница 22: ...ginal source audio for 10 seconds If continued after the 10 seconds the VA audio will mute the original source audio Once the VA audio is stopped the original source audio will resume Setup Tips If the VA audio is too low adjust the volume from the VA device If the start of the response from the VA is cut off enable Start of Request from your VA app settings To disable the VA function press and ho...

Страница 23: ...ton on the remote for 10 seconds to enable disable AUX VA mode Using the AUX VA Port to Connect Using Bluetooth to Connect 1 Press and hold the Bluetooth button on the sound bar or remote for three 3 seconds Search for the sound bar VIZIO V20 using your VA device app For more information refer to the user documentation that came with the device 2 After successful pairing press and hold the Bluetoo...

Страница 24: ...ENG 18 Advanced Setup Game Console Media Player Tablet MP3 Player Laptop HDMI Cable Digital Optical Cable 3 5mm to RCA Cable USB Drive Supports WAV and MP3 file format playback only ...

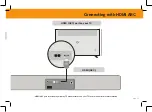
Страница 25: ...ENG 19 Connecting with HDMI ARC HDMI ARC port on your TV HDMI ARC port location may differ by TV manufacturer See your TV s user manual for more information HDMI ARC ...

Страница 26: ...ble System Audio Control from the CEC menu Using HDMI ARC your TV can send audio to the sound bar using an HDMI cable Connect your sound bar to your TV s HDMI ARC port using an HDMI cable that is ARC compatible 1 Connect one end of the HDMI cable to the HDMI 1 ARC port on the back of your TV 2 Connect the other end to the HDMI ARC port on your sound bar 3 From the AUDIO menu on your TV change the ...

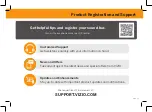
Страница 27: ...amera or QR reader Customized Support Get assistance quickly with your information on hand Updates and Enhancements Stay up to date with important product updates and notifications News and Offers Take advantage of the latest news and special offers from VIZIO More questions Find answers at SUPPORT VIZIO COM ...

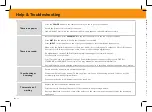
Страница 28: ...utput Confirm that the audio output setting is set to FIXED or STANDARD not VARIABLE Consult your TV s user manual for more detailed information If using Bluetooth ensure that the volume on your source device is turned up and that the device is not muted I hear buzzing or humming Ensure all cables and wires are securely connected Connect a different source device TV Blu ray player etc to see if th...

Страница 29: ...upport by going to support vizio com and selecting Contact Us You can also call Customer Support US 855 209 4106 Your Obligations Before Service You must obtain pre authorization before sending your product to a VIZIO service center You may be required to supply a purchase receipt or copy to show that the product is within the warranty period When you return a product to aVIZIO service center you ...

Страница 30: ...state or international commerce the Federal Arbitration Act will apply The filing fees to begin and carry out arbitration will be shared between you and VIZIO but in no event will your fees ever exceed the amount allowable by the American ArbitrationAssociation at which pointVIZIO will cover all additional administrative fees and expenses VIZIO waives its right to recover attorneys fees in connect...

Страница 31: ...ADVISED OF THE POSSIBILITY OF SUCH DAMAGES AND EVEN IF THE REMEDY FAILS OF ITS ESSENTIAL PURPOSE SOME STATES AND PROVINCES DO NOT ALLOW THE EXCLUSION OR LIMITATION OF INCIDENTAL OR CONSEQUENTIALDAMAGES SO THE ABOVE LIMITATION OR EXCLUSION MAYNOTAPPLYTOYOU IN LIEU OF ANY OTHER REMEDY FOR ANY AND ALL LOSSES AND DAMAGES RESULTING FROM ANY CAUSE WHATSOEVER INCLUDING VIZIO S NEGLIGENCE ALLEGED DAMAGE O...

Страница 32: ...mum distance 20cm between the radiator your body 3 FCC RF Warning This equipment must be installed and operated in accordance with provided instructions and the antenna s used for this transmitter must be installed to provide a separation distance of at least 20cm from all persons and must not be co located or operating in conjunction with any other antenna or transmitter End users and installers ...

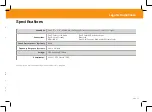
Страница 33: ...ach channel 1 for left 1 for right Connections One 3 5mm Stereo Audio One Optical Toslink HDMI ARC One 3 5mm AUX Voice Assistant Bluetooth One USB Supports WAV and MP3 format only Sound Pressure Level System 95 dB Frequency Response System 50 Hz 20 KHz Voltage 100 240Vac 50 60Hz Compliances cULus FCC Class B CEC Sound pressure level measured using pink noise at 1 meter c weighted Legal Compliance ...

Страница 34: ...ENG 28 ...

Страница 35: ...ENG 29 ...

Страница 36: ... HDMI High Definition Multimedia Interface and the HDMI logo are trademarks or registered trademarks of HDMI Licensing LLC in the United States and other countries For DTS patents see http patents dts com Manufactured under license from DTS Inc DTS TruVolume Virtual X and the DTS logo are registered trademarks or trademarks of DTS Inc in the United States and other countries 2020 DTS Inc ALL RIGHT...

Отзывы: