background image

VIZIO E320VP User Manual 

Version 6/15/2010 

13 

www.VIZIO.com


Rear Panel Connection  

1. 

USB—

Service port for use by a professional service technician. Register 

your HDTV to receive future product updates including upgrades for these 
ports. 

2. 

RGB PC—

Connect the video and audio from a computer here. Connect a 

1/8” mini plug stereo connector from the computer to your HDTV if you 
want the sound to come from your HDTV speakers.  

3. 

AUDIO OUT


HEADPHONE

—Connect your headphones for personal listening.  


OPTICAL

—When digital TV is selected for viewing, the audio 

associated with the programming will be available on the S/PDIF 
Optical connector for connection to a VIZIO Sound Bar or your home 
theater system. 


Side Panel Connections  

1. 

HDMI 1 and 2

—Connect digital video devices such as a DVD player 

or Set-Top Box through this all digital connector.  

2. 

COMPONENT (Y Pb/Cb Pr/Cr with L/R Audio)—


  Connect Component video devices such as a DVD Player or 

Cable/Satellite box here. 

  You can also connect Composite (AV) video devices such as 

camcorders and VCRs here. Connect the yellow video cable to 
the green Component Y jack and then connect the red and white 
audio cables to the Component L/R jacks. 

3. 

DTV/TV—

Connect to an antenna or digital cable source. For digital 

TV stations in your area visit www.antennaweb.org. For Cable and 
Satellite boxes, we recommend that you use a HDMI cable 
connection for high definition image quality. 


Содержание E320VP

Страница 1: ...number located on the back of your HDTV for easy reference when obtaining warranty support Serial _____________________ Purchase Date _____________________ VIZIO is a registered trademark of VIZIO Inc...

Страница 2: ...se openings are not blocked or covered Do not place your HDTV in a bookcase or cabinet unless proper ventilation is provided 8 Never push any object into the slots and openings on your HDTV cabinet Do...

Страница 3: ...d and the housing is damaged the internal components may function abnormally Unplug the power cord immediately and contact your dealer for repair Continued use of your HDTV may cause fire or electric...

Страница 4: ...structure grounding of the lead in wire to an antenna discharge unit size of the grounding conductors location of antenna discharge unit connection to grounding electrodes and requirements of the gro...

Страница 5: ...should continue to work as before to receive low power Class A or translator television stations and with cable and satellite TV services gaming consoles VCRs DVD players and similar products For addi...

Страница 6: ...ce 17 Watching a TV Program 17 Viewing Digital TV Program Information 18 CHAPTER 6 CONNECTING EQUIPMENT 19 Which Video Connection Should I Use 19 Connecting Your Cable Satellite Box 20 Using HDMI Best...

Страница 7: ...ions 30 Analog Closed Caption 30 Digital Closed Caption 30 Digital CC Style 31 Sleep Timer Menu 31 Picture Menu 31 Picture Mode 31 Backlight 31 Brightness 31 Contrast 31 Color 31 Tint 32 Sharpness 32...

Страница 8: ...leshooting Guide 41 TV Display Troubleshooting 41 Audio Troubleshooting 43 Remote Control Troubleshooting 44 Telephone Technical Support 44 CHAPTER 10 SPECIFICATIONS 45 E320VP Specifications 45 Compli...

Страница 9: ...te control VR15 AA batteries for the remote control 2 AC DC power adapter Detachable base This user manual Quick Setup Guide Registration Card HDTV Accessories and Services Additional certified access...

Страница 10: ...ventilation and excessive component damage If you want to mount your HDTV on the wall see below for additional information Read this user manual carefully before installing your HDTV VIZIO offers prof...

Страница 11: ...e your HDTV face down on a soft flat surface to prevent damage to the screen c Remove the cover on the stand neck d Remove the four 4 screws holding the stand neck and then remove the neck and base No...

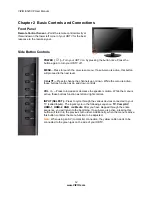
Страница 12: ...ive these buttons function as up and down controls VOL Press to increase or decrease the speaker volume While the menu is active these buttons function as left and right controls INPUT SELECT Press to...

Страница 13: ...e S PDIF Optical connector for connection to a VIZIO Sound Bar or your home theater system Side Panel Connections 1 HDMI 1 and 2 Connect digital video devices such as a DVD player or Set Top Box throu...

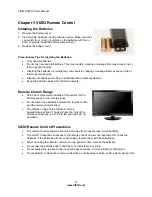
Страница 14: ...Point the remote control directly at this sensor for the best response to the remote signal Do not place any obstacles between the remote control and the remote control sensor The effective range of t...

Страница 15: ...wn left or right on the points of the diamond are used to navigate the OSD menu They will also be used as value settings when the slide bar is shown on the screen and option settings to turn a feature...

Страница 16: ...nd then plug the power cord into an AC wall socket 3 Connect your devices to your HDTV see Chapter 2 for detailed steps 4 Turn on your TV The Setup App will automatically play and guide your thru the...

Страница 17: ...tellite or off air antenna connections are secure Also verify that the AC DC power adapter is plugged into a correctly grounded electrical outlet or surge protector 1 Press the power button on the rem...

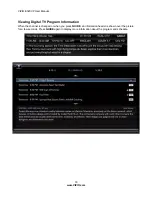
Страница 18: ...com Viewing Digital TV Program Information When the channel is changed or when you press GUIDE an information header is shown over the picture for a few seconds Press GUIDE again to display more infor...

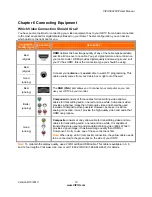
Страница 19: ...lows you to connect your computer so you can use your HDTV as your monitor Better analog Component consists of three cables for transmitting video and two cables for transmitting audio one red and one...

Страница 20: ...side of your HDTV Note The HDMI input on your HDTV supports High bandwidth Digital Content Protection HDCP HDCP encrypts the transmission between the video source and the digital display for added se...

Страница 21: ...TV 4 Turn on your HDTV and Cable Satellite box 5 Select Comp AV using the INPUT button on the remote control or side of your HDTV Using Composite AV Video Good 1 Turn off the power to your Cable Satel...

Страница 22: ...esults To maintain image quality use a VIZIO certified HDMI cable This cable is available in 6 15 and 30 foot lengths Visit www VIZIO com or call 877 MYVIZIO 877 698 4946 for details 1 Turn off your H...

Страница 23: ...the remote control or side of your HDTV Note There are no dedicated audio ports for HDMI so there may or may not be audio from your HDTV with this connection Using Component Video Better 1 Turn off y...

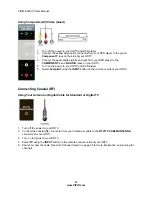
Страница 24: ...the power to your HDTV and DVD player 5 Select Comp AV using the INPUT button on the remote or side of your HDTV Connecting Coaxial RF Using Your Antenna or Digital Cable for Standard or Digital TV 1...

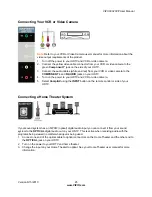
Страница 25: ...HDTV 4 Turn on the power to your HDTV and VCR or video camera 5 Select Comp AV using the INPUT button on the remote control or side of your HDTV Connecting a Home Theater System If your sound system...

Страница 26: ...r HDTV This step is optional and only needed if you want to transmit audio from the computer through your HDTV 5 Turn on the power to your HDTV and computer 6 Select RGB VGA using the INPUT button on...

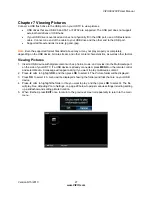
Страница 27: ...cs as well as other factors Viewing Pictures 1 Insert a USB device with digital content such as photos music and movies into the Multimedia port on the side of your HDTV If a USB device is already con...

Страница 28: ...ion is set to On the selected picture will be displayed until you press EXIT Sequence will show your pictures in the order they are listed on your USB device until you stop the slideshow Shuffle will...

Страница 29: ...r Parental Controls 1 Press MENU The OSD opens 2 Press or on the remote control to select one of the menu options Input Wide CC Sleep Timer Picture Audio Settings Media Help 3 Press OK to select the o...

Страница 30: ...se along the border switch to Zoom 1 For 720p 1080i only Panoramic When watching a standard broadcast or full frame movie in this mode the 4 3 Aspect Ratio 1 33 1 source display image is stretched hor...

Страница 31: ...input i e HDMI COMP etc remembers the custom setting you created Select Custom to manually adjust Backlight Brightness Contrast Color Tint Sharpness and to access the More menu where further adjustmen...

Страница 32: ...Position sub menu press the MENU button or the button A new menu will be displayed showing the following Size Position settings Horiz Position Adjust the horizontal position of the picture Vertical Po...

Страница 33: ...ff or Auto When set to Off it will stay at 60 fps When set to Auto the TV will detect the cadence for example at 24 frames second for film or normal video at 60 fps Backlight Control Set this feature...

Страница 34: ...ose from OFF Dolby Digital or PCM Analog Audio Out This option sets the volume control properties when using the RCA white and red connectors as audio line out to connect a Receiver Amplifier Home The...

Страница 35: ...ok for channel in a certain channel range again Select to scan for Analog Digital or both Analog Digital channels then press the button to highlight the From and To selection Press the button to selec...

Страница 36: ...labels 4 Press to select the new input label name and then press OK Parental Controls If you want to restrict certain channel and program viewing you can do this by turning on the Parental Control Se...

Страница 37: ...Movie Note When Rating Enable is OFF USA Movie Rating adjustments are not available Press the OK button to block locked or allow unlocked channels by the following US Movie ratings G General audience...

Страница 38: ...new 4 digit password using the number buttons on the remote control Enter it a second time to confirm you entered it correctly Note Make sure you write down and store the new password in a secure plac...

Страница 39: ...Discovery to see if there are any CEC supported devices connected to your HDTV Media Menu When viewing pictures you can adjust various settings including slideshow picture duration etc 1 Insert a USB...

Страница 40: ...ter 9 Maintenance and Troubleshooting Cleaning the TV and Remote Control 1 Remove the power adapter cable from your HDTV 2 Use a soft cloth moistened with diluted neutral cleaner to clean the TV and r...

Страница 41: ...vision and wall outlet Plug another electrical device into the outlet to insure the outlet is working correctly Try another electrical outlet elsewhere in your home Preferably on a different circuit T...

Страница 42: ...Composite Coax etc Try the external device on another input Perform a power cycle by removing the AC power cable from the back of your television for 30 seconds Reinsert the power cable and power on t...

Страница 43: ...xpand this content so the entire screen is filled at the expense of image accuracy To use this function select Wide from the HDTV Settings App Audio Troubleshooting Issue Solution No audio Press Volum...

Страница 44: ...due to a technical problem rather than a defective product that may result in unnecessary shipping charges billed to you Our trained support personnel can often resolve the problem over the phone For...

Страница 45: ...C QAM Signal Compatibility 480I SDTV 480P EDTV 720P HDTV 1080i HDTV Channel Skip Add VIDEO INPUT Naming Capability Closed Caption Parental Control V CHIP 2 0 Programmable Timer SRS TSHD SRS TruVolume...

Страница 46: ...there is no guarantee that interference will not occur in a particular installation If this equipment does cause harmful interference to radio or television reception which can be determined by turnin...

Страница 47: ...5 000 P P 49 500 Windows 6 1024 x 768 60 48 363 60 004 N N 65 000 Windows 7 1024 x 768 70 56 476 70 069 N N 75 000 Windows 8 1024 x 768 75 60 023 75 029 P P 78 750 Windows 9 720 x 400 70 31 469 70 087...

Страница 48: ...kmanship Items not covered include but are not limited to cosmetic damage normal wear and tear misuse signal issues power surges and damages from shipping acts of God any sort of customer misuse insta...

Страница 49: ...Box 20 DVD Player 22 Satellite Box 20 Contents 9 Contrast 31 Controls Front Panel 12 Jag Wheel 12 Daylight Savings setting 38 DTV Transition 5 DVD Player Connecting 22 EPG 18 Getting Started 16 Ground...

Страница 50: ...atellite Box Connecting 20 Search for channels 35 Setting Up 10 Settings Menu Audio 33 36 CEC 39 Menu Language 38 Parental Controls Menu 36 Time Local Settings 38 Tuner 35 Setup Wizard 16 Sharpness 32...

Отзывы: