background image

19

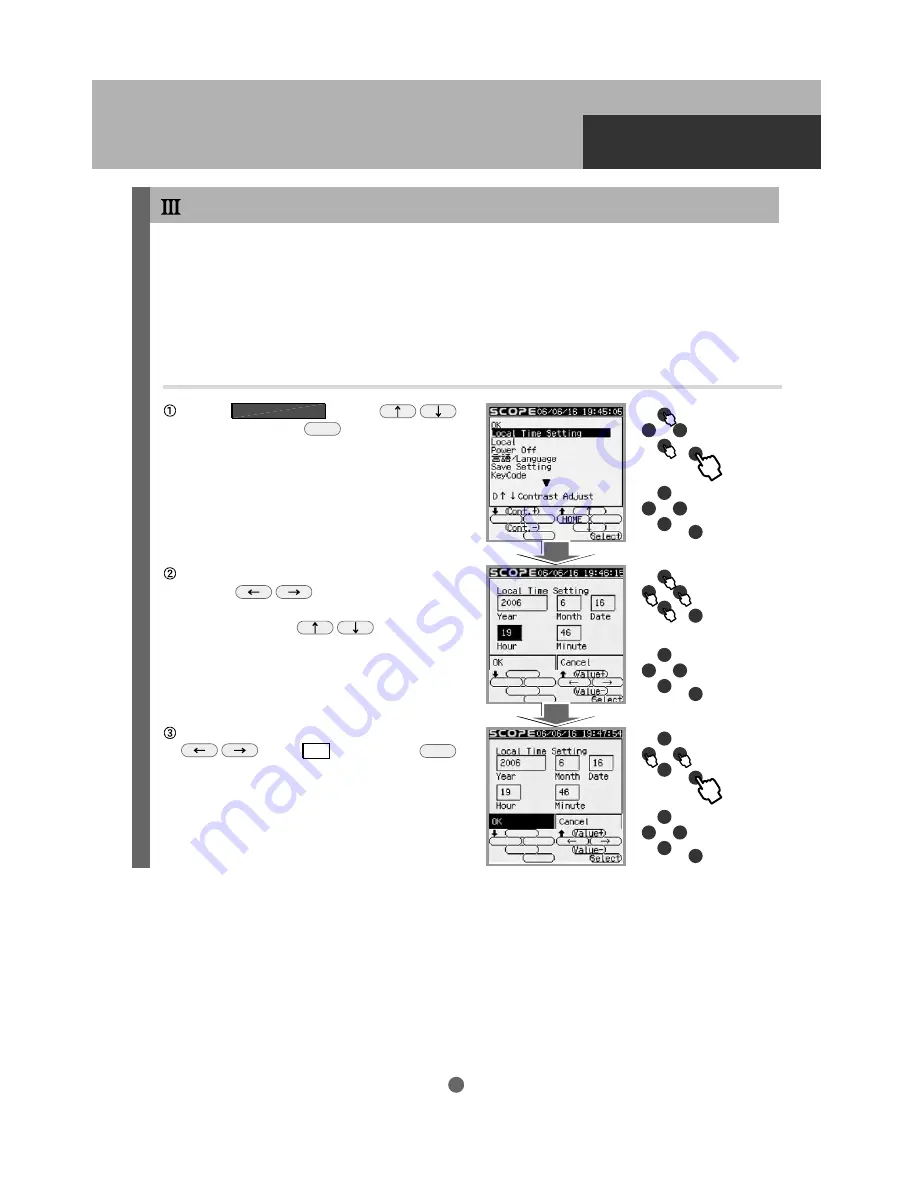
Setting Local Time 

Enter the date and local time of your observing site by using the upper five buttons on the STAR BOOK-S.

This task is required only once the first time you use the STAR BOOK-S.  However, you will need to reset 
the date and time if you travel from your regular observing site to a different time zone, or if you reset your 
clocks for Daylight Saving time.  The STAR BOOK-S keeps the stored memory while you replace the 
batteries.  It is not necessary to enter the date and time again if you put in new batteries within an hour. 
A deviation may arise between the internal clock of the STAR BOOK-S and your time, but a few minutes’  
difference does not affect the slewing performance of the unit.

Choose 

Local Time Setting

 with the

keys and press the  Select  key to enter. 

To change the date and time, move the cursor 
with the                     keys to the item where 
corrections are needed.  Then change the 
numbers with the                  keys. 

To finish the setting, move the cursor with the 
                    keys to  OK  and press the  Select 
key to enter.

INITIAL SETTING

Содержание Skypod

Страница 1: ...Altazimuth Mount Instruction Manual for...

Страница 2: ...to yourself or equipment damage Do not leave the optical tube uncapped in daytime It may cause a fire from the objective lens or mirror of the optical tube or finder scope in case of sunlight passing...

Страница 3: ...e Telescope 15 Connecting the STAR BOOK S Cable to the SKYPOD 16 Connecting External Power Supply 16 Setting Up the STAR BOOK S I II III IV V Turning the Power On and Off 17 Setting Language 18 Settin...

Страница 4: ...ippage of the telescope tube or interruption of obser vation Make sure to balance the telescope For a proper balancing procedure please refer to page 15 Balancing may not be necessary depending on mod...

Страница 5: ...Prism Fixing Knob Eyepiece Eyepiece Set Screw Finder Bracket Lock Screw VMC110L Optical Tube Dot Finder Finder Scope Half Pillar Optional Tripod Head Tube A80Mf Optical Tube Drawtube Azimuth Adjustme...

Страница 6: ...ion with a PC 14 MOUNT Controller Cable Connection Terminal 01 Mode Display SCOPE Mode and CHART Mode 02 Date 03 Time 04 Battery Level Varies according to a level of discharge The batter y levels are...

Страница 7: ...tandard accessories for some models BEFORE USE Controller CPU Display Autoguider Port Controller cable connection terminal LAN connection terminal Batteries Working duration with batteries Dimensions...

Страница 8: ...ervation site Read the manual to understand basic operation of the SKYPOD Home Position Slew the telescope to the home position by using the STAR BOOK S hand controller The Home Position is the initia...

Страница 9: ...tal of twelve 12 AA size alkaline batteries are needed optionally to run the product Push the latch of the rear cover down and open the cover toward you as shown in the figure Insert fresh batteries 4...

Страница 10: ...the tripod head so that the center shaft is above the matching hole Place the Half Pillar on the tripod head so that the two are flush Tighten the locking knob on the underside of the tripod head fir...

Страница 11: ...er to access the inner blue battery case as shown in the figure Open the battery case by sliding off its top cover Take out the battery pack and insert the fresh batteries into it Do not mix up the po...

Страница 12: ...y Screw Gap Dovetail Plate Lock Screw Dovetail Tube Plate Safety Screw Gap Safety Screw Loosen both the dovetail plate lock screw and safety screw until the tips of these screws no longer extended int...

Страница 13: ...r Bracket Lock Screw Finder Bracket Lock Screw Dot Finder Eyepiece 31 7mm 11 4 Supplied Flip Mirror Lever Changes the light path Focus Knob Right angled Viewing Straight through Viewing Focus Knob Foc...

Страница 14: ...ly Attach the finder bracket as shown in the figure Tighten the finder brac ket lock screw securely Tighten the two adjust ment screws so that the finder scope is aligned as shown in the figure Slide...

Страница 15: ...on the finder tube Position the O ring on the narrow groove at the middle of the finder scope Tighten the two adjust ment screws so that the finder scope is aligned as shown in the figure Back out the...

Страница 16: ...al DC 12V power supply or an optional AC Adapter 12V 3A be sure to connect the power cable to the SKYPOD mount before turning on the power switch External power terminal DC12V EIAJ RC5320A Class4 Hand...

Страница 17: ...is hard to read please refer to Hint 1 P18 The picture on the right will appear on screen after the Vixen logo when the STAR BOOK S power is switched on Move the cursor with the keys onto the item you...

Страница 18: ...splayed Choose your language with the keys and press the Select key to enter This will bring you back to the initial screen In the initial setting contrast of the LCD screen can be adjusted with the k...

Страница 19: ...while you replace the batteries It is not necessary to enter the date and time again if you put in new batteries within an hour A deviation may arise between the internal clock of the STAR BOOK S and...

Страница 20: ...enwich Mean Time GMT Its sign is plus if local time is ahead of GMT east of Greenwich and minus if local time is behind GMT west of Greenwich For example the time zone for Los Angeles on Pacific Stand...

Страница 21: ...hey will be stored in the memory of the STAR BOOK S and you can simply choose OK to advance the screen the next time you use it Choose Save Setting with the keys and press the Select key to enter Next...

Страница 22: ...ith the keys and press the Select key to enter The screen displays a warning on solar observation After reading the text choose Confirm with the keys and press the Select key to enter The warning cont...

Страница 23: ...d outdoors the image may not be clear as it may be affected by turbulence from air flowing out in through an open window Although a drifting image may also be seen outdoors it is considered very stabl...

Страница 24: ...p mirror is provided with the telescope the eyepiece can be attached on either side straight thru or right angled Make sure that the light rays passing through the telescope enter your eyepiece by tur...

Страница 25: ...e eyepiece The image will likely be out of focus at first Turn the focus knob slowly clockwise or counter clockwise to find a point where the image in the field of view of the eye piece becomes sharpe...

Страница 26: ...n the larger the object appears However the image is dimmer at higher power than at low power CHANGING THE MAGNIFICATION An optional high power eyepiece is needed Eyepiece Setscrew Eyepiece Setscrew H...

Страница 27: ...r into the distance as possible rotate the objective barrel to find best focus When the finder scope is in focus tighten the lock ring to secure the objective barrel For the novice telescope user it i...

Страница 28: ...om 0 to 11 Set the dial at 11 The intensity of the brightness can be varied from 1 faint to 11 bright You will see a red dot in the center of the field of view of the dot finder when you look along th...

Страница 29: ...the Moon Example What you can expect to see when viewing at a different magnification Magnification at 50X Magnification at 100X OBSERVING THE MOON Focus Knob Focus Knob Telescope s filed of view Find...

Страница 30: ...To learn about positions of these celestial objects when and where they can be found please refer to commercially available astronomy magazines Eyepiece Setscrew Eyepiece Hint 8 The full moon is not...

Страница 31: ...inish assembling the telescope turn the power switches of both the SKYPOD mount and STAR BOOK S hand controller to ON and complete all the initial settings Refer to pages 15 to 21 The screen will disp...

Страница 32: ...least two stars In SCOPE MODE as you slew the telescope the star chart on the screen moves along with the telescope as its direction changes SCOPE MODE is displayed as soon as you begin automatic slew...

Страница 33: ...eys Using the Zoom or Zoom keys to change the scale of the star chart on the screen will help you to center your reference object correctly Refer to Hint 10 Hint 11 Reference objects may also be selec...

Страница 34: ...tep It enables you to make finer adjustments With each press of the Zoom key the star chart is zoomed in more Enlarge the star chart until the outer of the two concentric circles goes off the screen R...

Страница 35: ...the Zoom key when you want to move the telescope slowly and zoom it out with the Zoom key when you want to move the telescope quickly With a high power eyepiece move the reference star into the exact...

Страница 36: ...rom the database and repeat steps to Refer to Hint 15 Hint 21 Zoom the star chart out with the Zoom key to find the next reference object over a large area of the sky The alignment system is designed...

Страница 37: ...cross the whole sky will keep the pointing accuracy high in every direction Hint 18 Choosing a reference point near the zenith will make pointing accuracy worse Due to the nature of SKYPOD Altazimuth...

Страница 38: ...ntinue zooming in further while centering M3 in the crosshairs with the keys Press the GOTO key Automatic slewing becomes available as soon as a two point alignment the first pair alignment is complet...

Страница 39: ...he telescope s eyepiece with the keys Press the Chart key when you wish to move to the next object SCOPE MODE on the screen changes to CHART MODE Choose the next object on the screen with the keys aft...

Страница 40: ...r catalog is displayed Only those objects above the horizon will be shown Move the cursor to the target object M51 here with the keys and press the Select key to enter Some brief data of this celestia...

Страница 41: ...yed Move the cursor to NGC IC with the keys and press the Select key to enter Enter the catalog number of the target object NGC4594 here Move the cursor to the head of the 4 digit number boxes with th...

Страница 42: ...cope starts moving to point to the target object NGC 4594 Sombrero galaxy M104 automatically Turn off the power to the SKYPOD Refer to Hint 22 Next turn off the STAR BOOK S using the following procedu...

Страница 43: ...ossed home position marks are not lined up Press the Menu key to display the system menu Move the cursor to Home Position with the keys and press the Select key to enter Choose YES with the keys and p...

Страница 44: ...is displayed Move the cursor with the keys and select your setting preference with the Value Value keys Choose OK and press the Select key to enter Choose AltAz in order to display the sky on screen a...

Страница 45: ...ng is canceled and the screen returns to SCOPE MODE The default setting is OFF Choose LCD Adjust to change the contrast of the screen Press the Menu key to display the system menu Move the cursor to L...

Страница 46: ...or when a dialog appears on the screen such as the warning for reverse motion When the screen is changed from to CHART MODE to from SCOPE MODE The backlight will not be turned off in the following cas...

Страница 47: ...return to the system menu You need to save the settings in order for the current settings to apply the next time the STAR BOOK S is used Refer to page 21 The STAR BOOK S works with its self contained...

Страница 48: ...PARTICULAR PURPOSE ARE DISCLAIMED IN NO EVENT SHALL THE AUTHOR BE LIABLE FOR ANY DIRECT INDIRECT INCIDENTAL SPECIAL EXEMPLARY OR CONSEQUENTIAL DAMAGES INCLUDING BUT NOT LIMITED TO PROCUREMENT OF SUBST...

Отзывы: