background image

DU6675/DW6655/DX6635 User Manual 


39 

Lamp Power 

Use 

the ◄► function to select Normal, Eco or Custom Power Level mode. 

Normal:

 Projection is carried out using the normal lamp power to obtain the brightest projection display. 

Eco:

 Projection is carried out in the energy saving mode to ensure the longest service life of the lamp. 

Custom Power Level 

In addition to the Normal and Eco modes, the lamp power equal to 100% to 75% of the power in the Normal mode is 
used for fine-tune of the brightness in the Custom Power Level mode. This function can be used for quick installation 
and routine maintenance in multi-projector applications. Select this mode to enable the Custom Power Level 
function.


Custom Power Level


Select this function and use the ◄► to adjust lamp powert between 100% and 75%, note that this function is vaid 
only when Lamp Power is set to Custom Power Level. 


Keystone 

When the image is projected toward the screen at angle, the image becomes distorted trapezoidally, this function 
can be used to correct the distortion. 

H Keystone:

 U

se ◄► to correct the distortion in horizontal direction. 

V Keystone: 

U

se ◄► to correct the distortion in vertical direction. 


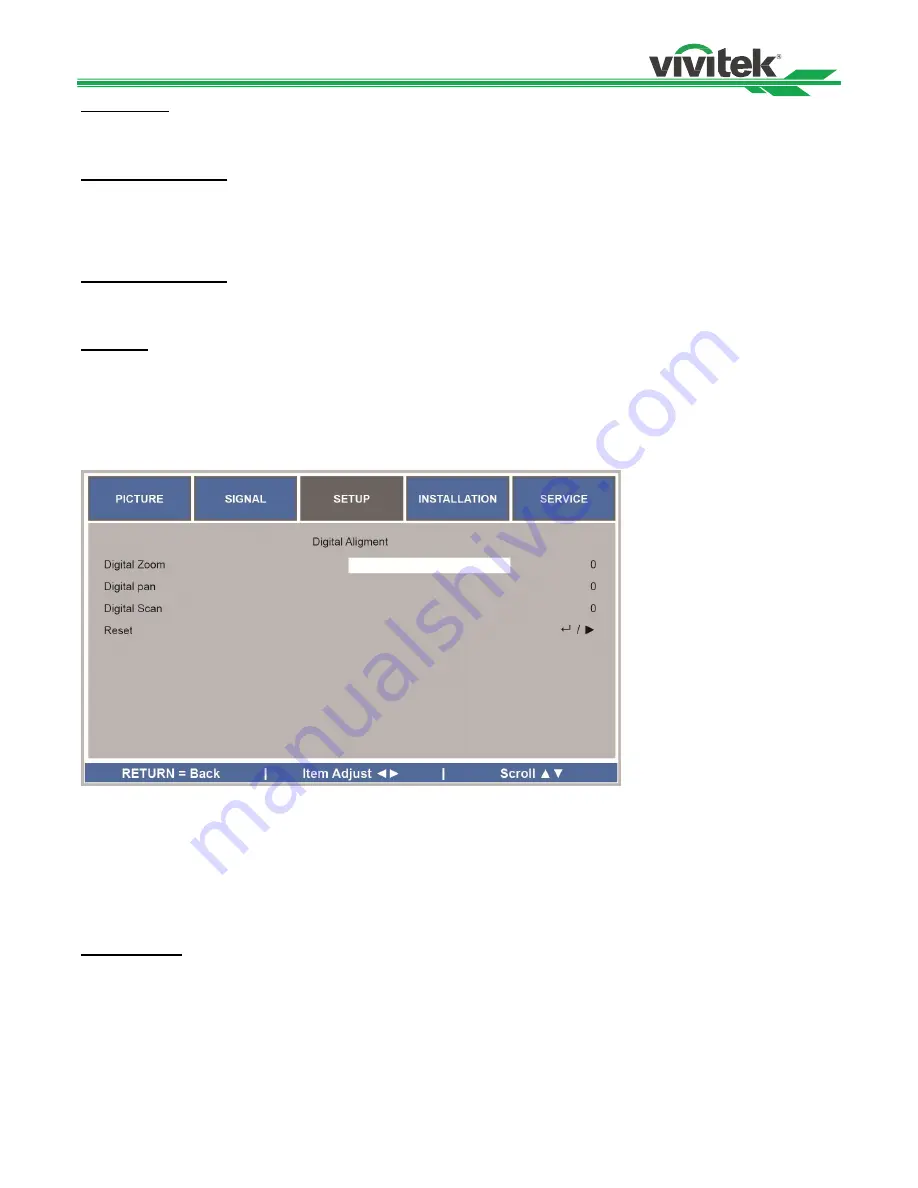
Digital Alignment 


Select this function to enlarge the projected image. 

Digital Zoom:


Use ◄► to enlarge the projected image. 

Digital Pan:


Use ◄► to move the projected image horizontally. This function is only available when the projected 

image is enlarged. 

Digital Scan:


Use ◄► to move the projected image vertically. This function is only available when the projected 

image is enlarged. 

Reset:

 Set the Digital Alignment back to the factory default value. 


H/V Alignment 
H Zoom:


Use ◄► to narrow the horizontal size of the projected image. 

V Zoom:


Use ◄► to narrow the vertical size of the projected image. 

H Shift:


Use ◄► to move the narrowed projected image horizontally. This function is only available when the 

projected image is narrowed. 

V Shift:


Use ◄► to move the narrowed projected image vertically. This function is only available when the 

projected image is narrowed. 

Reset

: Set the H/V Alignment back to the factory default value. 


Содержание DU6675

Страница 1: ...DU6675 DW6655 DX6635 User s Manual ...

Страница 2: ...lling the Optional Color Wheel 16 Remote Control and Operation Range 17 Turning on the Projector 17 Turning on the Projector 18 Turning off the Projector 19 Adjusting Projected Image Position 20 Adjusting the Focus and Zoom 21 Making Connections 22 Connecting to Personal Computer 22 Conecting to the Video Device 22 Connecting to the Control Equipment 23 Connecting to the Screen Trigger 24 Connecti...

Страница 3: ...gating the OSD 30 Menu Tree 31 OSD Operation PICTURE 34 OSD Operation SIGNAL 36 OSD Operation SETUP 38 OSD Operation INSTALLATION 42 OSD Operation SERVICE 45 Maintenace 46 Replacing the lamp 46 Cleaning the projector 48 Specification 50 Product Dimensions 51 Suppoerted Signal Input Timing 52 About the VIVITEK support 53 ...

Страница 4: ...s not provide any statement or warranty of the contents in the manual and clearly give up the implied warranties of merchantability and of fitness for a particular purpose The manufacturer reserves the rights to modify the publication and change the contents of the materials at any time without notice to any person About the Manual The manual describes how to install and use the DLP projector and ...

Страница 5: ... provided does not match the outlet contact the electrician to change the old outlet 8 Prevent the power cord from being treaded or pressed especially the power cord on the plug outlet and the connection between the power cord and the equipment 9 Only use the connectors accessories designated by the Manufacturer 10 Be careful of moving the trolley equipment and avoid being hurt due to turning over...

Страница 6: ... Material recycling is helpful to the protection of natural resources The symbol is only valid in European Union If you want to discard electrical and electronic equipment contact the governmental authorities or your dealer for the correct method of disposal Important Recycling Instructions The lamp of the product contains mercury The product may contain other electronic wastes and may pose risk i...

Страница 7: ...tallation The power of lamps can be adjusted in the normal and energy saving modes to make it easier for the installation personnel to fine tune the brightness With the lamp switching feature the projector can automatically select the lamps less used when turned on The projector has the replaceable color wheel and smart color wheel switching design can automatically detect and switch the parameter...

Страница 8: ... User Manual 7 Packing Checklist The following items are included in the packaging box of the DU6675 DW6655 DX6635 projector If any loss or damage to any item contact your dealer or the VIVITEK customer service department ...

Страница 9: ...amp cooling vent do not obstruct 8 Anti thief Screw hole 9 Height Adjuster Adjust level of projector 10 Intake Vent filter 11 I O Connector Panel Rear right View 12 Rear IR Receiver The Receiver for IR signal from remote control 13 Rear Intake Vent filter Rear cooling intake do not obstruct 14 Kensington Lock Attach the projector to a permanent object with the Kensington slot and a security cable ...

Страница 10: ...DU6675 DW6655 DX6635 User Manual 9 Bottom View ...

Страница 11: ...ght Menu Press the button to display OSD menu or exit the OSD menu Up Down Left Rignt Cursor Use the buttons to navigate the OSD or select the OSD option ENTER Press the button to select or change settings in the OSD CANCEL Exit the OSD menu POWER Press the button to turn the projector on or off main power switch must be turned on first Press to place the projector in standby mode SOURCE Select th...

Страница 12: ...MPONENT Connect a component video cable from a video device to the RCA jacks Video In Connect a composite video cable not supplied from a video device to the yellow RCA jack S Video Connect a commercially available S video cable from a video device Screen Trigger When connected to the screen through a commercially available cable the screen deploys automatically on start up of the projector The sc...

Страница 13: ...ursor right or enter submenu 14 ENTER Freeze unfreezes the on screen picture 15 MENU Display OSD main menu 16 RETURN Return to last OSD page or exit menu 17 INPUT Select the input source 18 PICTURE Display picture menu 19 NETWORK Display network setting menu 20 AUTO Auto adjustment for phase tracking size position 21 ASPECT Set up aspect ratio of the projected image 22 BLANK Blank the image or pre...

Страница 14: ...or in an enclosed space ensure that the surrounding air temperature within the enclosure does not exceed operation temperature while the projector is running and the air intake and exhaust vents are unobstructed All enclosures should pass a certified thermal evaluation to ensure that the projector does not recycle exhaust air as this may cause the device to shutdown even if the enclosure temperatu...

Страница 15: ...ojector is correctly installed Generally the light source facing the screen should be reduced or eliminated as much as possible The contrast of the image will be obviously reduced if the light directly shines on the screen such as the beam from windows or the searchlight cast on the image The image may become faded and not bright The available installation options as below Desktop Front Install th...

Страница 16: ...ents as the projector and lens components contain precision parts When shipping the projector with the optional lens remove the optional lens before shipping the projec tor The lens and the lens shift mechanism may encounter damage caused by improper handling during transportation Before removing or installing the lens be sure to turn off the projector wait until the cooling fans stop and turn off...

Страница 17: ...w the retaining screws x 4 on the color wheel 2 Tighten the 4 screws on the color wheel 3 Lift the color wheel in the direction shown 3 Place the color wheel and tightnen the screw on the color wheel cover as below illustration Note Keep the unused color wheel in the zipper bag in which the 6 segment color wheel was packaged This bag prevents dust from falling or collecting on the color wheel Only...

Страница 18: ... radius of about 10 meters 32 feet and 15 degrees above or below the projector level If the projector does not respond to the remote control move a little closer Important Avoid using the projector with bright fluorescent lighting turned on Certain high frequency fluorescent lights can disrupt remote control operation Be sure nothing obstructs the path between the remote control and the projector ...

Страница 19: ...ch to the on I position as shown B All four LEDs light orange then the Lamp1 and 2 LEDs turn off and the Warning LED lights green 2 Press the POWER button on the con trol panel or ON button on the remote control once the Power LED flashes green and the internal cooling fan starts 3 After approximately 10 seconds the Lamp1 and Lamp2 LEDs light green and the Power LED flashes more rapdly 4 Once the ...

Страница 20: ...in Power switch to the off position O to turn off the projec tor About Direct Power Off The projector has a feature called Direct Power Off This feature allows the projector to be turned off even when projecting an image using a power strip equipped with a switch and a breaker Note Do not unplug the power cable from the wall outlet or projector when the projector is powered on Do ing so can cause ...

Страница 21: ...The lens shift bit is shown in the percentage of the screen height The project installed on the desk can move up and down by 50 0 5V Vertical lens shift The project installed on the desk can move up and down by 50 0 5V The lens of the ceiling mount projector can move down by 50 0 5V Horizontal lens shift The image can be shifted horizontally to the right or left by 10 0 1H without moving the proje...

Страница 22: ...e adjusted manually from the projector control panel or remote control Refer to the following guides to adjust the focus and zoom manually Press the Focus or Zoom button on the control key panel or remote control to adjust the Fo cus Zoom using the increase and decrease buttons as required ...

Страница 23: ...Fasten the nut on the joint and connect the signal source equipment to the projector according to the figure below Connecting to Personal Computer You can connect the PC signal to be projected to the projector through the DVI D HDMI or RGBHV BNC cable If the signal to be input is VGA signal connect the VGA cable to the external display to simultaneously monitor the projected content Conecting to t...

Страница 24: ...or cannot receive the IR signal from the remote control due to the overly long distance or obstacles you can connect the cable to the IR remote control or the external IR transmitter optional via the WIRE input port to expand the working range of the remote control 3D Sync Out 3D IR sync signal transmitter Note When the terminal of the remote control cable is inserted to the wired control terminal...

Страница 25: ...ice you can connect these devices to the 12V trigger to output and configure the output 12V signal settings such as automation and the aspect ration of 16 10 through OSD control to Trigger The projector will output 12V signals according to the current settings of the aspect ratio and trigger when turned on You can use the signal to control the screen or device ...

Страница 26: ...emote control and the reception of the network control signals but do not support Power over Ethernet PoE Set the INSTALLATION RS232 Channel on the OSD menu to HDbaseT if you want to use the external HDbaseT transmitter to send the RS232 command to the projector via the RJ45 cable and baud rate will switch to 9600 If the command is sent via the HDbaseT transmitter the longest transmission distance...

Страница 27: ...e language to be used Selecting an Input Source The Input Source can be selected from the projector s control panel or from the remote control unit Refer to the following guide to select the Input Source 1 Press SOURCE buton on the control panel or INPUT button on the remote control unit to display Input Selection Menu 2 Select the required source using or and press ENTER button to confirm the inp...

Страница 28: ...rovides details on the life of consumable items within the projector as well as other information such as software version To access the Information screen refer to the following guide 1 Press Menu on the projector s OSD control panel or remote control to display the Main Menu Scroll to the Installation Information menu using or and press 2 The Information menu is displayed as the default view The...

Страница 29: ...ojector has a built in security feature to lock the OSD control panels and deny remote control operation The security feature has no default keyword in the first instance of enabling the security feature the user must define a keyword Locking the projector To setup the security keyword refer to the following guide 1 Press Menu on the OSD control panel on the projector or remote control to display ...

Страница 30: ...ither by re quest during operation or at start up the locked message is displayed 2 To unlock the projector enter the previously defined PIN code to activate the projector Using the Physical Lock Using the Kensington Lock If you are concerned about security attach the projector to a permanent object with the Kensington slot and a security cable ...

Страница 31: ...ation shows the corresponding buttons on the remote control and on the projector 1 To open the OSD press the Menu button on the OSD control panel or remote control There are file folders on the menu Press the cursor or buttons to move through secondary menus 2 Press or to select menu items and or to change values for settings Press to confirm the new setting 3 Press RETURN to leave a submenu or ME...

Страница 32: ...emperature Native 6500K 7800K 9300K Gamma 2 2 Film Graphic Video PC Auto Sync Advance Setting Input Balance Red Offset Green Offset Blue Offset Red Gain Green Gain Blue Gain Red Hue Saturation Gain Green Hue Saturation Gain Blue Hue Saturation Gain Cyan Hue Saturation Gain Mageta Hue Saturation Gain Yellow Hue Saturation Gain White Hue Saturation Gain Noise Reduction Dynamic Black On Off Signal In...

Страница 33: ...ogo Setup Language English 簡體中文 繁體中文 Lamp Mode Dual Single Lamp 1 Lamp 2 Lamp Power Normal Eco Customer Power level Customer Power level Keystone H Keystone VKeystone Digital Alignment Digital Zoom Digital Pan Digital Scan Reset H V Alignment H Zoom V Zoom H Shift V Shift Reset 3D 3D Format Off Auto Side by Side Top Bottom Frame Sequential DLP Link On off 3D Swap Normal Reverse 3D 24Hz Display 96H...

Страница 34: ...ate 38400 19200 9600 Channel Local HDBaseT Network IP Adress Subnet Mask Gateway DHCP On Off Apply No Yes MAC Adress Lens Control Zoom Focus Lens shift Test Pattern Color Bar Cross Hatch Burst H Ramp Red Green Blue White Black Off Service Model Serial Number Software Version Source Information Active Source Pixel Clock Signal Format H V Refresh Rate Sync Type Sync Polarity Scan Type Video Type Lam...

Страница 35: ...htness Use or to increase or decrease the brightness of the image Contrast Use to adjust the contrast of the projected image Saturation Use to adjust the saturation level of the color the higher the level the higher the saturation Hue Use to adjust the level of hue for reproduction of the true color Main Color Hue R Magenta Yellow G Yellow Cyan B Cyan Magenta C Green Blue M Blue Red Y Red Green No...

Страница 36: ... range while maintaining visual contrast this reduces contrast in highlights and deep shadows while maintaining or boosting it in middle tones Auto Sync Use this function to execute the Auto Sync input signal Advance Setting Input Balance There are two optios to fine tune Red Green and Blue color Offset These three options will shift the color spectrum for the whole image and change its brightness...

Страница 37: ... noise reduction can lower the value of the high frequency detail and make the image softer Dynamic Black Use the function to turn on off Dynamic Black it can be used to enhance the black level of the projected image OSD Operation SIGNAL Input Selection This function is same as the shortcut key on the remote control You can use the remote control or this function to select the correct input source...

Страница 38: ...ge the corresponding color space for the input signal In most cases the correct color space can be selected automatically by Auto mode If the selection is not correct you can use a specific color space forcibly by selecting one of the following options Auto The projector detects the input signal and switches to the corresponding color space automatically YCbCr Set the color space to ITU R BT 601 Y...

Страница 39: ... abnormal in activation Lamp 2 Use Lamp 2 for projection The system switches to Lamp 1 if Lamp 2 is abnormal in activation Note In the Lamp 1 or Lamp 2 mode the projector will switch to another lamp when the set lamp becomes abnormal The corresponding LED indicator of the lamp will flash simultaneously for seconds and light up When the lamp mode is set to Single the setting will become valid upon ...

Страница 40: ... the image becomes distorted trapezoidally this function can be used to correct the distortion H Keystone Use to correct the distortion in horizontal direction V Keystone Use to correct the distortion in vertical direction Digital Alignment Select this function to enlarge the projected image Digital Zoom Use to enlarge the projected image Digital Pan Use to move the projected image horizontally Th...

Страница 41: ...et the format to Frame Sequential DLP Link Set to activate or deactivate the DLP Link sync signal 3D Swap If the 3D imaged viewed through the 3D glasses for the left and right eyes are inverse set the 3D Swap to Inverse If the images are normal keep the current 3D 24Hz Display Set the 3D 24Hz image frame rate to 144fps or 96fps this option is only applicable when the input signal is 24Hz Filter Me...

Страница 42: ...rol signal transmition if the optional HDBaseT transmitter is capable of IR signal receiving and transmittion Both front IR receiver and back IR receiver are turned off if the option is selected Control Panel Lock This function allows you to lock control panel on the projector set it to On to lock the control panel Otherwise set it to Off to unlock the control panel Security Lock The projector has...

Страница 43: ...e projector detects ambient temperature to regulate the cooling fan speed However the projector may turn off automatically if it is used in an environment at excessively high temperature or in an area at a high altitude In this case please enable this function by setting it to ON and have the cooling fan operate at a higher speed to control the internal temperature of the projector Auto Power Off ...

Страница 44: ...hed to 9600 Network Use this function to set up network configurations so that you can control the projector via the network Use and the Enter button to select Network and network settings IP Address To specify an IP address press the Enter button to show the IP address input window Use the button to select the number in the address to be changed Use the button to increase or decrease the number i...

Страница 45: ...h the Zoom Focus or Shift menu Use to adjust zooming and horizontal shift of the lens or use to adjust focusing and vertical shift of the lens Test Pattern The built in image is provided for installation and adjustment You can select Test Pattern on OSD or the TEST PATTERN button on the remote control to display the test pattern menu use Use or to select desired test pattern ...

Страница 46: ...mp2 Life Remaining Display estimated remaining lamp2 life Lamp1 Time Display current lamp1 usage Lamp2 Time Display current lamp2 usage Filter Time Display the time from last reset of filter timiner to now Power On Time Display the total Power On time of the projector Filter Timer Reset Reset the filter timer Reset filter timer please execute this function to to synchronize the Filter time display...

Страница 47: ...e Lamp Replacement section of this manual Continuous use of the lamp with LAMP 1 and or LAMP 2 lighted may increase the risk of lamp explosion A Lamp may explode as a result of vibration shock or degradation as a result of hours of use as its lifetime draws to an end Risk of explosion may differ according to the environment or conditions in which the projector and lamp are being used If a lamp exp...

Страница 48: ...module s and re place the lamp cover 2 Loosen the two captive screws on the lamp module A Lift the module handle up as shown B 5 Tighten the two captive screws on the lamp module 3 Pull firmly on the module handle in the direction shown to remove the lamp 6 Place the lamp cover and tighten one screw on the cover as below illustration ...

Страница 49: ... should be cleaned every 500 hours of operation In dusty environments it is recommended to clean the filters more frequently If the filter is dirty or clogged your projector may overheat When the message be low is displayed the filters must be cleaned Refer to the following guide to clean the filters 1 The left side and rear filters can be cleaned as demonstrated in the fol lowing images Note When...

Страница 50: ...filter foams from all three filteholders in the direction shown Remove them completely from each filter holder and discard 5 Place a replacement foam and press down firmly 6 Replace the filter holders by push ing gentlyin the direction shown Once the filters are cleaned please reset the filter timer by using the Clear filter time option in the on page ...

Страница 51: ...DU6675 DW6655 DX6635 User Manual 50 Specification ...

Страница 52: ...DU6675 DW6655 DX6635 User Manual 51 Product Dimensions ...

Страница 53: ...DU6675 DW6655 DX6635 User Manual 52 Suppoerted Signal Input Timing ...

Страница 54: ...Africa Vivitek Service Support Zandsteen 15 2132 MZ Hoofddorp The Netherlands Tel 31 20 655 0960 Email support vivitek eu URL www vivitek eu China Vivitek Service Center 201209 Room 1802 18 F Cimic Tower No 1090 Century Avenue Pudong Shanghai Tel 400 888 3526 Toll Free Tel 021 58360088 142 Direct Email service vivitek com cn URL www vivitek com cn Asia and Taiwan VIVITEK after sales service Vivite...

Отзывы: