Vive Comfort TP-Z-RISW Скачать руководство пользователя страница 8

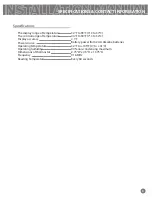
TECHNICIAN SETUP MENU

8

Note:


Tech setup cannot be entered if the 

 device is in an operation mode.  Press the 

RUN 

key or system key to OFF to enable

.

Room Temperature 

Calibration

F° or C°

0

F

44ºF

90ºF

Low Temperature 

Setpoint Limit

High Temperature Setpoint 

Limit

This feature allows the installer to 
change the calibration of the room 
temperature display. For example, if 
the thermostat reads 70° and you 
would like it to read 72° then select 
+2.

You can adjust the room temperature 
display to read -4°F to +4°F above 
or below the factory calibrated 
reading.

This feature sets the display 
temperature to read either Fahrenheit 
or Celsius.

F for Fahrenheit

C for Celsius

This feature allows you to set a 
minimum cool setpoint value. The 
setpoint temperature cannot be 
lowered below this value. 

Use the         key to select the 
minimum cool setpoint.

This feature allows you to set a 
maximum heat setpoint value. The 
setpoint temperature cannot be raised 
above this value. 

Use the         key to select the  
maximum heat setpoint. 

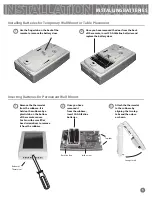
Tech Setup Steps (Continued from previous page)

LCD Will Show

Adjustment Options

Factory Default Settings

Tech Setup entry.

Содержание TP-Z-RISW

Страница 1: ...r quality products 1 A trained experienced technician must install this product Carefully read these instructions You could damage this product or cause a hazardous condition if you fail to follow the...

Страница 2: ...OTE THE SHOW SET MODE must be set to YES in TECH SETUP MENU before the CLEAN key will be displayed NOTE ABOUT THE LIGHT BUTTON This button is used to light up the display DO NOT hold the light button...

Страница 3: ...mperature and good air circulation Do not mount or place thermostats in following locations Close to hot or cold air ducts That are in direct sunlight With an outside wall behind the thermostat In are...

Страница 4: ...tat over the mounted T bracket Wall mount slot holders T bracket mounted on the wall Back View of Subbase of Remote Sensor T bracket Wall mount slots Wall Mount Permanent 1 Remove the thermostat from...

Страница 5: ...l Mount or Table Placement 1 Use the finger tab on the back of the remote to remove the battery door 2 Once you have removed the door from the back of the remote insert 2 AA Alkaline batteries and rep...

Страница 6: ...the light button on the zone thermostat until the Wireless Icon flashes approximately 3 seconds The Master Thermostat should now show the temperature of the Remote Zone Thermostat the Zone number it...

Страница 7: ...ault Settings This step links the device to the Master Thermostat for the Zone you wish to control Select the same zone on this ZONE THERMOSTAT that you select on the Master thermostat see page 6 Whil...

Страница 8: ...room temperature display to read 4 F to 4 F above or below the factory calibrated reading This feature sets the display temperature to read either Fahrenheit or Celsius F for Fahrenheit C for Celsius...

Страница 9: ...Power source Operating temperature Operating humidity Dimensions of thermostat Frequency Reading Temperature 32 F to 99 F 0 C to 37 C 44 F to 90 F 7 C to 32 C 1 F Battery power from 2 AA Alkaline batt...

Отзывы: