background image

4

 ENGLISH

MULTICOOKER 

The main purpose of the multicooker is swift and quality 
food cooking.

DESCRIPTION

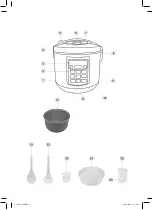
1.  Body 
2.  Control panel
3.  Display
4.  Lid 
5.  Lid opening button
6.  Steam valve
7.  Carrying handle 
8.  Condensation collector
9.  Power cord connector
10. Heating element
11. Temperature sensor
12. Cooking bowl

Control panel

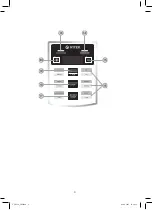
13. «COOKING» indicator
14. «KEEP WARM» indicator
15. Selected setting decrease button «-»
16. Cooking program buttons
17. «MULTICOOK» button
18. «DELAYED START» button
19. «KEEP WARM/STOP» button
20. Selected setting increase button «+»

Accessories

21. Spatula
22. Soup ladle
23. Measuring cup
24. Steam cooking basket
25. Yogurt cups
26. Yogurt cup lids

ATTENTION!

For  additional  protection  it  is  reasonable  to  install  a 
residual  current  device  (RCD)  with  nominal  operation 
current not exceeding 30 mA, to install RCD contact a 
specialist.

SAFETY MEASURES

Before using the unit, read this instruction manual care-
fully and keep it for future reference.
Use  the  unit  according  to  its  intended  purpose  only, 
as it is stated in this user manual. Mishandling the unit 
can lead to its breakage and cause harm to the user or 
damage to his property. 

• 

Before  using  the  unit,  closely  examine  the  power 
cord and the power cord connector located on the 
unit body and make sure that they are not damaged. 
Never use the unit if the power cord or power cord 
connector is damaged.

• 

Before  switching  the  unit  on  make  sure  that  your 
home mains voltage corresponds to the unit oper-
ating voltage.

• 

Power cord is equipped with «euro plug»; plug it into 
the socket with reliable grounding contact.

• 

Do not use adapters for plugging the unit in.

• 

Make sure that the power cord is properly inserted 
into  the  connector  on  the  unit  body  and  into  the 
mains socket.

• 

Use only the supplied power cord, do not use power 
cords of other units.

• 

Use only the removable parts supplied with the unit.

• 

Place the unit on a flat heat-resistant surface away 
from moisture and heat sources and open flame.

• 

Place the unit with free access to the mains socket.

• 

Use the unit in places with proper ventilation. 

• 

Do not expose the unit to direct sunlight.

• 

Do  not  place  the  unit  close  to  walls  and  furniture. 
Free space above the multicooker should be at least 
30-40 cm.

• 

Provide  that  the  power  cord  does  not  contact  with 
hot surfaces and sharp furniture edges. Avoid dam-
aging the isolation of the power cord.

• 

Do  not  touch  the  power  cord  or  power  plug  with 
wet hands.

• 

Do not immerse the unit, the power cord and power 
plug into water or any other liquids.

• 

If the unit was dropped into water, unplug it imme-
diately.  And  only  then  you  can  take  it  out  of  water. 
Apply  to  the  authorized  service  center  for  further 
use of the unit.

• 

Do  not  insert  foreign  objects  into  the  steam  valve 
opening, and make sure that foreign objects do not 
get between the lid and body of the multicooker.

• 

Do  not  leave  the  operating  unit  unattended,  al-
ways  switch  off  and  unplug  the  unit  when  you  do 
not use it.

• 

To avoid burns do not bend over the steam release 
lid.  Be  very  careful  when  opening  the  multicooker 
lid during and right after cooking. 

Danger of burns 

by hot steam!

• 

When the unit operates in the «Roasting» mode, do 
not bend over the multicooker bowl to avoid burns. 

• 

Keep  the  steam  valve  clean,  clean  it  when  it  gets 
dirty. 

• 

Never  use  the  unit  without  the  installed  bowl  and 
the  steam  valve.  Do  not  switch  the  multicooker  on 
without  products  and  sufficient  amount  of  liquid  in 
the bowl.

• 

Do not use the multicooker if the silicone gasket on 
the inner surface of the lid is damaged. 

• 

Follow  the  recommendations  for  amount  of  dry 
products and liquids.

• 

Do not remove the bowl during operation.

• 

Do not cover the multicooker during operation.

• 

Attention! 

When steaming food, watch the level of 

liquid in the bowl, add water to the bowl as needed. 
Do not leave the unit unattended!

• 

Do not carry the unit during operation. Use the car-
rying  handle,  having  unplugged  the  unit,  removed 
the  bowl  with  food  and  let  the  unit  cool  down  pre-
liminarily.

• 

The lid, the bowl and body parts heat up during op-
eration, do not touch them. If you need to take out 
hot bowl, use potholders.

• 

Clean the unit regularly.

VT-4212_IM.indd   4

06.08.2013   12:38:36

Содержание VT-4212 BK

Страница 1: ...1 VT 4212 BK Multicooker 4 9 15 21 27 32 37 43 49 VT 4212_IM indd 1 06 08 2013 12 38 35...

Страница 2: ...VT 4212_IM indd 2 06 08 2013 12 38 36...

Страница 3: ...3 VT 4212_IM indd 3 06 08 2013 12 38 36...

Страница 4: ...with free access to the mains socket Use the unit in places with proper ventilation Do not expose the unit to direct sunlight Do not place the unit close to walls and furniture Free space above the mu...

Страница 5: ...o hours at room temperature before switching on Unpack the unit remove any stickers and package materials that can prevent normal operation of the multicooker Place the unit on a flat heat resistant s...

Страница 6: ...e for Baking Roasting and Yogurt programs Select the program and set cooking time see the Use of the multicooker section Press the DELAYED START button 18 and set the time needed for the cooking to be...

Страница 7: ...program as it is described in the Multicook button 17 section 7 Cooking time in each program is set by default but it may be changed except the RICE program To set the cooking time press or hold the...

Страница 8: ...ry the steam valve 6 thoroughly before installing it back to its place Do not place the bowl 12 in the dishwashing ma chine Wipe the surface of the heating element only when it is cold never let water...

Страница 9: ...des Ger ts und in die Steckdose fest gesteckt ist Benutzen Sie nur das mitgelieferte Netzkabel Be nutzen Sie kein Netzkabel von anderen Ger ten Benutzen Sie nur die mitgelieferten abnehmba ren Teile...

Страница 10: ...F R DEN GEBRAUCH IM HAUS HALT GEEIGNET VERWENDUNG DES BEH LTERS F R NAHRUNGSMITTELZUBEREITUNG 12 Benutzen Sie den Multikocher und seine abnehm baren Teile nur bestimmungsm ig Es ist nicht gestattet d...

Страница 11: ...e ndert oder die Startr ck stellungszeit mit der STARTR CKSTELLUNG Taste 18 eingestellt haben automatisch um dabei leuchtet die ZUBEREITUNG Anzeige 13 auf Zum R cksetzen der Einstellungen oder zum Abb...

Страница 12: ...hlen Sie das Programm und stellen Sie die Zu bereitungsdauer ein siehe den Abschnitt Verwen dung des Multikochers Dr cken Sie die STARTR CKSTELLUNG Taste 18 dann stellen Sie die Kochenende Zeit mitte...

Страница 13: ...Sie die Nahrungsmittel mit der Plastik Schaufel 21 oder mit der Plastik Sch pfkelle 22 um Benutzen Sie keine Metallgegenst nde die die Antihaftbeschich tung des Beh lters 12 zerkratzen k nnen 11 Wenn...

Страница 14: ...Wasser oder andere Fl ssigkeiten Benutzen Sie abrasive und aggressive Waschmit tel f r die Reinigung des Ger ts und des Zubeh rs nicht AUFBEWAHRUNG Schalten Sie das Ger t aus und reinigen Sie es Bewa...

Страница 15: ...15 1 2 3 4 5 6 7 8 9 10 11 12 13 14 15 16 17 18 19 20 21 22 23 24 25 26 30 30 40 VT 4212_IM indd 15 06 08 2013 12 38 37...

Страница 16: ...16 12 12 12 9 12 12 12 12 21 22 12 12 12 12 20 30 40 VT 4212_IM indd 16 06 08 2013 12 38 37...

Страница 17: ...0 16 15 20 18 13 19 8888 1 00 4 00 1 00 4 00 8 00 4 00 0 15 0 40 0 20 0 10 2 00 1 10 0 05 0 45 0 20 0 20 1 10 0 55 0 20 1 10 0 55 6 00 12 00 8 00 0 40 2 00 0 45 0 30 2 30 0 30 0 30 2 30 1 10 35 150 10...

Страница 18: ...18 17 17 17 3 100 15 20 35 150 15 20 15 20 15 20 19 19 14 24 75 19 19 18 18 15 20 10 18 3 1 55 5 14 13 1 12 10 4 8 23 160 CUP 4 CUP 1 3 2 12 12 9 12 VT 4212_IM indd 18 06 08 2013 12 38 37...

Страница 19: ...19 12 12 9 10 10 3 12 24 24 12 4 4 5 9 6 16 17 7 15 20 8 18 9 10 13 10 16 15 20 18 13 19 8888 10 21 22 12 11 19 4 6 12 12 14 24 40 400 350 1 5 1 5 12 15 20 1 VT 4212_IM indd 19 06 08 2013 12 38 37...

Страница 20: ...20 35 45 17 10 4 1 4 8 6 12 1 1 1 1 1 1 1 6 1 220 240 50 60 900 5 3 38 7 1070 VT 4212_IM indd 20 06 08 2013 12 38 37...

Страница 21: ...21 1 2 3 4 5 6 7 8 9 10 11 12 13 14 15 16 17 18 19 20 21 22 23 24 25 26 30 30 40 VT 4212_IM indd 21 06 08 2013 12 38 38...

Страница 22: ...22 12 12 12 9 12 12 12 12 21 22 12 12 12 12 20 30 40 5 4 12 6 LOOSEN 6 12 21 22 23 24 25 26 VT 4212_IM indd 22 06 08 2013 12 38 38...

Страница 23: ...1 00 4 00 1 00 4 00 8 00 4 00 0 15 0 40 0 20 0 10 2 00 1 10 0 05 0 45 0 20 0 20 1 10 0 55 0 20 1 10 0 55 6 00 12 00 8 00 0 40 2 00 0 45 0 30 2 30 0 30 0 30 2 30 1 10 35 150 100 0 05 10 00 0 30 75 4 1...

Страница 24: ...4 19 8888 17 17 17 3 100 15 20 35 150 15 20 35 150 15 20 15 20 19 19 14 24 75 19 19 18 18 20 15 18 3 10 55 1 5 14 13 1 12 10 4 8 23 160 CUP 4 CUP 1 3 2 12 12 9 12 VT 4212_IM indd 24 06 08 2013 12 38 3...

Страница 25: ...25 12 12 9 10 10 3 24 12 24 12 4 4 5 9 6 16 17 7 15 20 8 18 9 10 13 16 15 20 18 10 13 19 8888 10 21 22 12 11 19 4 6 12 12 14 24 40 400 350 1 5 1 5 12 VT 4212_IM indd 25 06 08 2013 12 38 38...

Страница 26: ...26 15 20 1 35 45 17 10 4 1 4 8 6 12 1 1 1 1 1 1 1 6 1 220 240 50 60 900 5 3 i i i i i i i i i i i i i i i i 2004 108 i i i i i i 2006 95 VT 4212_IM indd 26 06 08 2013 12 38 38...

Страница 27: ...re furnizat mpreun cu aparatul i nu folosi i cabluri de alimentare de la alte dispozitive Utiliza i doar acele piese deta abile care sunt furni zate mpreun cu aparatul Plasa i aparatul pe o suprafa pl...

Страница 28: ...ari nemijlocit n bol 12 Niciodat nu l sa i i nu p stra i n bol 12 obiecte str ine n timpul prepar rii alimentelor n bol 12 mesteca i le numai cu spatula 21 sau polonicul 22 Pute i de asemenea utiliza...

Страница 29: ...accesibil Butonul 19 MEN INERE TEMPERATUR STOP Oprirea programului anularea set rilor programului operate gre it Utiliza i butonul 19 pentru anularea set rilor gre ite p n la nceperea prepar rii sau...

Страница 30: ...p de 1 3 2 Asigura i c suprafa a exterioar a bolului 12 este curat i uscat instala i bolul 12 n camera activ a aparatului Instala i bolul f r nclin ri astfel nc t acesta s adere perfect la suprafa a e...

Страница 31: ...i titlul Butonul 17 Multibuc tar Aproximativ peste 10 secunde dup terminarea set rilor aparatul va trece n regimul de preparare Remarc Pentru ob inerea unui rezultat optim nu des chide i capacul multi...

Страница 32: ...lu enstv kter se dod v spolu s t mto spot ebi em Um s ujte p stroj na rovn m teplovzdorn m povr chu ve vzd lenosti od zdroj vody tepla a otev e n ho ohn Um s ujte p stroj tak aby elektrick z suvka byl...

Страница 33: ...ou vejte kovov p edm ty kter by mohly po kodit nep il nav povlak Po va en j del s pou it m ko en a p sad je t eba um t n dobu 12 hned po ukon en va en Aby nedo lo k po kozen nep ilnav ho povlaku ne d...

Страница 34: ...dr ov n teploty p i tom se na displeji rozsv t kontrolka 14 P stroj udr uje teplotu hotov ho pokrmu a do 24 hodin Tato funkce nen dostupn v programech Jogurt a Multikucha pokud u ivatel nastavil teplo...

Страница 35: ...pn ho t lesa 9 je um st n teplotn sn ma 10 Dohl ejte na to aby po hybu sn ma e 10 nic nebr nilo 3 Pokud va te pokrm v p e nalijte vodu do n doby 12 tak aby va c se voda nedot kala se dna vlo ky 24 Dej...

Страница 36: ...vodn ho kabelu z elektrick z suvky a nechte p stroj vychl dnout Ot ete t leso 1 a poklici 4 lehce navlh en m had kem pak ut ete do sucha P i zapln n z sobn ku na kondenz t 8 vylijte z n j vodu V echn...

Страница 37: ...37 1 2 3 4 5 6 7 8 9 10 11 12 13 14 I 15 16 17 18 19 I 20 21 22 23 24 25 26 30 30 40 VT 4212_IM indd 37 06 08 2013 12 38 39...

Страница 38: ...38 12 12 12 9 12 12 12 12 21 22 12 12 12 12 20 30 40 4 5 12 6 LOOSEN VT 4212_IM indd 38 06 08 2013 12 38 39...

Страница 39: ...17 17 3 100 15 20 35 150 15 20 15 20 15 20 1 00 4 00 1 00 4 00 8 00 4 00 0 15 0 40 0 20 0 10 2 00 1 10 0 05 0 45 0 20 0 20 1 10 0 55 0 20 1 10 0 55 6 00 12 00 8 00 0 40 2 00 0 45 0 30 2 30 0 30 0 30 2...

Страница 40: ...40 4 19 19 I 19 14 24 75 19 19 18 18 15 20 10 18 3 1 55 5 14 I 13 1 12 10 4 8 23 160 CUP 4 CUP 1 3 2 12 12 9 12 12 12 9 10 10 3 12 24 24 12 4 4 5 9 VT 4212_IM indd 40 06 08 2013 12 38 40...

Страница 41: ...41 6 16 17 7 15 20 8 18 9 10 13 10 16 15 20 18 13 19 8888 10 21 22 12 11 19 4 6 12 12 14 I 24 40 400 350 1 5 1 5 12 15 20 1 35 45 17 10 4 1 4 8 6 VT 4212_IM indd 41 06 08 2013 12 38 40...

Страница 42: ...42 12 1 1 1 1 1 1 1 6 1 220 240 50 60 900 5 3 2004 108 2006 95 VT 4212_IM indd 42 06 08 2013 12 38 40...

Страница 43: ...43 1 2 3 4 5 6 7 8 9 10 11 12 13 14 15 16 17 18 19 20 21 22 23 24 25 26 30 30 40 VT 4212_IM indd 43 06 08 2013 12 38 40...

Страница 44: ...44 12 12 12 9 12 12 12 12 21 22 12 12 12 12 20 30 40 VT 4212_IM indd 44 06 08 2013 12 38 40...

Страница 45: ...9 8888 17 17 17 3 100 15 20 35 150 15 20 15 20 15 20 1 00 4 00 1 00 4 00 8 00 4 00 0 15 0 40 0 20 0 10 2 00 1 10 0 05 0 45 0 20 0 20 1 10 0 55 0 20 1 10 0 55 6 00 12 00 8 00 0 40 2 00 0 45 0 30 2 30 0...

Страница 46: ...46 4 i i 19 19 19 14 24 750 19 19 i i 18 18 15 20 10 18 3 1 55 5 14 13 1 12 10 4 8 23 160 CUP 4 CUP 1 3 2 12 12 9 12 12 12 9 10 10 3 12 VT 4212_IM indd 46 06 08 2013 12 38 40...

Страница 47: ...47 24 24 12 4 4 5 9 6 16 17 7 15 i 20 8 18 9 10 13 10 16 15 20 18 13 19 8888 10 21 22 12 11 19 4 6 12 12 14 24 40 400 350 1 5 1 5 12 15 20 1 35 45 17 10 4 1 4 VT 4212_IM indd 47 06 08 2013 12 38 40...

Страница 48: ...48 8 6 12 1 1 1 1 1 1 1 6 1 220 240 50 60 900 5 3 i 2004 108 i i i 2006 95 VT 4212_IM indd 48 06 08 2013 12 38 40...

Страница 49: ...ig qo shib b ril dig n lin dig n qisml rni ishl ting Jih zni t kis issiqq chid mli suvd n issiq chiq r dig n v sit l r v chiq l vd n n rir qq qo ying Jih zni r z tk g qo l uz tish s n bo l dig n qi li...

Страница 50: ...dd l r s lib pishirilg n vq t linishi bil n idishini 12 yuvish k r k Kuydirm ydig n q pl m si shik stl nm sligi uchun vq t pishishi bil n issiq idishig 12 s vuq suv t kkizm ng ldin s vushini kutib tu...

Страница 51: ...rt v Ko p il shp z d sturl rid ishl m ydi g r f yd l nuvchi h r r tni 75 C d r j d n p st qo ys Kutish h l tid n issiq s ql sh usulig o tk zish uchun shu tugm ni 19 b sing Issiq s ql sh usulid ishl sh...

Страница 52: ...lm sligi k r k Ishl tishd n ldin idish 12 sirti bil ln stini rtib quriting Qizitgich 9 o rt sig h r r t ko rs tgichi 10 qo yilg n Ko rs tgich 10 jilishig bir r n rs l qit b rm sligig q r b turing 3 g...

Страница 53: ...ishirigch q pq g ini 4 chm ng T Z L SH V EHTIYOT QILISH El ktr vilk sini r z tk d n chiq ring jih z s vushini kutib turing Jih z k rpusi 1 bil n q pq g ini 4 n m m t bil n rting so ng quruq m t bil n...

Страница 54: ...VT 4212_IM indd 54 06 08 2013 12 38 41...

Страница 55: ...um rul de serie pe tabelul cu datele tehnice Num rul de serie reprezint un num r din unsprezece cifre primele patru cifre indic nd data fabric rii De exemplu dac num rul de serie este 0606xxxxxxx nsea...

Страница 56: ...VT 4212_IM indd 56 06 08 2013 12 38 41...

Отзывы: