background image

6

 ENGLISH

– 

Never  steam  clothes  on  a  person  as  the 
steam temperature is very high, use a hang-
ers or a rack.

– 

After  you  finish  ironing,  switch  off  the  unit, 
wait until it cools down completely, then open 
the  water  inlet  lid  (2),  turn  over  the  iron  and 
drain the remaining water (pic. 8).

Steam chamber cleaning

To prolong lifetime of the iron we recommend to 
clean the steam chamber regularly, especially in 
the regions with hard water.

– 

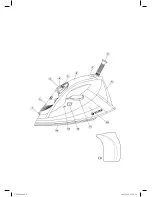
Set  the  continuous  steam  supply  knob  (3) 
to  the  position  « »  (continuous  steam  sup-
ply is off).

– 

Fill  the  water  tank  (10)  till  the  “MAX”  mark 
(13).

– 

Place the iron on its base (9). 

– 

Insert the power plug into the socket.

– 

Set the temperature control knob (11) to the 
“MAX” position, the indicator (7) will light up. 

– 

When the soleplate temperature (14) reaches 
the  desired  temperature  value,  the  indica-
tor (7) will go out. Wait till the soleplate is hot 
again,  then  you  can  proceed  with  cleaning 
the steam chamber.

– 

Unplug the unit.

– 

Hold  the  iron  above  the  sink  horizontally, 
press  and  hold  the  button  «SELF  CLEAN» 
(12) (pic. 7).

– 

Boiling  water  and  steam  with  scale  will  be 
released  from  the  iron  soleplate  (14)  open-
ings.

– 

Slightly  sway  the  iron  back  and  forth,  until 
water goes out of the water tank (10).

– 

Place the iron on the base (9) and let it cool 
down completely.

– 

Once  the  soleplate  (14)  cools  down  com-
pletely, wipe it with a dry cloth.

– 

Before  you  take  the  iron  away  for  storage, 
make sure that there is no water in the water 
tank  (10)  and  that  the  iron  soleplate  (14)  is 
completely dry.

Cleaning and care

– 

Before  cleaning  the  iron,  make  sure  that  it 
is  switched  off  and  has  cooled  down  com-
pletely.

– 

Clean  the  unit  body  with  a  damp  cloth  and 
then wipe dry.

– 

Scale  on  the  iron  soleplate  can  be  removed 
with a cloth soaked in vinegar-water solution.

– 

After  removing  scale,  polish  the  soleplate 
surface with a dry cloth.

– 

Do  not  use  abrasives  to  clean  the  soleplate 
and iron body.

– 

Avoid contact of the iron soleplate with sharp 
metal objects.

Storage

– 

Set the temperature control knob (11) to the 
“MIN”  position,  and  the  continuous  steam 
supply  knob  (3)  to  the  position  « »  (steam 
supply is off).

– 

Unplug the unit.

– 

Open the water inlet lid (2), turn over the iron 
and drain any remaining water from the water 
tank (10) (pic. 8). 

– 

Close the lid (2).

– 

Set  the  iron  vertically  and  let  it  cool  down 
completely.

– 

Wind the power cord.

– 

Store  the  iron  vertically  in  a  dry  cool  place, 
out of the reach of children.

Delivery set

Iron – 1 pc.
Beaker – 1pc. 
Instruction manual – 1 pc.

technical specifications

Power supply: 220-240 V ~ 50 Hz
Power consumption: 1850-2200 W

The  manufacturer  preserves  the  right  to 
change  the  specifications  of  the  unit  without  a 
preliminary notification.

Service life of the unit is 3 years

Guarantee


Details  regarding  guarantee  conditions  can  be 
obtained  from  the  dealer  from  whom  the  appli-
ance  was  purchased.  The  bill  of  sale  or  receipt 
must be produced when making any claim under 
the terms of this guarantee.

This product conforms to the EMC-Re-
quirements as laid down by the Council 
Directive  2004/108/EC  and  to  the  Low 
Voltage Regulation (2006/95/EC)

VT-1208.indd   6

18.07.2012   11:04:39

Содержание VT-1208VT/Y

Страница 1: ...1 VT 1208 VT Y Steam iron 3 7 12 17 22 27 31 36 41 VT 1208 indd 1 18 07 2012 11 04 38...

Страница 2: ...15 MAX VT 1208 indd 2 18 07 2012 11 04 38...

Страница 3: ...tank with scented liquids vinegar starch solution descaling reagents chemical agents etc Avoid contact of open skin areas with iron hot surfaces or outgoing steam in order to avoid getting burns Provi...

Страница 4: ...lid 2 Notes Do not fill the water tank 10 with scented liquids vinegar starch solution descaling reagents chemical agents etc Do not exceed the MAX mark 13 If you need to refill the water tank 10 with...

Страница 5: ...ace the iron on its base 9 Insert the power plug into the socket Make sure that there is enough water in the water tank 10 Turn the temperature control knob 11 to set the required ironing temperature...

Страница 6: ...hat the iron soleplate 14 is completely dry Cleaning and care Before cleaning the iron make sure that it is switched off and has cooled down com pletely Clean the unit body with a damp cloth and then...

Страница 7: ...eingeschaltete B geleisen nie unbeaufsichtigt ZiehenSiedenNetzsteckerausderSteckdose beim Auff llen des Wasserbeh lters mit Wasser immer heraus Der Deckel der Einf ll ffnung soll beim B geln geschlos...

Страница 8: ...t des B geleisens aus ert nt ein Tonsignal und wird die Kontrolleuchte 7 blinken Wenn das B geln fortgesetzt wird schaltet sich das B geleisen automatisch ein Wahl des Wassers Sie k nnen das B geleise...

Страница 9: ...hen und seidenen Stoffen zu ver meiden b geln Sie diese von der Innenseite aus Einstellen der B geltemperatur Stellen Sie das B geleisen auf die B geleisenfu platte 9 auf Stecken Sie den Netzstecker i...

Страница 10: ...en des Wassers aus den Dampf ffnungen zu vermeiden dr cken Sie die Dampfsto taste 4 mit dem Intervall von 4 5 Sekunden Vertikaldampf Vertikaldampf kann nur bei der hohen B geltemperatur verwendet werd...

Страница 11: ...kablagerungen Es ist nicht gestattet Abrasivmittel f r die Reinigung der Sohle und des Geh uses des B geleisens zu nutzen Vermeiden Sie den Kontakt der Sohle mit scharfen Metallgegenst nden Aufbewahru...

Страница 12: ...12 12 1 2 3 4 5 6 7 8 9 10 11 12 SELF CLEAN 13 MAX 14 15 MIN VT 1208 indd 12 18 07 2012 11 04 40...

Страница 13: ...13 14 1 30 7 2 8 7 1 1 1 2 11 MIN 3 2 1 15 10 2 2 10 MAX 13 VT 1208 indd 13 18 07 2012 11 04 40...

Страница 14: ...14 MAX 9 11 MAX 3 7 14 7 5 4 10 9 11 MAX 3 7 3 5 7 11 MIN 14 VT 1208 indd 14 18 07 2012 11 04 40...

Страница 15: ...15 9 10 11 MAX 7 14 7 3 14 11 MIN 3 3 10 11 MAX 4 6 4 4 5 11 MAX 10 30 4 4 5 14 2 8 3 10 MAX 13 9 11 MAX 7 14 7 SELF CLEAN 12 7 14 10 VT 1208 indd 15 18 07 2012 11 04 40...

Страница 16: ...16 9 14 10 14 11 MIN 3 2 10 8 2 1 1 1 220 240 50 1850 2200 3 38 7 1070 VT 1208 indd 16 18 07 2012 11 04 40...

Страница 17: ...17 1 2 3 4 5 6 7 8 9 10 11 12 SELF CLEAN 13 MAX 14 15 MIN VT 1208 indd 17 18 07 2012 11 04 40...

Страница 18: ...18 14 1 30 7 2 8 7 1 1 1 2 11 MIN 3 2 1 15 10 2 2 10 MAX 13 MAX VT 1208 indd 18 18 07 2012 11 04 40...

Страница 19: ...19 9 11 MAX 3 7 14 7 5 4 10 9 11 MAX 3 7 3 5 7 11 MIN 14 9 10 11 VT 1208 indd 19 18 07 2012 11 04 40...

Страница 20: ...20 MAX 7 14 7 3 14 11 MIN 3 3 10 11 4 6 4 4 5 11 10 30 4 4 5 14 2 8 3 10 MAX 13 9 11 MAX 7 14 7 SELF CLEAN 12 7 14 10 9 14 10 14 VT 1208 indd 20 18 07 2012 11 04 40...

Страница 21: ...21 11 MIN 3 2 10 8 2 1 1 1 220 240 50 1850 2200 3 i i i i i i i i i i i i i i i i 2004 108 EC i i i i i i 2006 95 EC VT 1208 indd 21 18 07 2012 11 04 40...

Страница 22: ...i fierul de c lcat conectat nesuprave gheat Deconecta i ntotdeauna fierul de c lcat de la re ea atunci c nd umple i rezervorul cu ap Capacul orificiului de umplere cu ap trebuie s fie nchis n timpul c...

Страница 23: ...ierul de c lcat se va conecta automat Alegerea apei Pentru umplerea rezervorului utiliza i ap obi nuit din sistemul de aprovizionare cu ap Dac ap este dur se recomand amestecarea ei cu ap distilat n p...

Страница 24: ...le te de aceea este posibil apari ia unui miros str in este un fenomen normal Pulverizatorul de ap Pute i s umezi i es tura ap s nd de c teva ori pe butonul de stropire cu ap 5 des 4 Asigura i v c n r...

Страница 25: ...r este foarte nalt utiliza i umera e sau un cuier Dup ce a i finisat c lcatul deconecta i fierul de c lcat a tepta i p n acesta se r ce te complet apoi deschide i capacul orificiului pentru ap 2 r stu...

Страница 26: ...i l sa i l s se r ceasc complet nf ura i cablul de alimentare a fierului de c lcat P stra i fierul de c lcat n pozi ie vertical ntr un loc uscat i r coros inaccesibil pen tru copii Set de livrare Fier...

Страница 27: ...b t uzav eno b hem ehlen Do n dr ky na vodu v dn m p pad nepou vejte aromatizovan tekutiny ocet krobov roztok odv p ovac prost edky chemick l tky atp Aby nedo lo k opa en vyhn te se kontaktu nechr n...

Страница 28: ...ete v ko plnic ho otvoru 2 obr 1 Odm rkou 15 nalijte vodu do vodn n dr ky 10 obr 2 a pak uzav ete v ko 2 Pozn mky Do n dr ky na vodu 10 v dn m p pad nepou vejte aromatizovan tekutiny ocet krobov rozto...

Страница 29: ...ra uje vyt k n kapek vody z otvoru na ehlic desce 14 P i zah t a ochlazov n ehlic desky je sly et typick cvak n doprov zej c otev r n a zav ran ventilu co sv d o jeho spr vn m fungov n Dejte ehli ku n...

Страница 30: ...se ehlic deska 14 pln vychl dne ut ete ji kouskem such l tky Ne uklid te ehli ku p esv d te se e n dr ka 10 je pr zdn a ehlic plocha 14 je such dr ba a i t n Ne za nete s i t n m ehli ky p esv d te s...

Страница 31: ...31 1 2 3 4 5 6 7 8 9 10 11 12 SELF CLEAN 13 MAX 14 15 MIN i 31 VT 1208 indd 31 18 07 2012 11 04 42...

Страница 32: ...32 14 1 30 7 2 8 7 1 1 1 2 11 MIN 3 2 1 15 10 2 2 10 MAX 13 10 VT 1208 indd 32 18 07 2012 11 04 42...

Страница 33: ...33 MAX 9 11 MAX 3 7 14 7 5 4 10 9 11 MAX 3 7 3 5 7 11 MIN 14 VT 1208 indd 33 18 07 2012 11 04 42...

Страница 34: ...34 9 10 11 MAX 7 14 7 3 14 11 MIN 3 3 10 11 MAX i 4 6 4 4 5 11 MAX 10 30 i 4 4 5 14 2 8 3 10 MAX 13 9 11 MAX 7 14 7 SELF CLEAN 12 7 14 VT 1208 indd 34 18 07 2012 11 04 42...

Страница 35: ...35 10 9 14 10 14 11 MIN 3 2 10 8 2 1 1 1 i i 220 240 50 1850 2200 3 2004 108 EC 2006 95 EC VT 1208 indd 35 18 07 2012 11 04 42...

Страница 36: ...36 i 1 2 3 4 5 6 7 8 9 10 11 12 SELF CLEAN 13 MAX 14 15 MIN i 36 VT 1208 indd 36 18 07 2012 11 04 42...

Страница 37: ...37 i 14 1 30 7 2 8 7 1 1 1 2 11 MIN 3 2 1 15 10 2 2 10 MAX 13 10 VT 1208 indd 37 18 07 2012 11 04 42...

Страница 38: ...38 i MAX 9 11 MAX 3 7 14 7 5 4 10 9 11 MAX 3 7 3 5 7 11 MIN 14 9 VT 1208 indd 38 18 07 2012 11 04 42...

Страница 39: ...39 i 10 11 MAX 7 14 7 3 14 11 MIN 3 3 10 11 MAX 4 6 4 4 5 11 MAX 10 30 4 4 5 14 2 8 3 10 MAX 13 9 11 max 7 14 7 SELF CLEAN 12 7 14 10 9 VT 1208 indd 39 18 07 2012 11 04 42...

Страница 40: ...40 i 14 10 14 11 MIN 3 2 10 8 2 1 1 1 220 240 50 1850 2200 3 i 2004 108 EC i i i 2006 95 EC VT 1208 indd 40 18 07 2012 11 04 42...

Страница 41: ...g ini lb tt yopib qo ying Suv idishig ushbo y suyuqlikl r sirk kr m l eritm si quyq t z l ydig n r g ntl r kimyoviy v sit l r v hk quyish t qiql n di T ringizning chiq j yl rig d zm l yoki und n chiq...

Страница 42: ...r tib qo ying H r r tni o zg rtirish murv tini 11 MIN t m ng o tk zib qo ying d imiy bug b rish murv tini 3 es d imiy bug b rish o chirilg n t m ng o tk zing Suv idishi q pq g ini 2 ching 1 r sm O lch...

Страница 43: ...zib qo ying 5 r sm D zm ll sh j yi b lgil ng n h r r tg ch qizig nid n k yin ishl yotg nini ko rs tish chir g i 7 o ch di shund d zm ll shni b shl sh mumkin D zm ll b bo lg nd n k yin h r r tni o zg r...

Страница 44: ...b lgil ng n h r r tg ch qizig nd n k yin ko rs tish chir g i 7 o ch di D zm l sti yan qizishini kutib turing shund n so ng bug l sh k m r sini t z l sh mumkin El ktr vilk sini r z tk d n chiq rib lin...

Страница 45: ...atl rini o zg rtirishg huquqi bo l di D zm lning ishl sh mudd ti 3 yil Kafolat shartlari Ushbu jihozga kafolat berish masalasida hududiy diler yoki ushbu jihoz xarid qiningan kompaniyaga murojaat qili...

Страница 46: ...n num rul de serie pe tabelul cu datele tehnice Num rul de serie reprezint un num r din unsprezece cifre primele patru cifre indic nd data fabric rii De exemplu dac num rul de serie este 0606xxxxxxx n...

Страница 47: ...VT 1208 indd 47 18 07 2012 11 04 43...

Отзывы: