5
ENGLISH
Version 2:
– place a suitable bowl under the spout for pour-
ing water (3) and press the manual pump (10).
Version 3:
– take a suitable cup for pouring water and press
on the valve (16) with a rim of the cup.
Attention! Be careful when pouring out water to
avoid burns by hot water.
•
Lock the hand pump by setting the lock (12) to
the position « ».
•
After you finish using the thermopot, disconnect
the power cord (18) plug from the mains, dis-
connect the power cord (18) connector from the
socket, open the thermopot lid (8) and wait until it
cools down completely. Remove the lid (8), drain
the water, dry the unit, install the lid (8) back to its
place and take the thermopot away for storage.
CLEANING AND CARE
•
Before cleaning, disconnect the thermopot
from the mains, pour out water and let the ther-
mopot cool down completely.
•
To remove the lid (8) slightly open it and pull the
lid (8) towards yourself taking it by both sides.
•
Carefully tilt the thermopot to drain the remain-
ing water.
•
Install the lid (8) back to its place; to do this
match the ledges on the rear part of the lid (8)
with the grooves in the lid installation place.
Slightly lift the lid and press on it from both sides
to fix. Before using the thermopot make sure
that the lid (8) is fixed properly.
•
Clean the outer surface of the thermopot body
(15) with a slightly damp cloth and then wipe it dry.
•
Use neutral detergents to remove dirt; do not
use metal brushes and abrasive detergents.
•
Do not immerse the thermopot and the power
cord into water and other liquids.
•
Do not wash the thermopot in a dishwashing
machine.
Stains on the inner surface
of the thermopot
The inner surface of the metal flask may change
its color under the influence of different water
impurities.
•
You can remove the stains with citric acid or
vinegar.
•
To remove the flavour of citric acid or vinegar,
boil water and pour it out.
•
Repeat this procedure until the smell and taste
vanish completely.
Descaling
•
Scale, appearing inside the metal flask, influ-
ences the water taste and disturbs the heat
exchange between water and the heating ele-
ment, that can lead to overheating and mal-
function.
•
To remove the scale fill the thermopot with a
mixture of one part ordinary vinegar and two
parts water up to the maximal level mark (13)
«FULL».
•
Insert the power cord (18) connector into the
socket on the thermopot body, and plug the
power cord (18) into the mains socket.
•
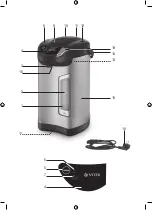
The boiling mode indicator «BOILING» (6) will
light up on the control panel (4).
•
After water starts boiling, the thermopot will be
switched to the keep warm mode, the indicator
(6) will go out and the indicator (7) will light up.
•
Unplug the thermopot and leave it filled with the
vinegar solution overnight.
•
In the morning pour out the vinegar solution,
fill the thermopot with water up to the maximal
level mark (13) «FULL», boil it and pour out the
water.
•
You can use special detergents for electric
kettles to remove scale, strictly following the
instructions on the detergent usage.
•
If necessary, perform the cleaning procedure
several times.
STORAGE
•
Before taking the thermopot away for long stor-
age, unplug it, let the unit cool down and pour
out the remaining water.
•
Clean the thermopot.
•
Keep the thermopot out of reach of children and
disabled persons.
DELIVERY SET
Thermopot – 1 pc.
Power cord – 1 pc.
Manual – 1 pc.
Warranty certificate – 1 pc.
TECHNICAL SPECIFICATIONS
Power supply: 220-240 V ~ 50 Hz
Rated input power: 730 W
Maximal water capacity: 4.2 L
RECYCLING
For environment protection do not throw out the unit
and the batteries (if included), do not discard the
unit and the batteries with usual household waste
after the service life expiration; apply to specialized
centers for further recycling.
Содержание VT-1195
Страница 1: ...1 VT 1195 Thermopot 3 7 12 16 20 24...
Страница 2: ...1 2 3 4 19 15 13 14 8 9 10 11 12 4 5 6 7 16 17 18...
Страница 7: ...7 VT 1195 1 MIN 2 3 4 5 6 7 8 9 10 11 12 13 FULL 14 15 16 17 18 19 30 MIN FULL 20 30...
Страница 8: ...8 www vitek ru 20 30 8 9...
Страница 10: ...10 8 8 8 15 2 1 FULL 13 18 18 4 6 6 7 FULL 15 1 1 1 1 220 240 50 730 4 2...
Страница 12: ...12 VT 1195 1 MIN 2 3 4 5 6 7 8 9 10 11 12 13 FULL 14 15 16 17 18 19 30 MIN FULL 20 30...
Страница 13: ...13 www vitek ru 20 30 9 8 13 FULL 18 18 4 6 6 7 12 10 18 18 8...
Страница 14: ...14 8 8 8 8 8 9 8 13 FULL 18 18 4 6 6 7 5 6 7 3 12 3 19 3 10 16 12 18 18 8 8 8 8 8 8 8 8 15...
Страница 15: ...15 2 1 FULL 13 18 18 4 6 6 7 FULL 15 1 1 1 1 220 240 50 730 4 2 info vitek ru 3 i i i i i i i i i i i i...
Страница 16: ...16 VT 1195 1 MIN 2 3 4 5 6 7 8 9 10 11 12 13 FULL 14 P 15 16 17 18 19 30 MIN FULL 20 30...
Страница 17: ...17 www vitek ru 20 30 8 9 13 FULL 18 18 4 6 6 7 12 10 18 18 8 8 8...
Страница 18: ...18 8 8 8 8 9 13 FULL 18 16 18 4 6 6 7 5 6 7 3 12 3 19 3 10 16 12 18 18 8 8 8 8 8 8 8 8 15 2 1 FULL 13...
Страница 19: ...19 18 18 4 6 6 7 FULL 15 1 1 1 1 220 240 50 730 4 2 info vitek ru 3...
Страница 20: ...20 VT 1195 1 MIN 2 3 4 5 6 7 8 9 10 11 12 13 FULL 14 15 16 17 18 19 30 MIN FULL 20 30...
Страница 21: ...21 www vitek ru 3 20 30 9 8 FULL 13 18 16 18 4 6 6 7 12 10 18 18 8 8 8 8 8...
Страница 22: ...22 8 9 8 FULL 13 18 18 4 6 6 7 5 6 7 3 12 3 19 3 10 16 12 18 18 8 8 8 8 8 8 8 15 2 1 FULL 13 18 18 4 6 6 7...
Страница 23: ...23 FULL 15 1 1 1 1 220 240 50 730 4 2 info vitek ru 3...


