Vitavia 21138 Скачать руководство пользователя страница 7

7

Press the end protectors (1017) and (1018) 

onto the profile ends (4.8). 

 5. door


Attention: 

do not stand the assembled 

door on the door gliders (1014) to avoid dama-

ging them.”

Push the door gliders (1014) onto both ends of 

door bar (1060) (5.1).
Assemble the door as shown in diagram 5.
connect door rollers (1015) to the door bar 

(1062) using bolt (1004), washer (1009) and 

nut (1007) (5.4). 
Bolt door bar (1062) to upper bar (1059) (5.3) 

and slide the door seals (3021) into the side 

bars (3058) (5.6). 

Connect the door fixer (1111) as shown. 

the door rollers can now be slid into door  

runner bar (1047) (5.7). Please ensure that the 

door gliders are also running on the bottom 

track (5.5).  
once the door is correctly in place, connect 

nuts and bolts into both ends of door runner 

bar (1047) as door stoppers.
Adjust the door so that it moves freely.

 6. rooF VENtS 


connect the side bars (1065) and the top bar 

(1064) depending on the glass thickness.  

up to 4 mm, see (6.1). For 4mm and over, see 

(6.2).
Place the bolts to connect the bottom bar 

(1066) in the prepared holes, and then slide 

the glass into the tracks in side bars (1065) 

(6.3).
Now connect bottom bar (1066), and 

ensure  

that the window is totally square


before tightening all bolts.
Position the window in the ridge bar from one 

end (6.4) and (6.5) and slide it to the required 

position (6.6).
connect the window sill (1063) with the extra 

bolts in the roof bars (6.7).
Bolt the window opener (1067) to the bottom 

bar (1066) using screws (1006) (6.8). 
Place the plastic cap (1019) over the end of 

the window opener (6.6) and connect both 

window fixers (1016) onto the window sill 

(1063) using screws (1006) (6.8).

 7. glAziNg – clEAr/FroStEd glASS 


Please note the already mentioned 

safety precautions.

Press the glazing seals (1020) onto the alumi-

nium profiles (7.3) and cut to length.

on the roof begin by positioning the glass at 

the ridge and fix in place using the glazing 

spring clips (1011) (7.2). 
the following pane should slide under the 

pane directly above it with the glass re taining 

clips (1012) between the panes (7.1). conti-

nue as shown in the glazing plan. 

If difficulties arise in placing the last glass 

sheet, please ensure that those above have 

not slipped down. 
on the sides please begin from the bottom. 


FiNiShiNg


if desired, it is possible to seal the greenhouse 

at the edges using silicon. Silicon is not in-

cluded.
Place the warning label inside the house.
A full range of greenhouse accessories, to help 

you make the most of this product, is available 

from your stockist. Please inform yourself as to 

the possibilities.

 SAFEty NoticE


in the event of high wind conditions, close the 

door and all vents.
in the event of heavy snowfall, clear the roof
of the building or take suitable measures to
support the roof. heat the building in winter.

 coMMENtS  
For the complete protection of your new 

greenhouse, we advise you to include it in 

your house insurance. Please take note of 

possible building rules relating to the position-

ing of greenhouses.
Please stick the included greenhouse model 

label onto the door bar (1062) after success-

fully assembling this product. this information 

is important in the event that replacement 

parts are later required. 
Please keep these Assembly instructions in  

a safe place, for future reference! 
our policy is one of continuous improvement 

and we reserve the right to change the specifi

-

cations without prior notice.

002.02.0806

Содержание 21138

Страница 1: ......

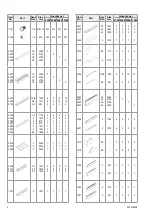
Страница 2: ...2 1 1 1 1 4 6 2 1 1 1 1 4 6 2 1 1 1 1 4 2034 2035 2046 2 2 3 2484 2476 2484 1 1 1 1 1 1 1 1 1 1 1 1 3036 2037 2038 2 3 2 3 2 3 1350 1535 1535 4 2 2 4 2 2 4 2 2 4 2 2 1047 3 1257 1 1 1 1 Item No Part S...

Страница 3: ...2 4 2 4 1091 1092 2 3 1 4 175 120 2 12 2 12 2 12 2 12 1004 1007 1009 5 5 5 M4 x 16 M4 M4 2 2 2 2 2 2 2 2 2 2 2 2 1014 1015 5 5 25 22 2 2 2 2 2 2 2 2 1003 1006 5 6 No 6x16 No 6x6 16 12 16 12 16 12 16 1...

Страница 4: ...m ssen in Schritt 4 die u eren Schrau ben wieder l sen um Giebelende bzw Giebel seite T r mit den Seitenteilen zu verschrauben 2 Giebelende ohne T r Auch diese Teile auf dem Boden auslegen und lose v...

Страница 5: ...Stellung bringen 6 4 6 5 6 6 Die Dachfensterschwelle entsprechend 6 7 mit den vorhandenen Leerschrauben fest schrauben Den Dachfensteraufsteller 1067 mit dem unteren Fensterprofil verschrauben Hierbe...

Страница 6: ...onnect them loosely Include two extra connecting bolts in the vertical bars 3041 and 3042 to connect the cross braces 2 2 2 6 In the vertical bar 3101 please include only one extra bolt 3 Door Gabel e...

Страница 7: ...screws 1006 6 8 7 Glazing Clear Frosted Glass Please note the already mentioned safety precautions Press the glazing seals 1020 onto the alumi nium profiles 7 3 and cut to length On the roof begin by...

Страница 8: ...Etaler toutes les pi ces sur le sol et les visser sans serrer Il faut pr voir de coulisser un boulon suppl mentaire dans chaque profil de vitrage vertical 3032 pour fixer plus tard les renforts lat ra...

Страница 9: ...rer le verre dans le cadre 6 3 en ayant pris soin de placer avant les boulons dans les trous Assembler alors le profil inf rieur 1066 de la fen tre sur les cadres lat raux Attention La fen tre doit t...

Страница 10: ...hvor der er en dobbelt streg udenom Disse er set udefra 1 Sider Placer delene p jorden og bolt dem l st sammen Husk at anbringe en bolt i de lodrette glas profiler 3032 for at kunne montere beslag 205...

Страница 11: ...nn vnte sik kerhedsforanstaltninger Tryk gummiliste 1020 p aluminiumsprofiler 7 3 og sk r til i rette l ngde L g glas i taget ved hj lp af glasholdere 1012 og glasclips 1011 som i 7 1 7 3 F lg glaspla...

Страница 12: ...r t profil 3032 f r montering av takst ttor 2056 1 5 samt extra bult i de yttersta lodr ta pro filerna 3032 f r montering av str van 3095 1 2 F st h rnplattan 1092 l tt 1 1 2 Gavel utan d rr L gg ut d...

Страница 13: ...sida kommer upp t F st f nsterhaken 1067 p den nedre f nster profilen 1066 6 6 och de tv h llarna 1016 p f nsterkarmen 1063 med skruvar 1006 6 7 S tt p skyddet 1019 p f nsterhaken 7 Glasning V nligen...

Страница 14: ...ne 3041 3042 3101 4 Montering Fest de 2 sidene til gavlene 4 1 4 2 monter hj rneplatene 1092 som vist 4 3 Monter takrygg 4 4 og beslag 1091 1092 4B Montering av de forskjellige tak delene Monter taksp...

Страница 15: ...bytte av drivhuset Kontakt deres forhandler for ytterligere opplysninger Sikkerthetsanvisning I tilfelle storm Lukk alle pne vinduer og d rer I tilfelle kraftig sn fall fjern sn fra taket Anmerking Vi...

Страница 16: ...0 16 merkur 0 002 02 0806 6700 8300 9900 11500 A 2544 mm 3166 mm 3788 mm 4410 mm B 2544 mm 2544 mm 2544 mm 2544 mm 30 x 20 mm B A X X 30 mm 30 mm...

Страница 17: ...1002 2 x 19 2 x 22 2022 2023 2 x 1 2 x 1 2027 2028 2 x 1 2 x 1 3032 2 x 3 2 x 4 3095 2 x 2 2 x 2 2056 2 x 3 2 x 4 1092 2 x 2 2 x 2 1 1 1 4 1 2 1 5 1 3 1 6 6700 2x 1 2 1 1 1 3 1 4 2027 1092 3095 3032 2...

Страница 18: ...1500 1001 2 x 25 2 x 28 1002 2 x 25 2 x 28 2024 2025 2 x 1 2 x 1 2029 2030 2 x 1 2 x 1 3032 2 x 5 2 x 6 3095 2 x 2 2 x 2 2056 2 x 5 2 x 6 1092 2 x 2 2 x 2 11500 2x 9900 2x 2056 2029 3032 1092 2024 205...

Страница 19: ...7 2 3 2 8 2 4 1001 32x 1002 32x 2034 1x 2035 1x 2037 1x 2038 1x 2054 1x 2100 1x 3036 2x 3041 1x 3042 1x 3095 2x 3101 1x 1043 2x 1091 1x 2 1 2 2 2 4 2 3 2037 2100 2038 1043 1043 3101 3095 3041 3095 30...

Страница 20: ...1x 2100 1x 3036 2x 3041 1x 3042 1x 3096 1x 3097 1x 3101 1x 10¹³ 2x 1043 2x 1091 1x 5001 1x 5002 1x 3 1 3 6 3 2 3 3 3 4 3 4 3 6 3 7 3 3 3 2 3 1 1043 3049 2046 3096 2096 1043 2037 2038 3036 3036 2048 21...

Страница 21: ...erkur 4A 21 002 02 0806 6700 8300 9900 11500 1001 28 28 28 28 1002 28 28 28 28 2050 2051 2052 2053 1 1 1 1 1092 8 8 8 8 4 1 4 2 4 3 4 4 4 1 4 4 1092 1092 1092 2050 2051 2052 2053 1091 1092 4 2 4 3 4 5...

Страница 22: ...0806 6700 8300 9900 11500 1001 46 52 62 72 1002 46 52 62 72 2033 4 4 4 4 2055 6 8 10 12 3057 3 4 5 6 1017 4x 10¹⁸ 8x 4 5 4 7 4 10 4 8 4 9 4 5 4 6 4 8 4 10 4 9 4 7 1018 3057 2055 2056 2033 2033 1017 4...

Страница 23: ...1002 4x 1059 1x 1060 1x 1061 2x 1062 1x 3021 2x 3058 2x 1003 16x 1004 2x 1007 2x 1009 2x 10¹⁴ 2x 10¹⁵ 2x 1111 1x 1003 1014 1014 1003 1003 1002 1001 1007 1009 1015 1004 5 8 3021 5 1 5 5 5 7 5 8 5 2 5 2...

Страница 24: ...700 8300 9900 11500 2x 2x 2x 2x 1001 8 8 8 8 1002 8 8 8 8 1063 2 2 2 2 1064 2 2 2 2 1065 4 4 4 4 1066 2 2 2 2 1067 2 2 2 2 1006 12 12 12 12 1016 4 4 4 4 1019 2 2 2 2 1063 1016 1006 1065 1001 1066 1065...

Страница 25: ...544 2 2 2 2 4 10180 610 x 511 8 10 12 14 5 10181 610 x 490 8 10 12 14 6 10183 610 x 434 x 8 4 4 4 4 7 10184 610 x 460 x 40 4 4 4 4 8 10190 610 x 457 45 51 57 63 9 10182 610 x 460 3 3 3 3 10 10192 610...

Страница 26: ......

Страница 27: ......

Страница 28: ...A D 58089 Hagen Postfach 3320 D 58033 Hagen Tel 49 2331 37555 0 Fax 49 2331 37555 55 www eph schmidt de verkauf eph schmidt de OPJ Volderslevvej 36 A Postboks 480 DK 5260 Odense S Danmark Tel 45 66 15...

Отзывы: