background image


track the host IP and listening port. 
Note: 1, tracking the host network and recording and broadcasting the same network segment; 2, tracking host 
also need to set the corresponding settings in the IP address and monitor the host port (recording and broadcast 
default port 9999). 
 

4.5.7.11 Menu

Setting

Broadcast Setting

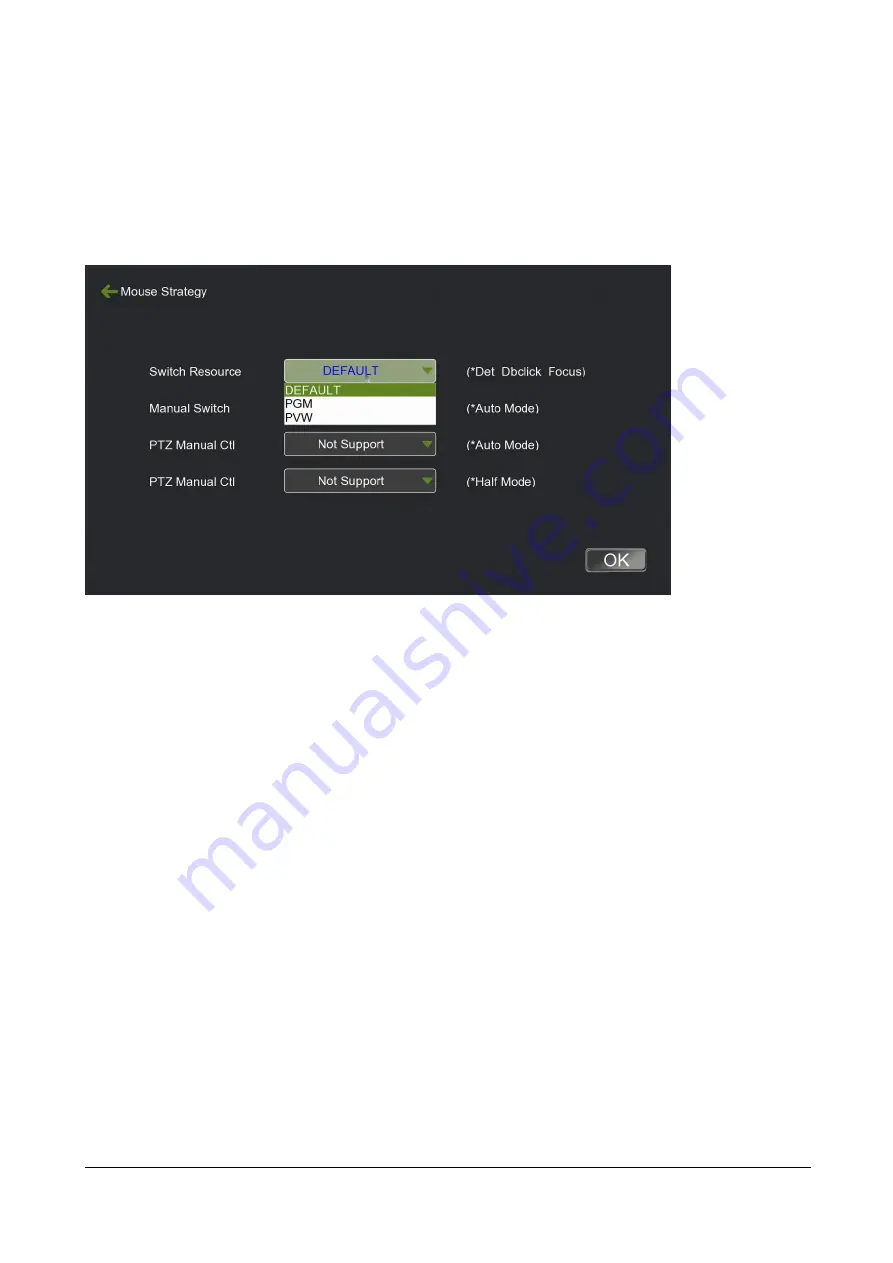
Mouse Strategy 


Figure 51 

Mouse Strategy


As  shown  in  Figure  51,  the  Instruct  Switch  Settings  menu  is  one  of  three  ways  to  set  up  resource  channel 
switching: 
1, the default DEFAULT, that is, the mouse click to activate PGM / PGM2 / PVW, then double-click one of resource 
channels and then the resource channel image switch to the active window. 
2, PGM: The resource channel switches to PGM. The mouse does not need to activate the PGM channel before 
and  double-click  the  resource  channel  directly  to  switch  the  image  to  the  PGM  channel.  This  method  quickly 
switches the resource image to PGM without PVW pre-monitoring. 
3, PVW: The resource channel is switched to PVW. Double click on the resource channel to switch the image to 
PVW, confirm it is correct, then double click PVW or click [Take] button in PVW channel to switch to PGM.


4.5.7.12 Menu

Setting

FTP Setting 

The recorder support video upload/download by FTP, LAN users only need to know the recorder IP 

and input ftp: / /

 recorder IP

 in the browser to log into the folder of recorder for downloading video, no 

need to download by U disk. 

Users can click the FTP Upload Menu to set the server address port, Name Password etc. setting to 

upload 

the 

recorded 

files 

to 

the 

server.


Содержание VIS-CRS02-A

Страница 1: ...VIS CRS02 A CRS03 A CRS05 A P Pr ro of fe es ss si io on na al l C Co on nf fe er re en nc ce e r re ec co or rd de er r U Us se er r M Ma an nu ua al l V Ve er rs si io on n 1 1 0 0 ...

Страница 2: ...About the Manual Type No Product Versions V1 0 Edited by Jackson Huang Updated Date 2019 4 ...

Страница 3: ...AMERA CONTROL 17 4 5 MEETING GROUP CONTROL MGT CONTROL 18 4 6 DIRECTOR FUNCTION 21 4 6 1 Interface 21 4 6 2 Split screen Processing 22 4 6 3 Subtitle and sound 23 4 6 4 logo OSD information time setting additional OSD 24 4 6 5 Insert titles Insert endings 25 4 6 6 Full Auto Semi Auto Manual direction 26 4 7 SYSTEM FUNCTION 26 4 7 1 Recording control 27 4 7 2 Interact button 28 4 7 3 Quick Start 28...

Страница 4: ... based on the embedded hardware architecture design with highly stable H 264 encoding 3 HDMI 2HDMI video input interfaces and 1 HDMI video out or direction interface out Supports simultaneous recording and live broadcast of the movie mode resource mode The picture supports picture in picture 1 2 3 4 6 split screen mode display and recording The user can connect the mouse and display for operating ...

Страница 5: ...long with video Video encoding H 264 High Profile Recording file format MP4 Video coding frame rate 1 30fps Video code rate 50kbps 40Mbps adjustable Audio code rate 8KB 420KB adjustable Storage Built in 1TB hard disk support extensions RS485 interface 4 ports RJ45 RS232 interface 2 ports RJ45 RJ45 network port 1 Network port support 802 3ab 1000Base T Gigabit Ethernet network interface Console por...

Страница 6: ...ace or PGM software can be set 6 HDMI OUT 1 HDMI signal output output screen is the guide interface or PGM software can be set 7 HDMI IN 1 3 HDMI signal input support 2 3 channels depend on model of 4K video signals simultaneously input 8 LINE IN OUT Audio input and output interface IN means input OUT means output 9 Monitor 3 5mm headphone monitor interface monitor PGM channel sound 10 COM Console...

Страница 7: ...e corresponding audio and video input and output connections 2 After confirming that the recording host is properly connected to the power supply then press the power switch of the navigation panel to start the recording host After the device is powered on it can wait for about 30 seconds to enter the navigation interface to manage the system Notice The HDMI OUT 2 interface outputs the system inte...

Страница 8: ...ystem configuration 1 Monitor Interface program in film mode preview or broadcasting PGM PGM2 PVW 2 Video Channel display the input video 3 Camera control to control the camera manually 4 Program panel functions for effects scripts logo OSD information Program mode 5 System configuration All settings for recording system and file management ...

Страница 9: ...Figure 3 Function Structure 4 1 Main Screen 4 1 1 Power on Press the power button on front panel to power on the system The display connecting to HDMI OUT 1 and monitor on controller will show the booting logo The logo can be change by entering system setting system ...

Страница 10: ... 1 2 System Interface After around 20 seconds you will see the main system interface Figure 9 Main Screen 4 2 Monitor Interface Including 1 PGM and PVW in Movie mode 2 PGM and PGM2 in Res mode 3 Audio Bar PGM and PVW on Movie mode ...

Страница 11: ...le director and Dual director is in the Full Auto mode only supports PGM channel image automatically switch When directing under Dual director mode and Manual mode it could manually switch the output device HDMI OUT 1 output HDMI OUT 1 output video can be changed from PGM channel picture or PGM2 channel picture you need to manually select the button Director output on the lower left window 3 In Si...

Страница 12: ...al 6 screen image is replaced PVW and PGM PGM2 are all support multi screen combination If working under Full Auto you double click the PVM screen only make you get the full screen image Procedure After selecting the PGM PGM2 or PVW channel select the type of screen division and then select the combined position of each channel in the video input channel 7 In the single director mode PVW window ha...

Страница 13: ...u connect the remote conference recorder like VIS CRS02 the remote video will display at the fourth input channel Each conference recorder can connect to several remote video channels The remote image and sound can be transmitted together and also can be switch to PVM PGM and PGM2 to push stream and recording etc Multi conference room communication two or more conference recorder need to be connec...

Страница 14: ...ile mp4 click apply and OK Back to the input channel interface click the to play the video and to stop playing The local replay image also can be switch to the PGM channel to live broadcast 4 3 2 Input Channel setting There are a channel setting item on each channel By the channel setting we can set the video parameter for current channel The setting is included sub menu Channel PTZ Picture and Co...

Страница 15: ...nt channel and can be changed the name according to the source for easily identification 4 Auto Switch Select the Auto Switch ID for the current channel and it work with the switch strategy 5 Disp Mode Provide the ratio and full screen If the video from the current input channel can t display full screen on PGM You can change the display mode setting 6 Source Corresponding to the hardware input nu...

Страница 16: ...5 and RS232 corresponding the RJ45 port 4 Baud Rate support 2400 4800 9600 and set it according to the specification of the camera 5 Address Code The address code should be the same as the camera setting 6 Speed Set the speed of camera turning 7 Preset You can select the 1 to 8 preset and extreme closeup closeup close range mid range perspective The preset of extreme closeup is 11 closeup is 12 cl...

Страница 17: ... controller to recorder must be corrective 2 The setting of camera protocol baud rate address code input channel under channel input need to be the same as camera 3 Only under the Manual mode the setting of PTZ on channel PTZ setting or main screen PTZ setting are valid 4 Selecting the Enable PTZ on setting of input channel is a must to operate the PTZ setting on main screen 4 3 2 3 Picture The se...

Страница 18: ... stream c ode rate 400Kbps 4 Picture quality level 0 to 5 0 level is the best 5 Frame rate 10 to 60 frame default set is 25 frame 6 GOP time settable default is 30s 4 4 Camera control PTZ control function is the same as channel settings The is to control the direction And are zoom in and zoom out function keys and the focus and buttons are Focusing on distant objects or close objects Aperture is a...

Страница 19: ...the remote audio video to add to the local input channel and display on the local screen Application example 1 conference room as the main conference room and other conference room connect to the main conference room and get the audio video from main conference room NOTE All the recorders should be under the same local area network ...

Страница 20: ...Click the MTG Control Get the interface as ...

Страница 21: ...left menu will display the IP of remote recorders You also add the recorder from outside of local network internet by Manual Add Dev button The remote internet recorder need to be mapped its IP to internet by setting the router and the mapping port no is 10060 Click the button to add the remote recorders to right menu and select the channel to display on the local recorder as bellowing picture ...

Страница 22: ...annels Figure 20 Remote channel display As above picture the remote channels are display on the channel no 8 and no 9 on the second page You also can control the audio on the remote channel as the figure 20 If the audio option Default is on and keep audio output of local recorder is on you get listen the remote audio by connecting speaker If the audio option PGM or RES is active on the remote chan...

Страница 23: ...ing as the figure 22 the PGM PVW and PGM2 can select the types of split screen to display Split screen modes provide 12 types as single screen two screen PIP two screen on corner three screens quad screen 6 screens and U1 U2 U3 customized mode Figure 23 Switch Effect 2 Switch effects As shown in Figure 23 the director of switching effects According to the type is divided into 1 erase wipe 2 cover ...

Страница 24: ...eview When there is no problem click PGM Insert to publish to the PGM Live screen When the subtitle is inserted into the screen the button will change to Cancel Click on the corresponding PGM Cancel and PVW Cancel to clear the subtitles from the PGM and PVW Subtitles Only one line can be displayed on the PGM PVW and the subtitles will be replaced with the previously released subtitles Figure 25 So...

Страница 25: ...e logo file in the upper right corner of the setting icon You can also customize the image of the angle marking here The standard picture format is png the best The resolution image size of the effect image is 200 100 Figure 27 OSD information 2 OSD Information OSD information is mainly conference information or other recording information For example the user can customize the course name class t...

Страница 26: ...nal OSD custom information loaded into the video channel 4 6 5 Insert titles Insert endings Figure 30 Prologue Epilogue setting Choose the path of the video file the format must be mp4 format video files can be local hard disk video can also be an external U disk mobile hard disk files Select the path to save the application back to the interface point insert titles the PGM live screen will play t...

Страница 27: ...acking host Note The auto tracking command code must correspond to the tracking of the tracking camera or the tracking master The automatic tracking command code for recording and playing is modified in the recording setup Live Debugging Auto Track Strategy Type Action Automatic direct broadcast is the recording and broadcasting host according to the switching strategy to automatically switch live...

Страница 28: ...he left to right is 1 Start recording 2 Pause recording 3 Stop recording 4 Recording time 5 Recording setting Movie Auto Rec Select the auto recording channel after switching on the recorder Files Split Select the recording time for each file Video Format Default MP4 Resource ...

Страница 29: ...nteract button Interact button is launch the MTC Control with another recorder terminal 4 7 3 Quick Start The Quick Start is a shortcut button and set the corresponding parameters at system setting Settings Project Setting Factory setting Quick Start Setting You can select bellowing action for the Quick Start button ...

Страница 30: ...le interface for the end user to operate the system and reduce the setting buttons 4 7 5 System Setting The system settings include 4 main menu such as Channel Setting File and User as bellowing figure 34 Figure 34 System Setting ...

Страница 31: ...I1 HDMI2 HDMI5 channel Remote Remote interact channel File Channel local video play channel 4 7 5 2 Settings All the setting of the system is available under this menu 4 7 5 3 File Manage the recorded file on the hard or copy to the USB ...

Страница 32: ...4 7 5 4 User Manage the user to login this system restart and reset the default system etc ...

Страница 33: ...e You can select the audio Codec parameter HDMI OUT is the option to select on or off the sound for the HDMI output If the audio source is microphone and HDMI out connected to a display with speaker it is better to select OFF to avoid howling ...

Страница 34: ... LOCAL PGM Codec Major code Sub code menu to adjust the corresponding stream size Under Movie mode on PGM channel or PGM2 channel to click the RTMP Push button View in the main interface under the State menu will show Live status push the flow of the successful display of red live Open browser and input the live broadcast address to watch live video ...

Страница 35: ...treaming port to open and watch the live screen TS multicast using UDP network protocol no user request open the player to watch just tick the corresponding code stream and port number click the TS button to open the real time streaming The setting of UDP is the same as the above Unicast and the multicast address is the default multicast address 239 0 0 2 Open the network stream in the player and ...

Страница 36: ... and will automatically query switching strategy menu in the strategy table getting the appropriate signal state to switch During the switching some of the effects of switching and screen combination effects will display After receiving the audience s close up command code the full view of audience will be switched to the PGM channel after 3 seconds and the close up of audience will be switched to...

Страница 37: ...o camera auto tracking controller VIS DCP2000 and the recorder will not response and execute any commands from camera auto tracking controller VIS DCP2000 the camera auto tracking controller VIS DCP2000 is still working and control the camera to tracking the position The user can switch the input channel video to PGM by manual A1 A5 HDMII 1 HDMI 5according to models the commands filled should be c...

Страница 38: ...e set channel Note The parameters must be set to copy to a specific date or time recording can t be properly turned on 4 5 7 10 Menu Setting Live Debugging Track Camera Network Setting Figure 50 Track Camera Network Setting As shown in Figure 50 the tracing host can connect to the recording host without hardware RS232 or RS485 The recording and broadcasting host supports the network to receive and...

Страница 39: ...esource channel switches to PGM The mouse does not need to activate the PGM channel before and double click the resource channel directly to switch the image to the PGM channel This method quickly switches the resource image to PGM without PVW pre monitoring 3 PVW The resource channel is switched to PVW Double click on the resource channel to switch the image to PVW confirm it is correct then doub...

Страница 40: ... to download the file from the recorder FTP Download Setting FTP default password is empty just fill in the new password and confirm password two columns 4 7 6 System Setting System setting is included 1 User management 2 COM Set 3 Disk 4 Network 5 Net Test 6 Graphics 7 Controller setting 8 System information ...

Страница 41: ...emporarily turned off 4 7 6 2 Menu Setting System Setting Serial Port Setting Figure 54 Serial Port Setting Description As shown in Figure 54 the serial settings menu can be configured to return code to consoler It is must to select the corrective COM port no which is connected to the consoler and the recorder will send out the return code to the consoler for lighting up the indicator The consoler...

Страница 42: ... the size If the system required the password the default password is 1 After the disk is full the recorder supports loop coverage or you can select to stop recording The disk formatting file system has NTFS and EXT4 two kinds of formats The default format is EXT4 which is the format under Linux system EXT4 format hard disk in the windows system is not read out If the hard disk with EXT4 format is...

Страница 43: ...g the software upgrade tool under the LAN You can also map the recorder in the LAN to the WAN in the router Mapping 554 port to the external network internet you can use VLC player to play the RTSP real time stream from pushing recorder mapping 10060 port to the external network achieve multi recorder interaction between the connection of recorders in the internet and user can get the remote image...

Страница 44: ...der to preview the image from the PGM you need to download the FBVLC software https sourceforge net projects fbvlc If you have change the IP address of the recorder you need to change the IP on LIVE SET menu ...

Страница 45: ...e local area network packet loss and delay data The input IP address must be in the same LAN segment as the IP address of the recorder It is commonly used for network debugging between the RTMP streaming server or the test computer and the recorder 4 7 6 7 Menu Setting Project setting Factory Setting Dual Video Card ...

Страница 46: ... card 1 output device from VGA to HDMI graphics card 2 output device from the HDMI to VGA the hardware interface of the VGA signal output is PGM live screen HDMI output signal for the local direction screen Graphics 2 output can hook on the audio option when using the HDMI cable to output live images can also transmit audio commonly used in the display which built in amplifier speaker 4 7 6 8 Menu...

Страница 47: ...ect the correct hardware connection interface Support start video pause video stop recording safe shutdown VGA lock and so on a key to open the command code and the central control equipment must be one to one correspondence 4 7 6 9 Menu Setting System Setting System time Figure 62 System time 5 Time setting set the time manually or you can connect the recorder to Ethernet for keeping the time upd...

Страница 48: ...is 1024 768 72 dpi bit depth of 24 the file size is not more than 128KB The interface logo picture format is the gif resolution size is200 100 72dpi bit depth 24 Users can import the logo file into the USB disk and then connect to the recorder In this menu the user can import the logo and click apply and then exit the menu and restart the system to activate the setting ...

Страница 49: ...al hard drive or external storage device with file search delete copy paste and rename commands The Recorder is built in player and the user can double click the xxx mp4 file in the file management menu for playback preview It is Commonly used to view the video effects recorded by the unit and video start and ending imported from the external storage device as following ...

Страница 50: ...Figure 68 Recording Preview Player ...

Страница 51: ... and sound and send the standard codes to the network 2 The player which support the codes can receive the codes The recorder will upload the recording files automatically to server the mobile devices PC can get these media resource by network 3 The user can manage the recorder by PC terminal ...

Страница 52: ......

Отзывы: