background image

USER SETTINGS


DE5467U 

29 

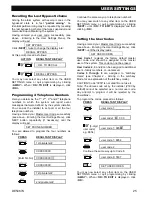
Enabling the Squawk Option 

You can determine that the system will activate (or 
not activate) high/mid/low siren sound, for a short 
time, upon arming (1 beep) and disarming (2 beeps), 
by keyfob only. 
Having entered your Master User Code successfully 
(see above - Entering the User Settings Menu), click 
the NEXT button (repeatedly, if necessary) until the 
display will read: 

SQUAWK OPTION 

From here, proceed as follows: 

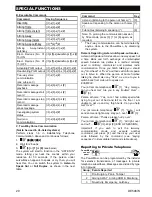
PRESS RESULTANT 

DISPLAY 

squawk disable           


(if this is the current option) 
 
squawk low volume 

If not 
satisfied - 


squawk mid volume 

If not 
satisfied - 


squawk hi volume 

If not 
satisfied  


squawk hi volume       


If satisfied 


For wired siren, refer to "low", "mid" and "hi" options 
as "squawk enable". 
You


may


now


select


any


other


item


on


the


USERS


SETTINGS


menu


or


quit


the


programming


process


by


clicking <NEXT>. When "<OK> TO EXIT" is displayed, 
click OK. 

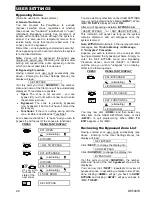
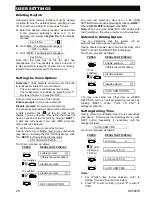
Setting Time and Time Format 

Having entered your Master User Code successfully 
(see Entering the User Settings Menu, above), click 
<

NEXT

> until the display reads: 

SET TIME&FORMAT 

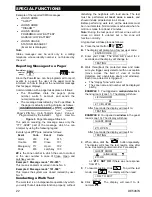
A. If 12h format is desired, continue as follows: 

PRESS RESULTANT 

DISPLAY 

US FORMAT  -  12H  


(if this is the current option) 

TIME    _ _ : _ _ A 


TIME    12:55A 


(time 

digits] (e.g. 
12:55A) 


TIME      HH:MM  A 


Note:

 To enter “

A

” - press [ ] or to enter “

P

” - press [

#

].  

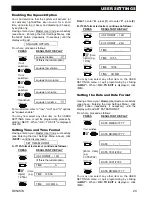
B. If 24h format is desired, continue as follows: 

PRESS RESULTANT 

DISPLAY 

US FORMAT  -  12H  


EU FORMAT  -  24H 


TIME            _ _ : _ _ 


TIME    19:55  

 [time 

digits] (e.g. 
19:55)  


TIME     19:55  


TIME     HH:MM  


You may now select any other item on the USER 
SETTINGS menu or quit programming by clicking 
<

AWAY

>. When <

OK

>

 TO EXIT

 is displayed - click 

<

OK

>. 


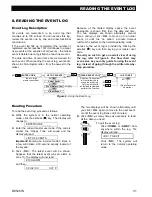
Setting the Date and Date Format 

Having entered your Master User Code successfully 
(see above - Entering the User Settings Menu),  click 
NEXT button (repeatedly, if necessary) until the 
display will read SET DATE&FORMAT.  
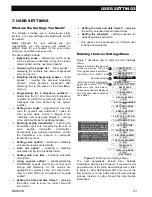
From here, proceed as follows: 

PRESS RESULTANT 

DISPLAY 

DATE MM/DD/YYYY  


DATE DD/MM/YYYY 

If not satisfied 


DATE  _ _ / _ _ /_ _ _ _  


DATE 01/01/2002  

[Enter date] 
(e.g. 
01/01/2002) 


DATE 01/01/2002  


DATE DD/MM/YYYY  


You may now select any other item on the USER 
SETTINGS menu or quit programming by clicking 
<

AWAY

>. When <

OK

>

 TO EXIT

 is displayed - click 

<

OK

>. 

Содержание POWERMAX -

Страница 1: ...Fully Supervised Wireless Alarm Control System For a secure way of life User Guide ...

Страница 2: ... AND TROUBLE DATA 16 Reviewing Alarm Tamper Memory 16 Reviewing Trouble Information 16 Reviewing Memory Troubles at the Same Time 17 Correcting Trouble Situations 18 6 SPECIAL FUNCTIONS 19 Looking after People Left at Home 19 Emergency Calls for Help 19 Remote Control by Telephone 19 Reporting to Private Telephone 20 Remote Control by SMS 21 Reporting by SMS 21 Reporting Messages to a Pager 22 Con...

Страница 3: ...____________ Phone No 3 _______________________________ Phone No 4 _______________________________ Quick Guide To Primary Alarm Control Operations Arming AWAY Code Arming AWAY INSTANT Code Arming HOME Code Arming HOME INSTANT Code Arming AWAY LATCHKEY Code Force Arming AWAY system not ready Code to silence the protest buzz Force Arming HOME system not ready Code to silence the protest buzz Disarmi...

Страница 4: ...y choose to bypass a zone leave the door or window open and arm the system a voice message will announce that Forced Arming is under way Bypassed zones will not be protected during one arming period Gaining access to 24 hour zones If you wish to access a sensor defined as a 24 hour zone without causing an alarm Click NEXT the display will read NORMAL MODE Click NEXT again the display will read USE...

Страница 5: ...will allow you and other users to control major functions without approaching the control panel CONTROL KEYS KEYPAD COVER CLOSED BATTERY COMPARTMENT COVER CLOSED DISPLAY LUMINOUS INDICATORS MICROPHONE BUILT IN SIREN Figure 1 Control Panel with Covers Closed 15 ELECTRICAL APPLIANCES CONTROLLED VIA EXISTING ELECTRICAL CABLING ON OFF BY VARIOUS FACTORS AS PROGRAMMED BY THE INSTALLER UP TO 8 KEYFOB TR...

Страница 6: ...m the keypad major functions can be carried out by pressing buttons on hand held miniature transmitters Access from remote telephones You may access the PowerMax from a remote telephone and Arm Disarm it or receive system status information Numerical keys serve as function keys In the disarmed state numerical keys are used to control various system functions A simple icon on each key identifies th...

Страница 7: ...tton immediately after arming during exit delay causes the system to be armed without an entry delay This means that entering the protected premises via any zone will trigger an immediate alarm You and other holders of keyfob transmitters will have no problem because you can disarm the system before entering by pressing the DISARM button on your transmitter before entry C Getting status informatio...

Страница 8: ...ion is enabled enable prompts see user setting flow chart fig 8 Screen Saver Option The Screen Saver option if enabled by the installer causes that when no key is pressed during more than 30 seconds the display is PowerMax and the LEDs do not light to prevent an intruder to know the system status The normal display returns after pressing the OFF button followed by entering user code Refresh by Cod...

Страница 9: ...AY NOT READY HH MM BACK DOOR alternating Z2 OPEN KITCHEN alternating Z13 OPEN after 10 seconds None see note below NOT READY HH MM Note To quit immediately at any stage press It is highly recommended to fix the open zone s thus restoring the system to the state of ready to arm If you do not know how to do this consult your installer IMPORTANT All arming procedures below are based on the assumption...

Страница 10: ...ME INSTANT proceed as follows PRESS RESULTANT DISPLAY ARMING HOME ARMING INSTANT alternating ARMING HOME Exit delay ARM HOME HH HH alternating Go to an internal zone ARM HOME INSTANT ARM indicator flashes during the armed state Forced Arming Not to be used in UL listed systems Forced arming allows you to arm the system even though one zone or several zones are disturbed and the NOT READY message i...

Страница 11: ...n the system is in the disarmed state FIRE EMERGENCY READY HH MM To stop the alarm press and then key in your valid user code Initiating Emergency Alarm You can generate an emergency alarm manually depends on the purchased system version see PowerMax door label in the disarmed and armed states as follows PRESS RESULTANT DISPLAY EMERGENCY Then if or when the system is in the disarmed state EMERGENC...

Страница 12: ... the system was in the armed state is back to normal the disarming operation will progress as shown PRESS RESULTANT DISPLAY CODE _ _ _ CODE READY HH MM alternating READY TRBL alternating READY MEMORY ARM extinguishes and sounds once per minute To find out which zone alarmed and what kind of trouble is being sensed see Chapter 5 The TRBL display will disappear the TROUBLE indicator will extinguish ...

Страница 13: ...ws how to decrease the loudness with the 4 key assuming that the volume was at maximum to begin with PRESS RESULTANT DISPLAY max VOLUME VOLUME VOLUME VOLUME Voice ON OFF You can switch spoken announcements on and off by alternate clicking of the 7 key as shown below PRESS RESULTANT DISPLAY VOICE ON VOICE OFF READY HH MM Note The system will maintain the Voice OFF state until subsequent selection o...

Страница 14: ...t be erased Message Playback To listen to a message left by another user of the system Click and listen PLAY will be displayed and the message will be played back over the built in loudspeaker When the playback ends the display will revert to the normal status displaying mode If more than 1 minute elapsed after recording the MSG indication will disappear Chime ON OFF You can disable enable the chi...

Страница 15: ... Appliances are controlled by sensors as well as by a timer Examples of benefits gained by automatic remote control Timer Control When you are away the timed activation de activation of lights radio and TV simulates the presence of people at home to deter potential burglars Zone Control Upon disturbance of a perimeter zone lights are switched on and a tape recorder starts running playing back a se...

Страница 16: ... far right The dark box will appear if you click OK while the option is displayed The represents the Happy Tune successful saving of a new option PRESS RESULTANT DISPLAY BY TIMER ON If this is the default BY TIMER OFF If not satisfied press BY TIMER OFF If satisfied press BY TIMER OFF BY SENSOR ON If this is the default BY SENSOR OFF If not satisfied Press BY SENSOR OFF If satisfied BY SENSOR OFF ...

Страница 17: ... details of other events retained in memory if any or reverts to its initial state see A above EXAMPLE 2 An alarm was triggered because the garage door zone No 12 opened and was left open PRESS RESULTANT DISPLAY NOT READY HH MM Z12 ALARMED alternating GARAGE DOOR Z12 OPEN alternating GARAGE DOOR Remember The memory indication and content are cleared upon the next arming of the system Reviewing Tro...

Страница 18: ...BL You can review the current troubles one by one by clicking the SHOW OK button EXAMPLE The kitchen sensor zone No 9 has been inactive and the living room sensor zone No 15 has reported a low battery However these troubles do not prevent the system from being ready to arm To investigate the source of trouble proceed as follows PRESS RESULTANT DISPLAY READY HH MM Z09 INACTIVE alternating KITCHEN Z...

Страница 19: ...nder renews its periodical transmissions the inactivity trouble no longer exists and will no longer be indicated by the control panel LOW BATTERY Upon replacing the battery in a wireless device in a keyfob or in a wireless commander that reported a low battery the next transmission made by the relevant sensor will include a battery restored message and low battery will no longer be indicated by th...

Страница 20: ...sed in UL listed systems Suppose the disabled person discussed above has an accident such as falling in the bathtub without being able to get up It might take hours before the No Active alert is sent out but he or she must be assisted much sooner Even though the odds for such an accident are not high it is advisable to provide the disabled person with a miniature single button pendant type or wris...

Страница 21: ...ion can be terminated by anyone close to the PowerMax by disarming the system Remark Regarding Listen in Speak out modes Listen in Speak out modes allow one way speech at a time Back and forth exchange of uninterrupted speech between two parties is a method normally used in military commercial and amateur radio communication Once you finish talking you should say Go Ahead or Over and then switch f...

Страница 22: ...hout any necessity to switch the system from listen in to speak out and vice versa for 50 sec extendable 6 Acknowledge and request a status report The PowerMax will issue a verbal report of system status For example Disarm ready to arm or Disarm back door open or Disarm alarm in memory 9 Remote Control by SMS PowerMax system with GSM unit can respond to SMS commands from any cellular telephone onl...

Страница 23: ...Test The walk test is an indispensable operation by which you verify that all detectors function properly without disturbing the neighbors with loud sirens The test must be performed at least once a week and should include all detectors in all zones Before performing walk test all the detectors must be in normal state Normal state is achieved when no motion is made for at least 2 minutes Note Duri...

Страница 24: ...ing disabling LOW MID HI squawk short siren sound upon arming and disarming All the options are applicable for wireless siren For wired siren refer to LOW MID and HI options as squawk enable Setting the time and time format adjusting the built in clock to show the correct time and time format Setting the date and date format adjusting the built in calendar date and date format Setting the schedule...

Страница 25: ...ng KITCHEN OK TO BYPASS Z01 BYPASSED alternating KITCHEN Z02 FUNCTIONAL alternating FRONT DOOR If you wish to check the state of the next zone SET BYPASS You can select any other item on the USER SETTINGS menu or quit programming by clicking AWAY When OK TO EXIT is displayed click OK After end of bypassing operation BYPASS blinks READY BYPASS or NOT READY BYPASS This indication will persist as lon...

Страница 26: ...LAY 1st private tel XXXXXXXXX Enter Tel No XXXXXXXXX XXXXXXXXX 1st private tel 2nd private tel Continue the same way up to telephone number 4 You may now switch to any other item on the USER SETTINGS menu or quit programming by clicking NEXT until OK TO EXIT is displayed and then clicking OK Setting the User Codes Having entered your Master User Code successfully see above Entering the User Settin...

Страница 27: ...ess any key NEXT NEXT NEXT Moving forward Moving backward Moving one level up in the menu Return to OK TO EXIT NEXT To move within most of the menus the following keys can be used SHOW OK Show confirm data DATE 30 12 2000 DATE 12 30 2000 OK OK TIME 07 55 P TIME 19 55 OK OK e g 30 12 2000 e g 12 30 2000 Tel No 1st private tel OK OK NEXT Tel No 2nd private tel OK OK NEXT Tel No 3rd private tel OK OK...

Страница 28: ...nits you intend to enroll and make sure they all have batteries installed Keyfob transmitter enrolling involves the following steps A Having entered your Master User Code successfully see above Entering the User Settings Menu Click the NEXT button repeatedly if necessary until the display will read ENROLL KEYFOB B Click OK The display will read KEYFOB No _ C Suppose that the Keyfob you are about t...

Страница 29: ...tered your Master User Code successfully see above Entering the User Settings Menu click the NEXT button until the display reads SET VOICE OPTIONS From here proceed as follows PRESS RESULTANT DISPLAY enable prompts if this is the current option disable prompts If not satisfied disable prompts If satisfied SET VOICE OPTION You may now select any other item on the USER SETTINGS menu or quit programm...

Страница 30: ...er Settings Menu above click NEXT until the display reads SET TIME FORMAT A If 12h format is desired continue as follows PRESS RESULTANT DISPLAY US FORMAT 12H if this is the current option TIME _ _ _ _ A TIME 12 55A time digits e g 12 55A TIME HH MM A Note To enter A press or to enter P press B If 24h format is desired continue as follows PRESS RESULTANT DISPLAY US FORMAT 12H EU FORMAT 24H TIME _ ...

Страница 31: ...PWRLNK FAILURE disable report report report 2 PWRLNK FAILURE Reporting enabling success is indicated by short beeps and failure is indicated by long beep You may now select any other item on the USER SETTINGS menu or quit programming by clicking AWAY When OK TO EXIT is displayed click OK D PowerLink failure reporting Disabling Having entered your Master User Code successfully see above Entering th...

Страница 32: ...ad of going through the written step by step procedure Attention The system will not allow you to erase the event log Only the installer is authorized to view and perform this function OK Oldest Event Event Before Last Latest Event LIST OF EVENTS OK OK ENTER CODE _ _ _ _ Enter 4 digit master user code OK TO EXIT CLEAR EVENT LOG NEXT NEXT NEXT Return to normal operation OK Figure 9 Using the Event ...

Страница 33: ...g of the transmitter s red indicator while the button is pressed instead of lighting steadily When a low battery indication appears for the first time it may be considered as a pre warning It normally gives you ample time about 30 days to obtain a new battery and replace the old one and the detector or keyfob unit will be fully operational throughout this period However to be on the safe side it i...

Страница 34: ...ion Telephone line trouble Telephone lines may be disconnected or short circuited With the telephone line down your alarm system will not be able to report events to the central station Sirens do not always wake up sound sleepers Sirens and bells installed outside or far from bedrooms are not likely to awaken people who are sound asleep behind closed doors inside the protected area or in adjacent ...

Страница 35: ...sable the chime function Control Panel The control panel is a cabinet that incorporates the electronic circuitry and microprocessor that control the alarm system It collects information from various sensors processes it and responds in various ways It also includes the user interface control keys numerical keypad display sounder and loudspeaker Disarming The opposite of arming an action that resto...

Страница 36: ... system Remote Responder A responder can be either a professional service provider to which the home or business owner subscribes a central monitoring station or a family relation friend who agrees to look after the protected site during absence of its occupants The control panel reports events by telephone to both kinds of responders Restore When a detector reverts from the state of alarm to the ...

Страница 37: ...se the stairs never the elevator Tell guests or visitors to your home about your family s fire escape plan When visiting other people s home ask about their escape plan If they don t have a plan in place offer to help them make one This is especially important when children are permitted to attend sleepovers at friends homes FCC STATEMENT The 315 MHz model of this device complies with Part 15 of t...

Страница 38: ...F W C For a secure way of life Visonic LTD 2006 PowerMax English User Guide DE5467U ...

Отзывы: